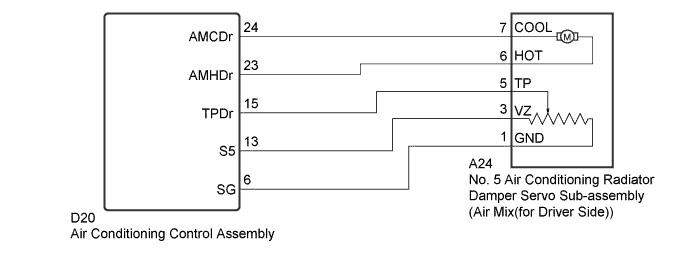
DTC B1440/41 Open in Driver Side Air Mix Damper Position Sensor Circuit |
DTC B1442/-41 Short in Driver Side Air Mix Damper Position Sensor Circuit |
DTC B1446/E41 Driver Side Air Mix Damper Control Servomotor Circuit |
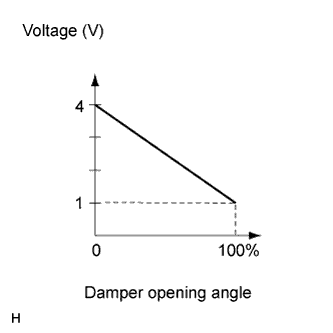
| DTC No. | DTC Detection Condition | Trouble Area |
| B1440/41 | Open in driver side air mix damper position sensor circuit |
|
| B1442/-41 | Short in driver side air mix damper position sensor circuit |
|
| B1446/E41 | Driver side air mix damper position sensor circuit |
|
| 1.READ VALUE USING GTS |
Connect the GTS to the DLC3.
Turn the ignition switch to ON.
Turn the GTS on.
Operate the driver side temperature adjustment switch.
Enter the following menus: Body Electrical / Air Conditioner / Data List.
Check the value(s) by referring to the table below.
| Tester Display | Measurement Item/Range | Normal Condition | Diagnostic Note |
| Air Mix Damper Position (D) (A/M Damp Pos-D)) | Driver side air mix damper position / Min.: -32.68%, Max.: 133.33% | MAX COLD: 0% MAX HOT: 110% | - |
| Air Mix Damper Target (D) (A/M Damp Targ-D) | Driver side air mix damper target position / Min.: -32.68%, Max.: 133.33% | MAX COLD: 0% MAX HOT: 110% | - |
|
| ||||
| OK | |
 |
| 2.CHECK FOR DTC |
Clear the DTCs (Click here).
Check the DTCs (Click here).
|
| ||||
| OK | ||
 | ||
| ||
| 3.CHECK HARNESS AND CONNECTOR (NO. 5 AIR CONDITIONING RADIATOR DAMPER SERVO SUB-ASSEMBLY - AIR CONDITIONING CONTROL ASSEMBLY) |
Disconnect the D20 air conditioning control assembly.
Disconnect the A24 No. 5 air conditioning radiator damper servo sub-assembly (air mix (for driver side)).
Measure the resistance according to the value(s) in the table below.
| Tester Connection | Condition | Specified Condition |
| A24-1(GND) - D20-6(SG) | Always | Below 1 Ω |
| A24-3(VZ) - D20-13 | Always | Below 1 Ω |
| A24-5(TP) - D20-15(TPDr) | Always | Below 1 Ω |
| A24-6(HOT) - D20-23(AMCDr) | Always | Below 1 Ω |
| A24-7(COOL) - D20-24(AMHDr) | Always | Below 1 Ω |
| A24-1(GND) - Body ground | Always | 10 kΩ or higher |
| A24-3(VZ) - Body ground | Always | 10 kΩ or higher |
| A24-5(TP) - Body ground | Always | 10 kΩ or higher |
| A24-6(HOT) - Body ground | Always | 10 kΩ or higher |
| A24-7(COOL) - Body ground | Always | 10 kΩ or higher |
|
| ||||
| OK | |
|
| 4.INSPECT NO. 5 AIR CONDITIONING RADIATOR DAMPER SERVO SUB-ASSEMBLY |
Remove the No. 5 air conditioning radiator damper servo sub-assembly (air mix (for driver side)) .
Potentiometer circuit inspection
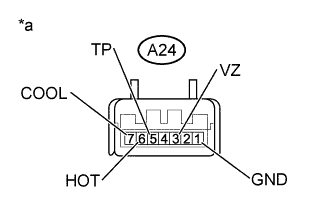 |
Measure the resistance according to the value(s) in the table below.
| Tester Connection | Condition | Specified Condition |
| A24-1(GND) - A24-3(VZ) | Always | 4.2 to 7.8 kΩ |
| *a | Component without harness connected (No. 5 air conditioning radiator damper servo sub-assembly) |
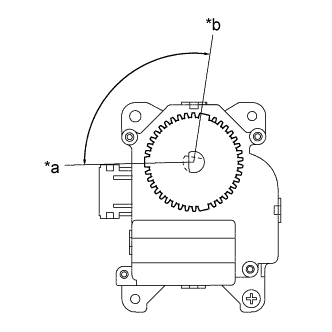 |
Measure the resistance according to the value(s) in the table below.
| Tester Connection | Condition | Specified Condition |
| A24-1(GND) - A24-5(TP) | MAX. COOL position | 3.4 to 6.2 kΩ |
| A24-1(GND) - A24-5(TP) | MAX. HOT position | 0.8 to 1.6 kΩ |
| *a | MAX. COOL |
| *b | MAX. HOT |
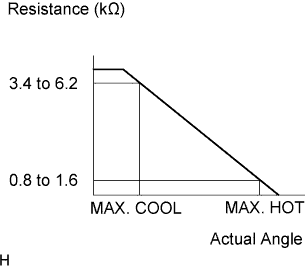 |
As the arm of the air mix control servo motor moves from the COOL side to the HOT side, the resistance decreases gradually without interruption.
Motor circuit inspection
When the terminal 7(COOL) of the connector A24 is connected to the battery positive terminal, and terminal 6 (HOT) of the connector A24 is connected to the battery negative terminal, confirm that the arm smoothly rotates from HOT to COOL.
When the terminal 7 (HOT) of the connector A28 is connected to the battery positive terminal, and terminal 6 (COOL) of the connector A28 is connected to the battery negative terminal, confirm that the arm smoothly rotates from COOL to HOT.
|
| ||||
| OK | ||
| ||
| ||

