 |
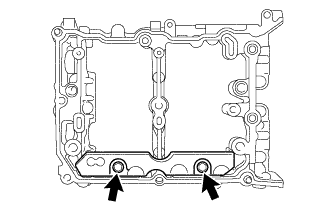
Install the oil spacer LH with the 2 bolts.
- Torque:
- 6.4 N*m{ 65 kgf*cm , 57 in.*lbf }
ENGINE UNIT > REASSEMBLY |
| 1. INSTALL OIL SPACER LH |
|
Install the oil spacer LH with the 2 bolts.
| 2. INSTALL OIL CONTROL VALVE FILTER (for Bank 2) |
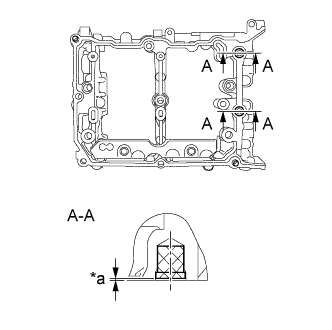 |
Install 2 new oil control valve filters to the camshaft housing sub-assembly LH as shown in the illustration.
| *a | 0 to 0.5 mm (0 to 0.0197 in.) from the face of the camshaft housing sub-assembly LH |
| 3. INSTALL CAMSHAFT (for Bank 2) |
Apply engine oil to the journals of the camshaft housing sub-assembly LH.
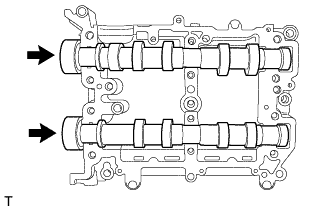 |
Set the intake camshaft LH and the exhaust camshaft LH to the camshaft housing sub-assembly LH.
| 4. INSTALL CAMSHAFT CAP (for Bank 2) |
Using a sealer gun, apply seal packing to the contact surface of the front camshaft cap LH, intake rear camshaft cap LH and exhaust rear camshaft cap LH as shown in the illustration.
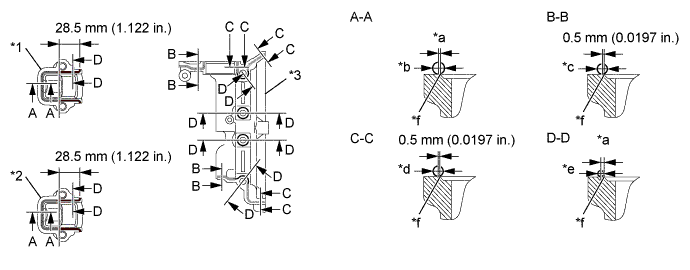
| *1 | Intake Rear Camshaft Cap LH | *2 | Exhaust Rear Camshaft Cap LH |
| *3 | Front Camshaft Cap LH | - | - |
| *a | Within 1.0 mm (0.0394 in.) | *b | φ3.0 to 4.0 mm (0.1181 to 0.1575 in.) |
| *c | φ2.5 to 3.5 mm (0.0984 to 0.1378 in.) | *d | φ2.5 to 4.0 mm (0.0984 to 0.1575 in.) |
| *e | φ1.5 to 2.5 mm (0.0591 to 0.0984 in.) | *f | Chamfer edge |
Apply engine oil to the journals of the camshaft caps, and place them on the camshaft housing sub-assembly LH.
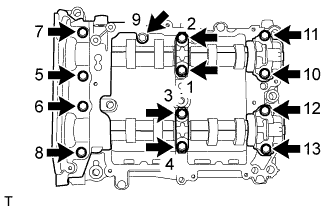 |
Tighten the 13 bolts in the order shown in the illustration to install the front camshaft cap LH, intake center camshaft cap LH, intake rear camshaft cap LH, exhaust center camshaft cap LH and exhaust rear camshaft cap LH.
| 5. INSTALL HOLE PLUG (for Manual Transmission) |
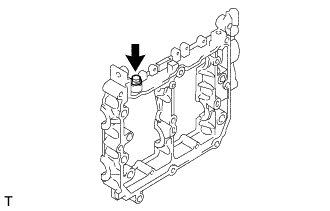 |
Install a new gasket and the hole plug to the camshaft housing sub-assembly RH.
| 6. INSTALL CAMSHAFT OIL FEED PIPE SUB-ASSEMBLY (for Automatic Transmission) |
Temporarily install 2 new gaskets and the camshaft oil feed pipe sub-assembly with the bolt and 2 union bolts.
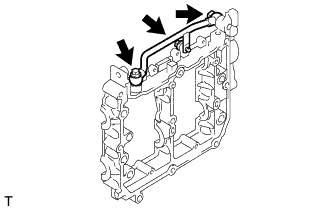 |
Tighten the 2 union bolts to the specified torque.
Tighten the bolt to the specified torque.
| 7. INSTALL OIL SPACER RH |
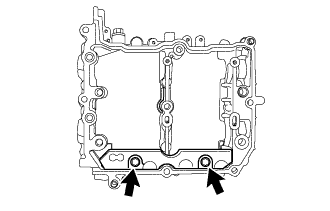 |
Install the oil spacer RH with the 2 bolts.
| 8. INSTALL OIL CONTROL VALVE FILTER (for Bank 1) |
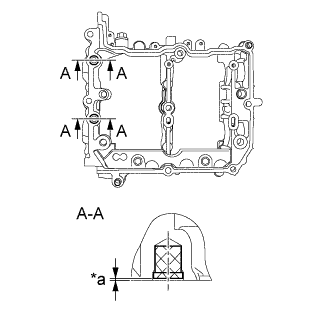 |
Install 2 new oil control valve filters to the camshaft housing sub-assembly RH as shown in the illustration.
| *a | 0 to 0.5 mm (0 to 0.0197 in.) from the face of the camshaft housing sub-assembly RH |
| 9. INSTALL CAMSHAFT (for Bank 1) |
Apply engine oil to the journals of the camshaft housing sub-assembly RH.
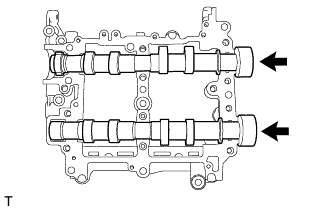 |
Set the intake camshaft RH and the exhaust camshaft RH to the camshaft housing sub-assembly RH.
| 10. INSTALL CAMSHAFT CAP (for Bank 1) |
Using a sealer gun, apply seal packing to the contact surface of the front camshaft cap RH, intake rear camshaft cap RH and exhaust rear camshaft cap RH as shown in the illustration.
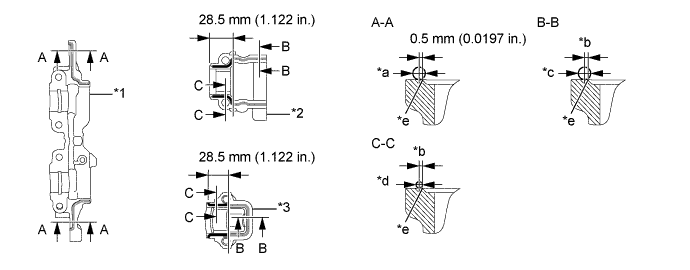
| *1 | Front Camshaft Cap RH | *2 | Intake Rear Camshaft Cap RH |
| *3 | Exhaust Rear Camshaft Cap RH | - | - |
| a | φ2.5 to 4.0 mm (0.0984 to 0.1575 in.) | b | Within 1.0 mm (0.0394 in.) |
| c | φ3.0 to 4.0 mm (0.1181 to 0.1575 in.) | d | φ1.5 to 2.5 mm (0.0591 to 0.0984 in.) |
| e | Chamfer edge | - | - |
Apply engine oil to the journals of the camshaft caps, and place them on the camshaft housing sub-assembly RH.
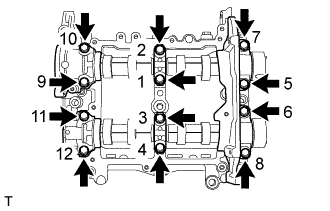 |
Tighten the 12 bolts in the order shown in the illustration to install the front camshaft cap RH, intake center camshaft cap RH, intake rear camshaft cap RH, exhaust center camshaft cap RH and exhaust rear camshaft cap RH.
| 11. INSTALL OIL PAN SUB-ASSEMBLY |
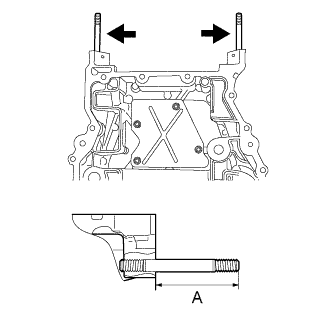 |
Install the 2 stud bolts to the oil pan sub-assembly.
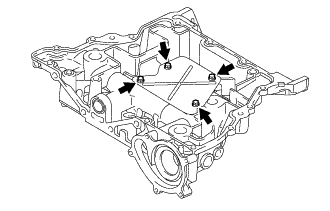 |
Install the baffle plate to the oil pan sub-assembly with the 4 bolts.
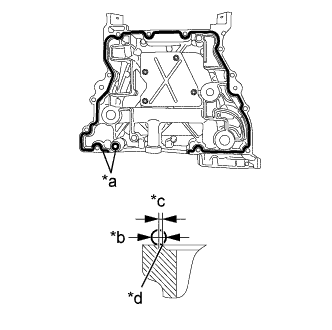 |
Using a sealer gun, apply seal packing in a continuous line as shown in the illustration.
| *a | Seal Packing |
| *b | φ4.0 to 6.0 mm (0.158 to 0.236 in.) |
| *c | 1.5 mm (0.059 in.) |
| *d | Chamfer edge |
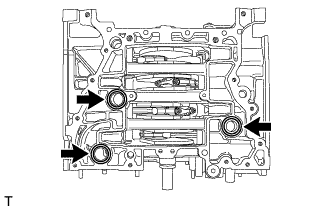 |
Install 3 new O-rings to the cylinder block.
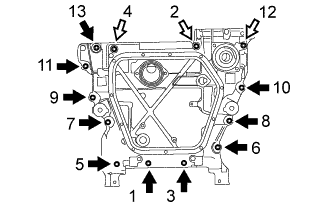 |
Tighten the 13 bolts in the order shown in the illustration to install the oil pan sub-assembly to the cylinder block.
 | Bolt A |
 | Bolt B |
| 12. INSTALL OIL STRAINER SUB-ASSEMBLY |
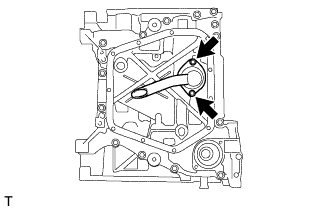 |
Install a new O-ring.
Install the oil strainer sub-assembly to the oil pan sub-assembly with the 2 bolts.
| 13. INSTALL NO. 2 OIL PAN SUB-ASSEMBLY |
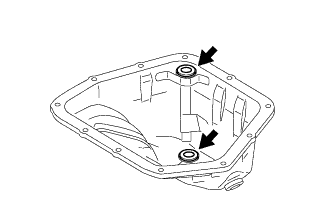 |
Install 2 new oil pan seal rings to the No. 2 oil pan sub-assembly.
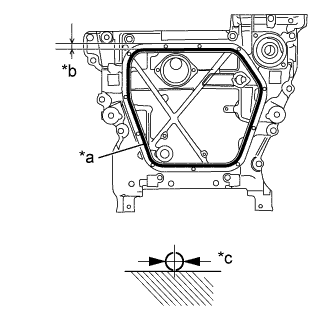 |
Using a sealer gun, apply seal packing in a continuous line as shown in the illustration.
| *a | Seal Packing |
| *b | 9.5 mm (0.374 in.) |
| *c | φ4.0 to 6.0 mm (0.158 to 0.236 in.) |
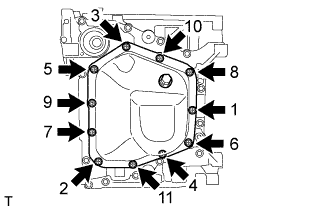 |
Tighten the 11 bolts in the order shown in the illustration to install the No. 2 oil pan sub-assembly.
Install a new gasket and the drain plug.
| 14. INSTALL NO. 2 ENGINE HANGER |
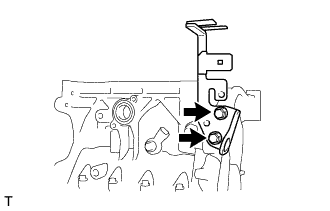 |
Install the No. 2 engine hanger to the cylinder block (for bank 1) with the 2 bolts.
| 15. INSTALL NO. 2 CYLINDER HEAD GASKET |
Operate the engine stand so that the bank 2 side faces upward.
Clean the bolt holes in the cylinder block (bank 2).
Using a sealer gun, apply seal packing to both sides of the No. 2 cylinder head gasket as shown in the illustration.
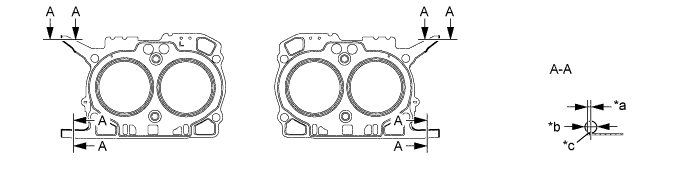
| *a | 0 to 1.0 mm (0 to 0.039in.) | *b | φ2,0 to 4.0 mm (0.079 to 0.158 in.) |
| *c | Edge of the gasket | - | - |
Place the No. 2 cylinder head gasket on the cylinder block (bank 2).
| 16. INSTALL CYLINDER HEAD SUB-ASSEMBLY LH |
Clean the threads of the cylinder head bolts and apply sufficient engine oil to the washers and threads of the bolts.
Mount the cylinder head sub-assembly LH on the cylinder block (bank 2).
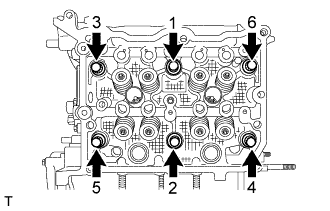 |
Tighten the 6 cylinder head bolts in the order shown in the illustration.
Tighten the 6 cylinder head bolts further in the same order above.
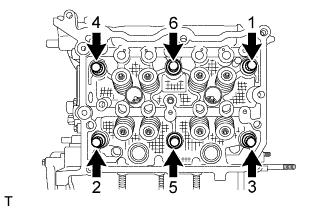 |
Loosen the 6 cylinder head bolts by 360 ° in the order shown in the illustration.
|
Tighten the 6 cylinder head bolts in the order shown in the illustration.
Tighten the 6 cylinder head bolts further in the same order above.
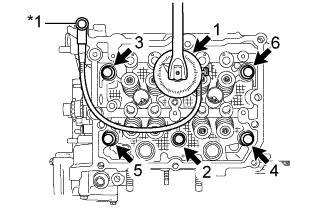 |
Using an angle gauge, tighten the 6 cylinder head bolts another 100 ° in the order shown in the illustration.
| *1 | Temporary Bolt |
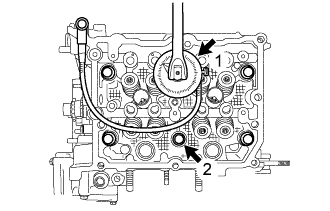 |
Using an angle gauge, tighten the 2 cylinder head bolts another 100 ° in the order shown in the illustration.
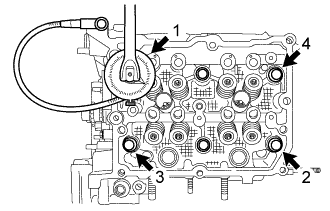 |
Using an angle gauge, tighten the 4 cylinder head bolts another 50 ° in the order shown in the illustration.
| 17. INSTALL CAMSHAFT HOUSING SUB-ASSEMBLY LH |
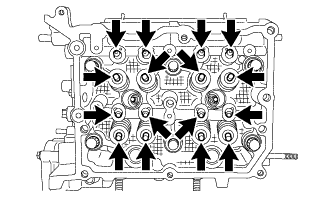 |
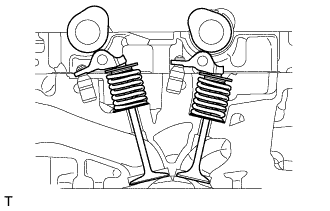
Apply engine oil to the 8 valve adjusting shims and 8 roller rocker arm pivots, and then install them to the cylinder head sub-assembly LH.
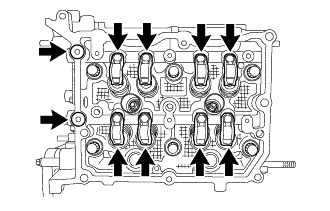 |
Apply engine oil to 2 new O-rings and the 8 No. 1 valve rocker arm sub-assemblies, and then install them to the cylinder head sub-assembly LH.
Using a sealer gun, apply seal packing in a continuous line as shown in the illustration.
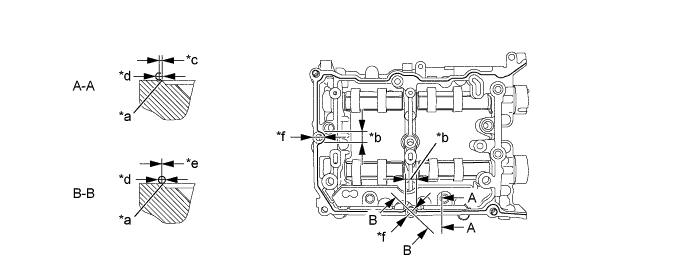
| *a | Chamfer edge | *b | Range of B-B |
| *c | within 1.0 mm (0.0394 in.) | *d | φ2.5 to 3.5 mm (0.098 to 0.138 in.) |
| *e | -0.5 to 0.5 mm (-0.0197 to 0.0197 in.) | *f | 18.0 mm (0.709 in.) |
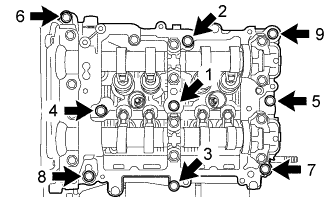 |
Tighten the 9 bolts in the order shown in the illustration to install the camshaft housing sub-assembly LH.
 |
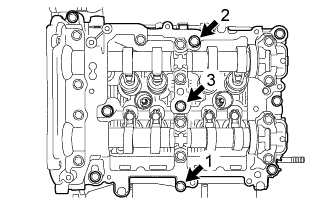 |
Loosen the 3 bolts by 180° in the order shown in the illustration.
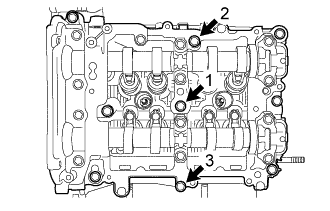 |
Tighten the 3 bolts in the order shown in the illustration.
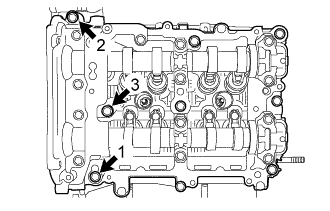 |
Loosen the 3 bolts by 180° in the order shown in the illustration.
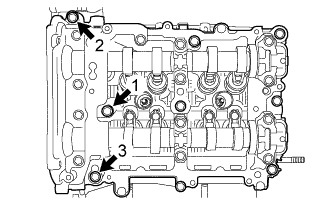 |
Tighten the 3 bolts in the order shown in the illustration.
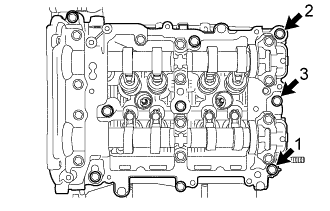 |
Loosen the 3 bolts by 180° in the order shown in the illustration.
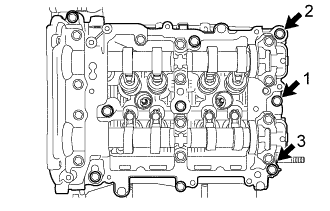 |
Tighten the 3 bolts in the order shown in the illustration.
| 18. INSPECT VALVE CLEARANCE (for Bank 2) |
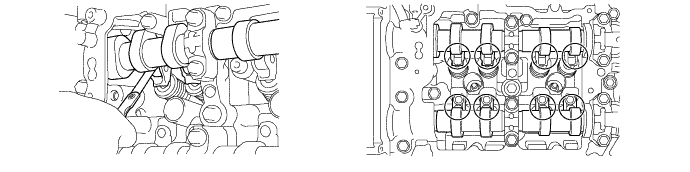
Using a feeler gauge, check the valve clearance between the cam base circle and the roller surface of the No. 1 valve rocker arm sub-assembly.
| 19. ADJUST VALVE CLEARANCE (for Bank 2) |
Remove the camshaft housing sub-assembly LH.
Remove the No. 1 valve rocker arm sub-assemblies.
Remove the valve adjusting shims.
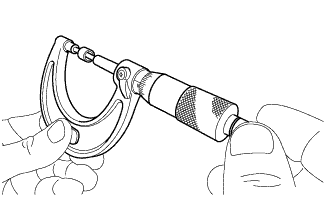 |
Using a micrometer, measure the thickness of the valve adjusting shims.
Calculate the thickness of the valve adjusting shim so that the valve clearance comes within the specified values.
Apply engine oil to the inner face of the valve adjusting shims and install them to the valves.
Install the No. 1 valve rocker arm sub-assemblies.
Install the camshaft housing sub-assembly LH.
| 20. INSTALL CYLINDER HEAD COVER SUB-ASSEMBLY LH |
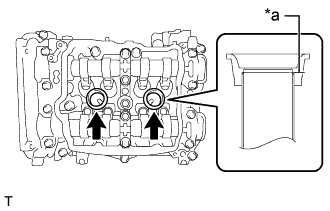 |
Apply a light layer of engine oil to 2 new spark plug tube gaskets and install them to the spark plug tubes as shown in the illustration.
| *a | Spark plug tube edge |
Install a new cylinder head cover gasket to the cylinder head cover sub-assembly LH.
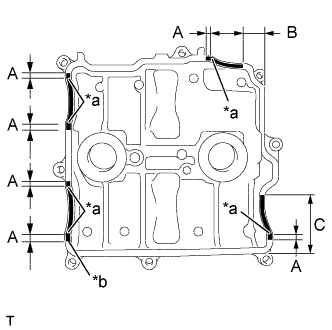 |
Using a sealer gun, apply seal packing to the mating surface of cylinder head cover sub-assembly LH as shown in the illustration.
| Area | Application Length |
| A | 10.0 mm (0.394 in.) or more |
| B | 18.8 mm (0.740 in.) or more |
| C | 63.0 mm (2.480 in.) or more |
| *a | Arch starting point |
| *b | φ2,0 to 4.0 mm (0.079 to 0.158 in.) |
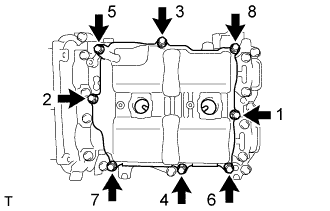 |
Tighten the 8 bolts in the order shown in the illustration and install the cylinder head cover sub-assembly LH.
| 21. INSTALL CYLINDER HEAD GASKET |
Operate the engine stand so that the bank 1 side faces upward.
Clean the bolt holes in the cylinder block (bank 1).
Using a sealer gun, apply seal packing to both sides of the cylinder head gasket as shown in the illustration.
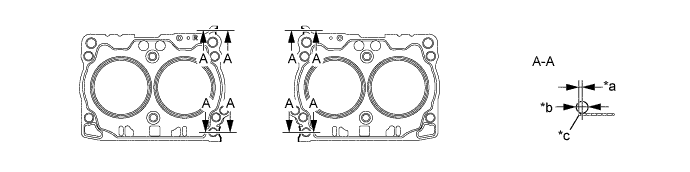
| *a | 0 to 1.0 mm (0 to 0.039in.) | *b | φ2,0 to 4.0 mm (0.079 to 0.158 in.) |
| *c | Edge of the gasket | - | - |
Place the cylinder head gasket on the cylinder block (bank 1).
| 22. INSTALL CYLINDER HEAD SUB-ASSEMBLY RH |
Clean the threads of the cylinder head bolts and apply sufficient engine oil to the washers and threads of the bolts.
Mount the cylinder head sub-assembly RH on the cylinder block (bank 1).
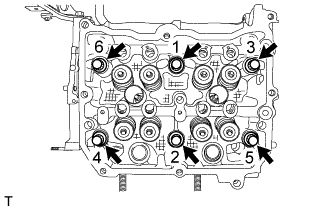 |
Tighten the 6 cylinder head bolts in the order shown in the illustration.
Tighten the 6 cylinder head bolts further in the same order as above.
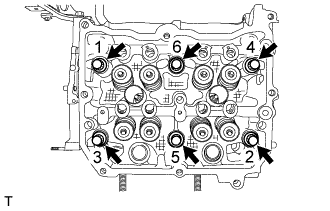 |
Loosen the 6 cylinder head bolts by 360 ° in the order shown in the illustration.
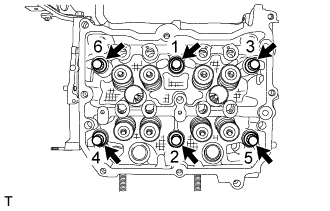 |
Tighten the 6 cylinder head bolts in the order shown in the illustration.
Tighten the 6 cylinder head bolts further in the same order above.
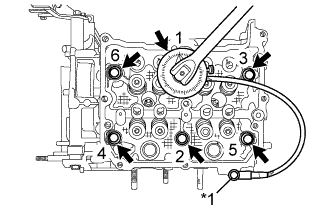 |
Using an angle gauge, tighten the 6 cylinder head bolts another 100 ° in the order shown in the illustration.
| *1 | Temporary Bolt |
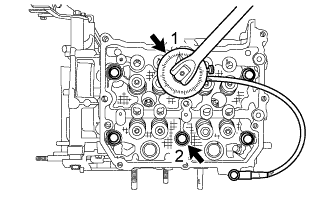 |
Using an angle gauge, tighten the 2 cylinder head bolts another 100 ° in the order shown in the illustration.
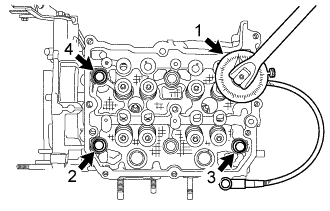 |
Using an angle gauge, tighten the 4 cylinder head bolts another 50 ° in the order shown in the illustration.
| 23. INSTALL CAMSHAFT HOUSING SUB-ASSEMBLY RH |
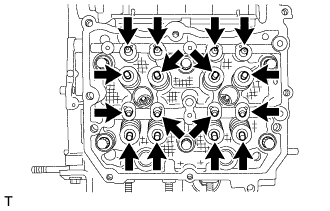 |
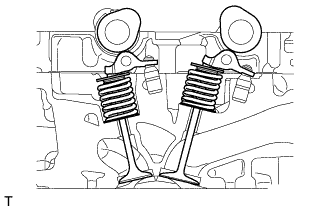
Apply engine oil to the 8 valve adjusting shims and 8 roller rocker arm pivots, and then install them to the cylinder head sub-assembly.
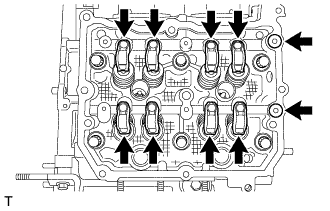 |
Apply engine oil to 2 new O-rings and the 8 No. 1 valve rocker arm sub-assemblies, and then install them to the cylinder head sub-assembly.
Using a sealer gun, apply seal packing in a continuous line as shown in the illustration.
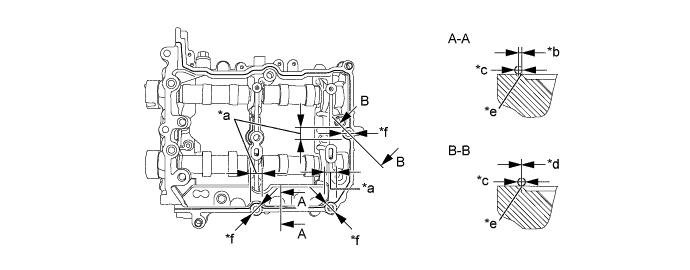
| *a | Range of B-B | *b | 0 to 1.0 mm (0 to 0.0394 in.) |
| *c | φ2.5 to 3.5 mm (0.098 to 0.138 in.) | *d | -0.5 to 0.5 mm (-0.0197 to 0.0197 in.) |
| *e | Chamfer edge | *f | 18.0 mm (0.709 in.) |
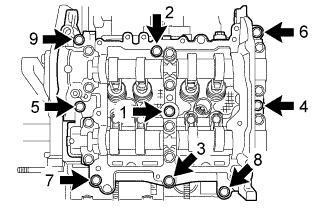 |
Tighten the 9 bolts in the order shown in the illustration to install the camshaft housing sub-assembly RH.
 |
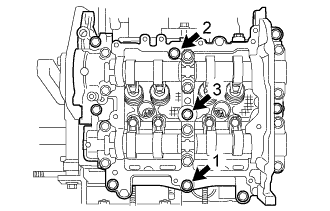 |
Loosen the 3 bolts by 180° in the order shown in the illustration.
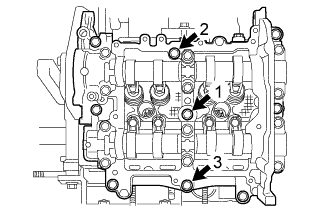 |
Tighten the 3 bolts in the order shown in the illustration.
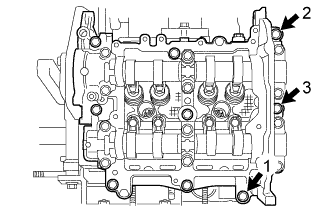 |
Loosen the 3 bolts by 180° in the order shown in the illustration.
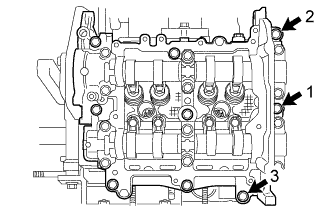 |
Tighten the 3 bolts in the order shown in the illustration.
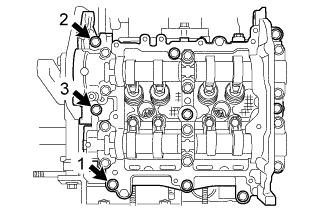 |
Loosen the 3 bolts by 180° in the order shown in the illustration.
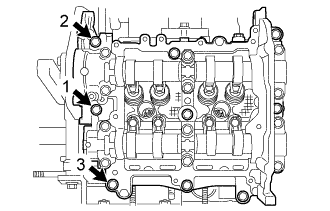 |
Tighten the 3 bolts in the order shown in the illustration.
| 24. INSPECT VALVE CLEARANCE (for Bank 1) |
Using a feeler gauge, check the valve clearance between the cam base circle and the roller surface of the No. 1 valve rocker arm sub-assembly.
| 25. ADJUST VALVE CLEARANCE (for Bank 1) |
Remove the camshaft housing sub-assembly RH.
Remove the No. 1 valve rocker arm sub-assemblies.
Remove the valve adjusting shims.
|
Using a micrometer, measure the thickness of the valve adjusting shims.
Calculate the thickness of the valve adjusting shim so that the valve clearance comes within the specified values.
Apply engine oil to the inner face of the valve adjusting shims and install them to the valves.
Install the No. 1 valve rocker arm sub-assemblies.
Install the camshaft housing sub-assembly RH.
| 26. INSTALL CYLINDER HEAD COVER SUB-ASSEMBLY RH |
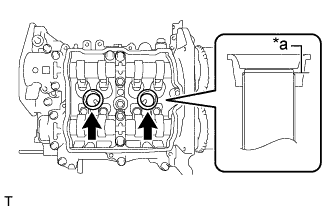 |
Apply a light layer of engine oil to 2 new spark plug tube gaskets and install them to the spark plug tubes as shown in the illustration.
| *a | Spark plug tube edge |
Install a new cylinder head cover gasket to the cylinder head cover sub-assembly RH.
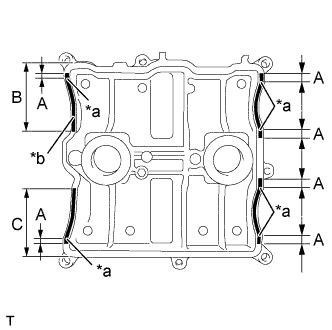 |
Using a sealer gun, apply seal packing to the mating surface of cylinder head cover sub-assembly RH as shown in the illustration.
| Area | Application Length |
| A | 10.0 mm (0.394 in.) or more |
| B | 68.0 mm (2.677 in.) or more |
| C | 70.7 mm (2.784 in.) or more |
| *a | Arch starting point |
| *b | φ2,0 to 4.0 mm (0.079 to 0.158 in.) |
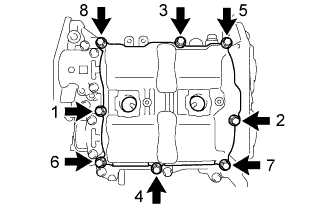 |
Tighten the 8 bolts in the order shown in the illustration and install the cylinder head cover sub-assembly RH.
| 27. INSTALL INJECTOR DRIVER BRACKET |
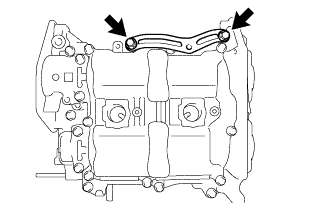 |
Install the injector driver bracket with the 2 bolts.
| 28. INSTALL SPARK PLUG |
Using a 14 mm spark plug wrench, install the 4 spark plugs.
| 29. INSTALL CAMSHAFT TIMING EXHAUST GEAR ASSEMBLY LH |
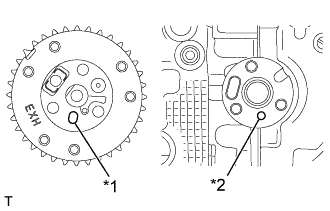 |
Install the camshaft timing exhaust gear assembly LH while aligning the knock hole of the camshaft timing exhaust gear assembly LH with the knock pin of the exhaust camshaft LH.
| *1 | Knock Hole |
| *2 | Knock Pin |
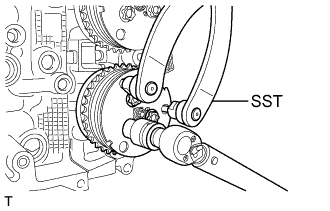 |
Using SST, hold the camshaft timing exhaust gear assembly LH, and tighten the 3 bolts with a socket "TORX" wrench E16.
| 30. INSTALL CAMSHAFT TIMING INTAKE GEAR ASSEMBLY LH |
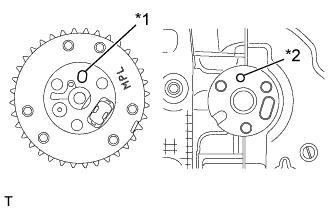 |
Install the camshaft timing exhaust gear assembly LH while aligning the knock hole of the camshaft timing intake gear assembly LH with the knock pin of the intake camshaft LH.
| *1 | Knock Hole |
| *2 | Knock Pin |
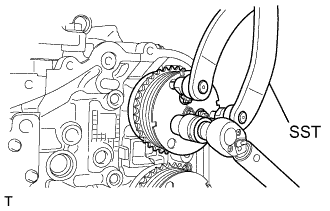 |
Using SST, hold the camshaft timing intake gear assembly LH, and tighten the 3 bolts with a socket "TORX" wrench E16.
| 31. INSTALL CAMSHAFT TIMING EXHAUST GEAR ASSEMBLY RH |
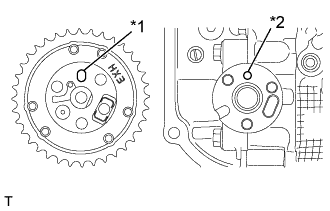 |
Install the camshaft timing intake gear assembly RH while aligning the knock hole of the camshaft timing exhaust gear assembly RH with the knock pin of the exhaust camshaft RH.
| *1 | Knock Hole |
| *2 | Knock Pin |
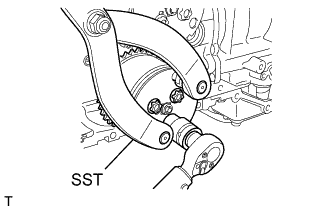 |
Using SST, hold the camshaft timing exhaust gear assembly RH, and tighten the 3 bolts with a socket "TORX" wrench E16.
| 32. INSTALL CAMSHAFT TIMING INTAKE GEAR ASSEMBLY RH |
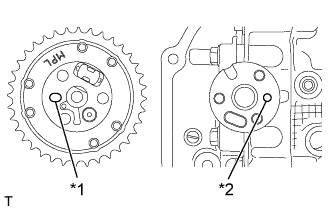 |
Install the camshaft timing intake gear assembly RH while aligning the knock hole of the camshaft timing intake gear assembly RH with the knock pin of the intake camshaft RH.
| *1 | Knock Hole |
| *2 | Knock Pin |
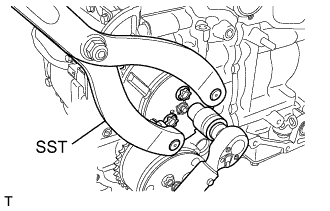 |
Using SST, hold the camshaft timing intake gear assembly RH, and tighten the 3 bolts with a socket "TORX" wrench E16.
| 33. INSTALL CRANKSHAFT TIMING GEAR OR SPROCKET |
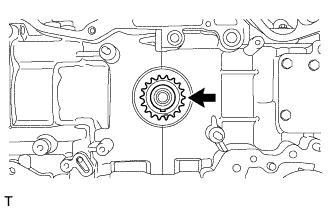 |
Install the crankshaft timing gear or sprocket.
| 34. INSTALL CHAIN SUB-ASSEMBLY (for Bank 2) |
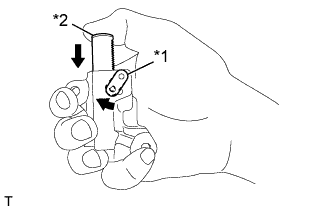 |
Move the link plate in the direction of the arrow in the illustration to press in the plunger.
| *1 | Link Plate |
| *2 | Plunger |
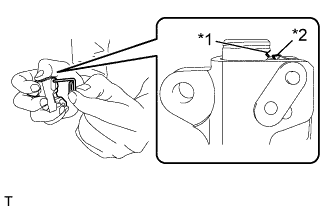 |
Insert an approximately 1 mm (0.0394 in.) diameter wire or the like into the chain tensioner assembly through the stopper pin hole, and hold the plunger.
| *1 | First notch of the plunger rack |
| *2 | Stopper Tooth |
Temporarily install the crankshaft pulley spacer and crankshaft pulley.
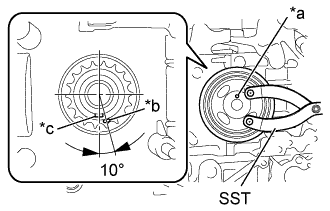 |
Using SST, set the crankshaft pulley pin hole at the position shown in the illustration.
| *a | Crankshaft Pulley Pin Hole |
| *b | Alignment Mark |
| *c | Crankshaft Timing Gear key |
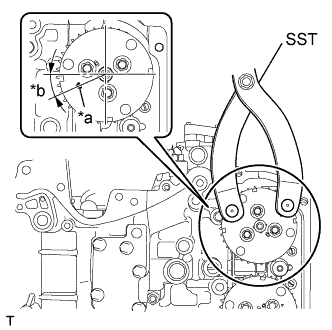 |
Using SST, turn the camshaft timing intake gear assembly LH and align the alignment mark as shown in the illustration.
| *a | Alignment Mark |
| *b | 25°to 30° |
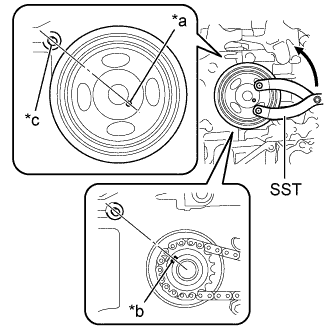 |
Using SST, turn the crankshaft about 200 degrees counterclockwise until the crankshaft pulley pin hole is aligned at the position shown in the illustration.
| *a | Crankshaft Pulley Pin Hole |
| *b | Crankshaft Timing Gear key |
| *c | Cylinder Block Guide Pin |
Remove the crankshaft pulley and crankshaft pulley spacer.
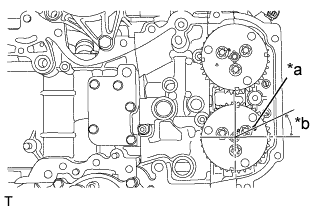 |
Align the alignment mark on the camshaft timing exhaust gear assembly LH as shown in the illustration.
| *a | Alignment Mark |
| *b | 25° to 30° |
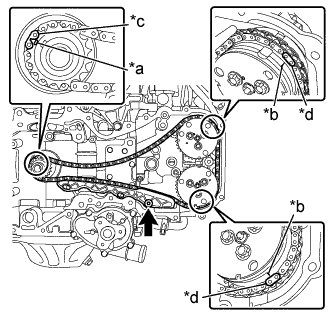 |
Install the chain sub-assembly in the following order.
| *a | Alignment Mark (Oval) |
| *b | Alignment Mark (Engraved Line) |
| *c | Mark plate (Grayish Blue) |
| *d | Mark plate (Pink) |
Align the mark plate (grayish blue) on the chain sub-assembly with the alignment mark (oval) on the crankshaft timing gear or sprocket.
Align the mark plate (pink) on the chain sub-assembly with the alignment mark (engraved line) on the camshaft timing exhaust gear assembly LH.
Align the mark plate (pink) on the chain sub-assembly with the alignment mark (engraved line) on the camshaft timing intake gear assembly LH.
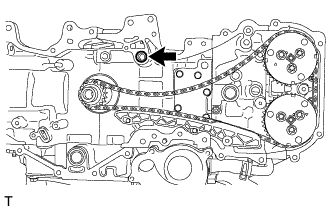
Using a 5 mm hexagon socket wrench, install the No. 1 chain vibration damper with the bolt.
 |
Install a new O-ring to the cylinder block (for bank 2).
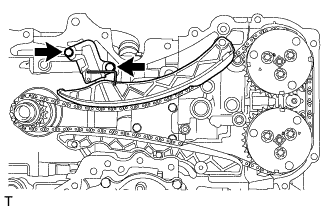 |
Install the chain tensioner slipper.
Install the No. 2 chain tensioner assembly with the 2 bolts.
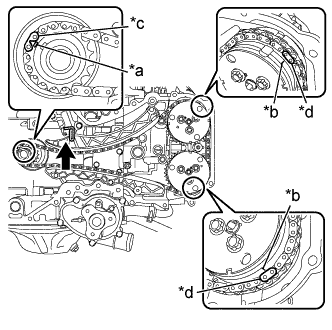 |
Check that the chain is correctly installed.
| *a | Alignment Mark (Oval) |
| *b | Alignment Mark (Engraved Line) |
| *c | Mark plate (Grayish Blue) |
| *d | Mark plate (Pink) |
The mark plate (grayish blue) on the chain sub-assembly is aligned with the alignment mark (oval) on the crankshaft timing gear or sprocket.
The mark plate (pink) on the chain sub-assembly is aligned with the alignment mark (engraved line) on the camshaft timing intake gear assembly LH.
The mark plate (pink) on the chain sub-assembly is aligned with the alignment mark (engraved line) on the camshaft timing exhaust gear assembly LH.
Pull out the wire or the like from the No. 2 chain tensioner assembly.
Temporarily install the crankshaft pulley spacer and crankshaft pulley.
Using SST, turn the crankshaft clockwise to make sure that there are no abnormal conditions.
| 35. INSTALL CHAIN SUB-ASSEMBLY (for Bank 1) |
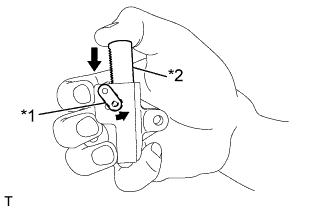 |
Move the link plate in the direction of the arrow in the illustration to press in the plunger.
| *1 | Link Plate |
| *2 | Plunger |
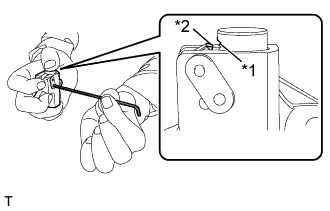 |
Insert a 2.5 mm (0.098 in.) diameter hexagon wrench into the No. 1 chain tensioner assembly through the stopper pin hole, and hold the plunger.
| *1 | First notch of the plunger rack |
| *2 | Stopper Tooth |
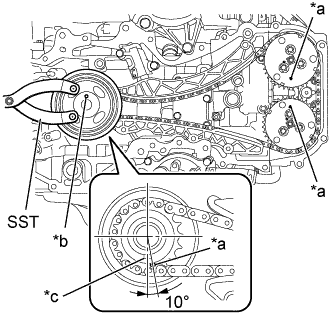 |
Using SST, turn the crankshaft pulley until the alignment marks on the camshaft timing intake gear assembly LH and the camshaft timing exhaust gear assembly LH, and the crankshaft pulley pin hole are aligned at the positions shown in the illustration.
| *a | Alignment Mark |
| *b | Crankshaft Pulley Pin Hole |
| *c | Crankshaft Timing Gear Key |
Remove the crankshaft pulley and crankshaft pulley spacer.
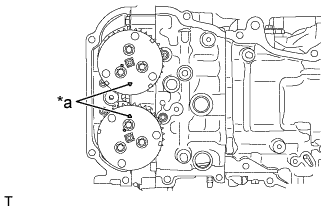 |
Align the alignment marks of the camshaft timing intake gear assembly RH and camshaft timing exhaust gear assembly RH as shown in the illustration.
| *a | Alignment Mark |
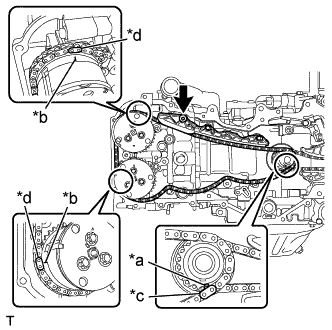 |
Install the chain sub-assembly in the following order.
| *a | Alignment Mark (Oval) |
| *b | Alignment Mark (Engraved Line) |
| *c | Mark plate (Grayish Blue) |
| *d | Mark plate (Pink) |
Align the mark plate (grayish blue) on the chain sub-assembly with the alignment mark (oval) on the crankshaft timing gear or sprocket.
Align the mark plate (pink) on the chain sub-assembly with the alignment mark (engraved line) on the camshaft timing intake gear assembly RH.
Align the mark plate (pink) on the chain sub-assembly with the alignment mark (engraved line) on the camshaft timing exhaust gear assembly RH.
Using a 5 mm hexagon socket wrench, install the No. 1 chain vibration damper with the bolt.
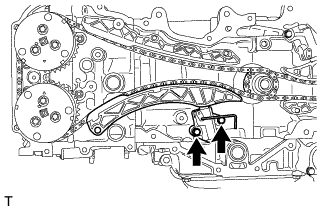 |
Install the chain tensioner slipper.
Install the No. 1 chain tensioner assembly with the 2 bolts.
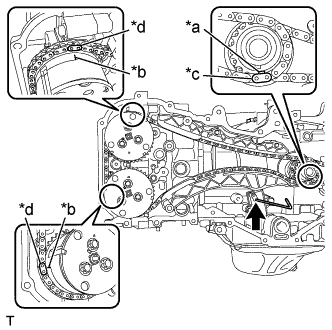 |
Check that the chain is correctly installed.
| *a | Alignment Mark (Oval) |
| *b | Alignment Mark (Engraved Line) |
| *c | Mark plate (Grayish Blue) |
| *d | Mark plate (Pink) |
The mark plate (grayish blue) on the chain sub-assembly is aligned with the alignment mark (oval) on the crankshaft timing gear or sprocket.
The mark plate (pink) on the chain sub-assembly is aligned with the alignment mark (engraved line) on the camshaft timing intake gear assembly RH.
The mark plate (pink) on the chain sub-assembly is aligned with the alignment mark (engraved line) on the camshaft timing exhaust gear assembly RH.
Pull out the hexagon wrench from the No. 1 chain tensioner assembly.
Temporarily install the crankshaft pulley spacer and crankshaft pulley.
Using SST, turn the crankshaft clockwise to make sure that there are no abnormal conditions.
Remove the crankshaft pulley and crankshaft pulley spacer.
| 36. INSTALL TIMING CHAIN OR BELT COVER SUB-ASSEMBLY |
Apply a light layer of engine oil to 4 new O-rings and attach them to the engine.
Clean and degrease the contact surface.
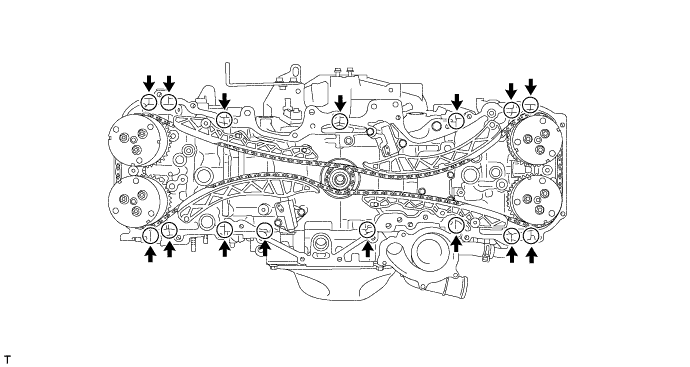
If there are gaps at positions shown in the illustration, fill up with seal packing by using a sealer gun.
Using a sealer gun, apply seal packing in a continuous line as shown in the illustration.
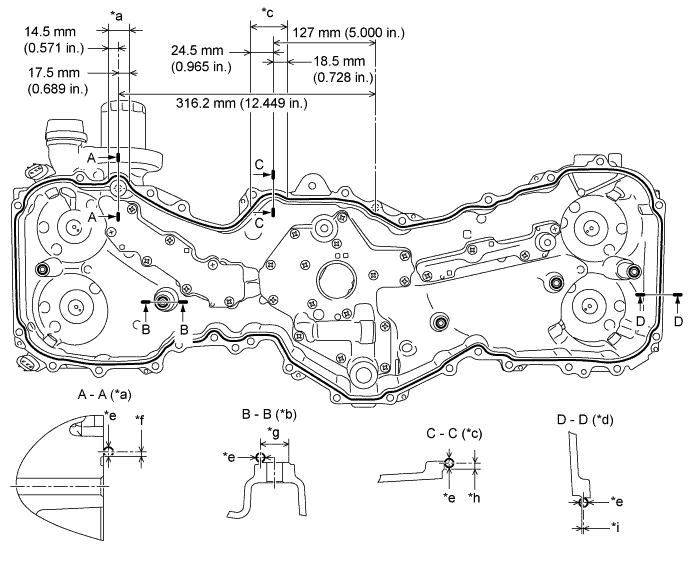
| *a | Area A | *b | Boss (5 locations) |
| *c | Area B | *d | Other than ranges A and B |
| *e | φ3.5 to 4.5 mm (0.138 to 0.177 in.) | *f | 2.0 mm (0.079 in.) |
| *g | φ12 mm (0.472 in.) | *h | 2.5 mm (0.098 in.) |
| *i | 0.5 mm (0.0197 in.) | - | - |
Temporarily install the timing chain or belt cover sub-assembly with the 32 bolts.
Securely tighten the 32 bolts in the order as shown in the illustration.
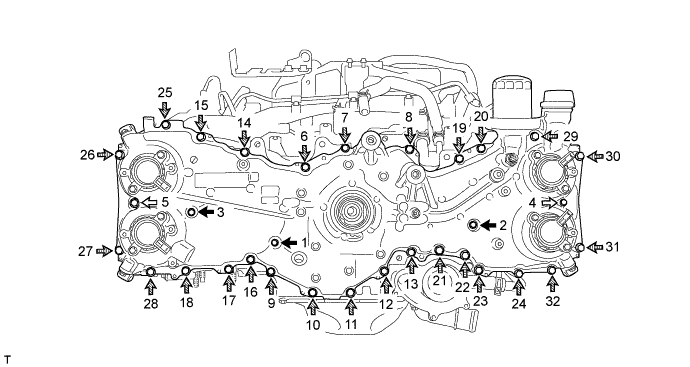
| Bolt A | | Bolt B |
 | Bolt C |  | Bolt D |
| Item | Length | Item | Length |
| Bolt A | 20 mm (0.787 in.) | Bolt B | 50 mm (1.969 in.) |
| Bolt C | 25 mm (0.984 in.) | Bolt D | 60 mm (2.362 in.) |
| 37. INSTALL TIMING CHAIN COVER OIL SEAL |
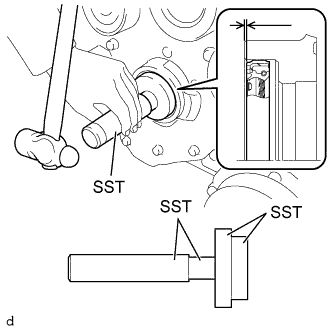 |
Apply engine oil to a new oil seal lip.
Using SST and a hammer, tap in the new oil seal until its surface is flush with the timing chain or belt cover sub-assembly edge.
| 38. INSTALL CRANKSHAFT PULLEY |
Install the crankshaft pulley spacer.
Install a new O-ring to the crankshaft pulley spacer.
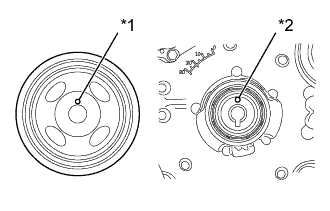 |
Install the crankshaft pulley while aligning the knock hole of the pulley with the knock pin on the crankshaft pulley spacer.
| *1 | Knock Hole |
| *2 | Knock Pin |
Apply engine oil to threads and seat sections of the crankshaft pulley set bolt.
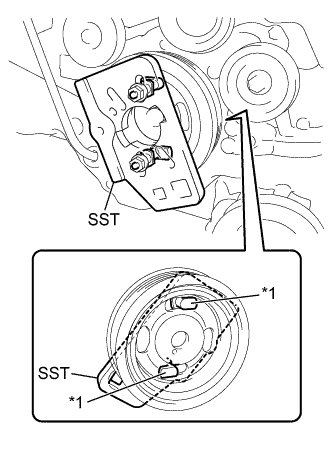 |
Install SST to the crankshaft pulley.
| *1 | Claw |
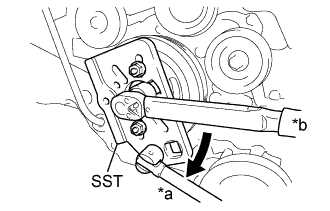 |
Using SST, hold the crankshaft pulley and tighten the crankshaft pulley set bolt.
| *a | Hold |
| *b | Turn |
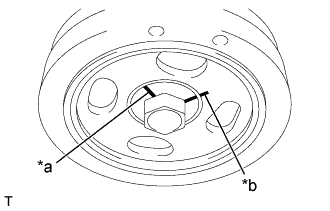 |
Using a marker, draw the reference line (A) on the crankshaft pulley set bolt and also the reference line (B) on the crankshaft pulley according to the line engraved around the crankshaft pulley set bolt head as shown in the illustration.
| *a | Reference Line A |
| *b | Reference Line B |
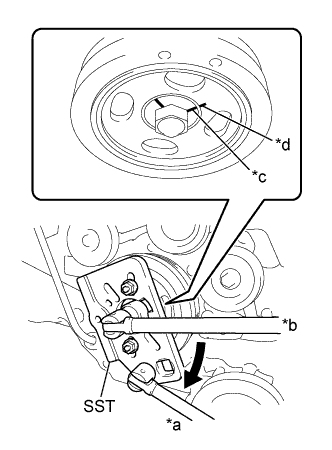 |
Using SST, hold the crankshaft pulley, and tighten the crankshaft pulley set bolt by 90° until the reference lines A and B are aligned.
| *a | Hold |
| *b | Turn |
| *c | Reference Line A |
| *d | Reference Line B |
| 39. INSTALL THERMOSTAT |
Attach a new gasket to the thermostat.
| 40. INSTALL WATER OUTLET |
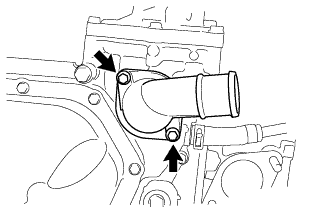 |
Install the thermostat and water outlet with the 2 bolts.
| 41. INSTALL ENGINE WATER PUMP ASSEMBLY |
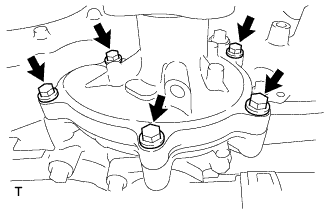 |
Install a new gasket and the water pump assembly with the 5 bolts.
| 42. INSTALL WATER PUMP PULLEY |
Temporarily install the water pump pulley with the 3 bolts.
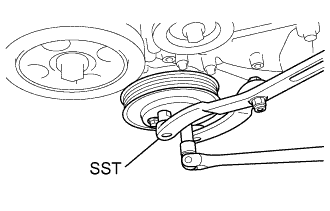 |
Using SST, hold the water pump pulley.
Securely tighten the 3 bolts.
| 43. INSTALL NO. 1 IDLER PULLEY SUB-ASSEMBLY |
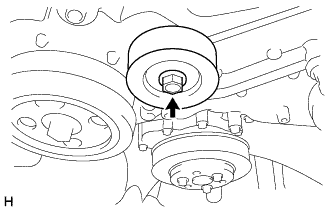 |
Install the idler pulley cover and No. 1 idler pulley sub-assembly with the bolt.
| 44. INSTALL NO. 1 IDLER PULLEY SUB-ASSEMBLY |
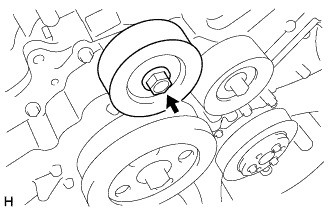 |
Install the idler pulley cover and No. 1 idler pulley sub-assembly with the bolt.
| 45. INSTALL PCV VALVE SUB-ASSEMBLY |
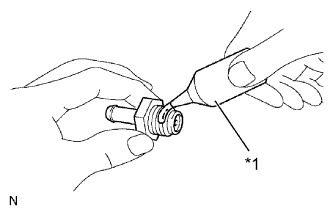 |
Apply adhesive to 2 or 3 threads of the PCV valve sub-assembly.
| *1 | Adhesive 1141G |
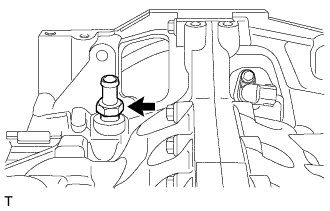 |
Using a 19 mm deep socket wrench, install the PCV valve sub-assembly.
| 46. INSTALL WATER INLET PIPE |
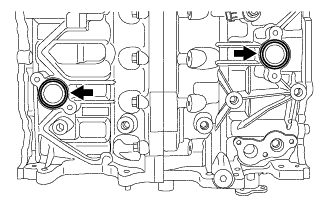 |
Attach 2 new O-rings to the cylinder block.
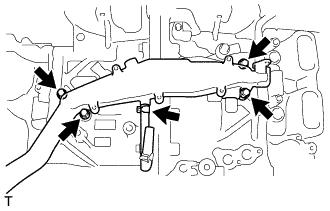 |
Install the water inlet pipe with the 4 bolts.
Connect the No. 3 water by-pass hose with the clamp.
| 47. INSTALL REAR CYLINDER HEAD PLATE (for Manual Transmission) |
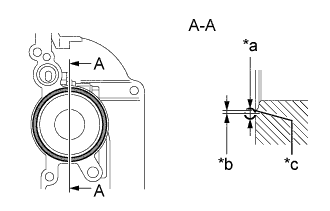 |
Using a sealer gun, apply seal packing in a continuous line as shown in the illustration.
| *a | φ2,0 to 4.0 mm (0.079 to 0.158 in.) |
| *b | Within 1.0 mm (0.0394 in.) |
| *c | Chamfer edge |
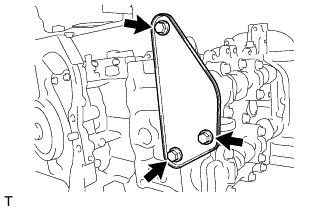 |
Install the rear cylinder head plate with the 3 bolts.
| 48. INSTALL VACUUM PUMP ASSEMBLY (for Automatic Transmission) |
Coat a new O-ring with engine oil, and install it.
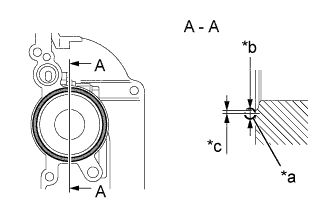 |
Apply seal packing in a continuous line as shown in the illustration.
| *a | Edge of Groove |
| *b | 2.0 to 4.0 mm (0.078 to 0.158 in.) in Diameter |
| *c | 1.0mm or Less |
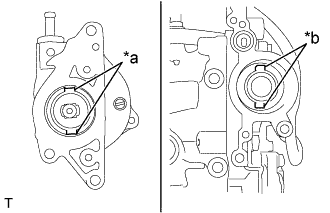 |
Install the vacuum pump assembly while aligning the grooves of the vacuum pump assembly with the claws of the intake camshaft RH.
| *a | Groove of the Vacuum Pump Assembly |
| *b | Claw of the Intake Camshaft |
Install the 3 bolts.
| 49. INSTALL PCV HOSE CONNECTOR |
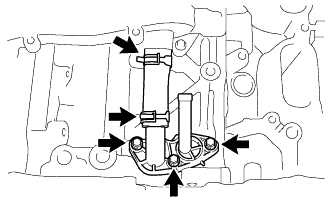 |
Connect the No. 2 water by-pass hose to the PCV hose connector and water inlet pipe with the clips.
Install the PCV hose connector with the 3 bolts.
| 50. INSTALL ENGINE OIL PRESSURE SWITCH ASSEMBLY |
Clean and degrease the threads of the engine oil pressure switch assembly.
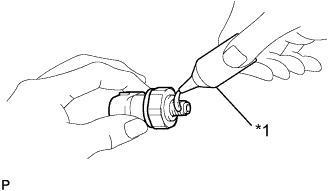 |
Apply adhesive 1324 to the threads of the engine oil pressure switch assembly.
| *1 | Adhesive 1324 |
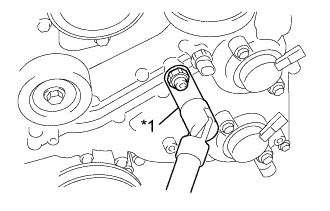 |
Using a 24 mm deep socket wrench, install the engine oil pressure switch assembly.
| *1 | 24 mm Deep Socket Wrench |
| 51. INSTALL ENGINE OIL TEMPERATURE SENSOR |
Attach a new gasket to the engine oil temperature sensor.
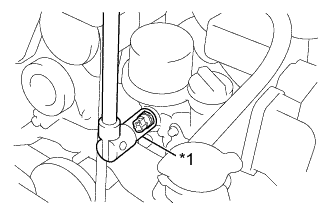 |
Using a 19 mm deep socket wrench, install the engine oil temperature sensor.
| *1 | 19 mm Deep Socket Wrench |
| 52. INSTALL CAMSHAFT TIMING OIL CONTROL VALVE |
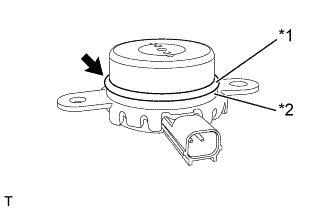 |
Install the back-up ring to the camshaft timing oil control valve (for exhaust side of bank 2).
| *1 | O-ring |
| *2 | Back-up ring |
Install a new O-ring to the camshaft timing oil control valve (for exhaust side of bank 2).
Apply a light coat of engine oil to the O-ring.
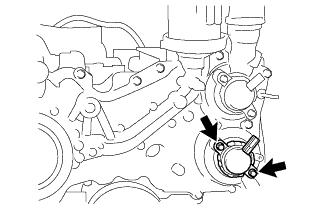 |
Install the camshaft timing oil control valve (for exhaust side of bank 2) with the 2 bolts.
Install the back-up ring to the camshaft timing oil control valve (for intake side of bank 2).
Install a new O-ring to the camshaft timing oil control valve (for intake side of bank 2).
Apply a light coat of engine oil to the O-ring.
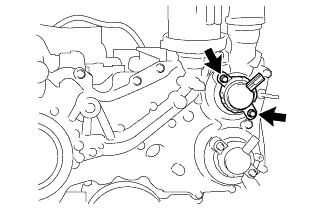 |
Install the camshaft timing oil control valve (for intake side of bank 2) with the 2 bolts.
Install the back-up ring to the camshaft timing oil control valve (for exhaust side of bank 1).
Install a new O-ring to the camshaft timing oil control valve (for exhaust side of bank 1).
Apply a light coat of engine oil to the O-ring.
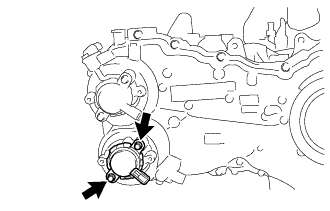 |
Install the camshaft timing oil control valve (for exhaust side of bank 1) with the 2 bolts.
Install the back-up ring to the camshaft timing oil control valve (for intake side of bank 1).
Install a new O-ring to the camshaft timing oil control valve (for intake side of bank 1).
Apply a light coat of engine oil to the O-ring.
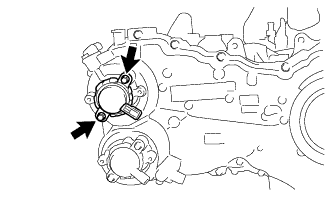 |
Install the camshaft timing oil control valve (for intake side of bank 1) with the 2 bolts.
| 53. INSTALL VVT SENSOR |
Install a new O-ring to the VVT sensor (for exhaust side of bank 2).
Apply a light coat of engine oil to the O-ring.
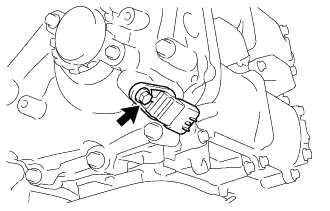 |
Install the VVT sensor (for exhaust side of bank 2) with the bolt.
Install a new O-ring to the VVT sensor (for intake side of bank 2).
Apply a light coat of engine oil to the O-ring.
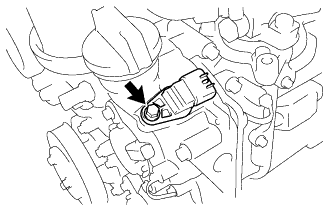 |
Install the VVT sensor (for intake side of bank 2) with the bolt.
Install a new O-ring to the VVT sensor (for exhaust side of bank 1).
Apply a light coat of engine oil to the O-ring.
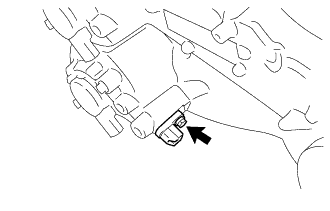 |
Install the VVT sensor (for exhaust side of bank 1) with the bolt.
Install a new O-ring to the VVT sensor (for intake side of bank 1).
Apply a light coat of engine oil to the O-ring.
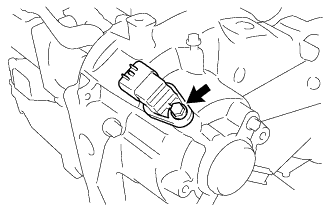 |
Install the VVT sensor (for intake side of bank 1) with the bolt.
| 54. INSTALL CRANK POSITION SENSOR |
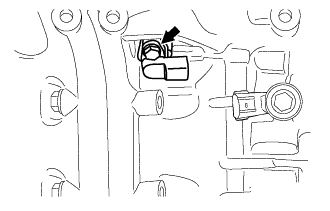 |
Install the crank position sensor with the bolt.
| 55. INSTALL KNOCK CONTROL SENSOR |
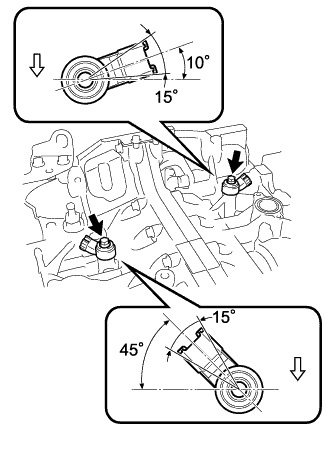 |
Install the 2 knock control sensors onto the cylinder block with the 2 bolts as shown in the illustration.
| Engine front |
| 56. INSTALL E.F.I. WATER TEMPERATURE SENSOR |
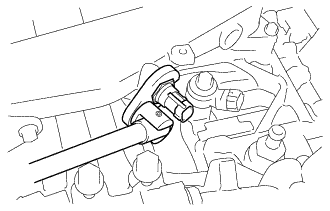 |
Using a 19 mm union nut wrench, install a new gasket and the E.F.I. water temperature sensor.
| 57. INSTALL OIL FILTER UNION |
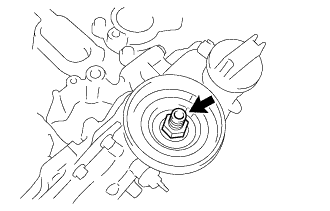 |
Install the oil filter union.
| 58. INSTALL OIL FILTER SUB-ASSEMBLY |
Apply engine oil to the installation surface of the oil filter sub-assembly.
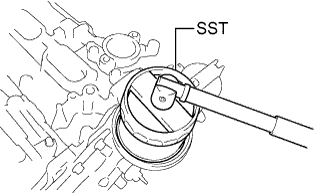 |
Using SST, install the oil filter sub-assembly.
| 59. INSTALL OIL FILLER CAP |
Install the oil filler cap.