Home › Engine / Hybrid System › FA20 ENGINE MECHANICAL › CYLINDER HEAD

CYLINDER HEAD > REPLACEMENT

for Preparation Click here


1. REPLACE NO. 2 INTAKE VALVE GUIDE BUSH
  1. Place the cylinder block on wooden blocks with the combustion chamber side facing upward.


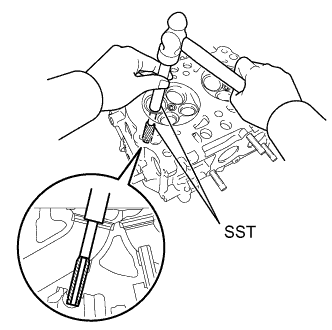
    A278775E01
  1. Using SST and a hammer, tap out the No. 2 intake valve guide bush.

    SST
    09201-10000   (09201-01050)
    09950-70010   (09951-07100)

    NOTICE:
    1. Place wooden blocks wrapped in a cloth under the cylinder head and stabilize the cylinder head during servicing.
    2. Use special care not to damage the cylinder head.
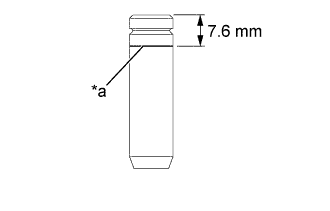
  1. Before installing the No. 2 intake valve guide bush, make sure that neither scratches nor damages exist on the inner surface of cylinder head valve guide bush holes.


    A281653E01
  1. Draw a reference line 7.6 mm (0.299 in.) below from the top face on a new No. 2 intake valve guide bush using a marker.
    Text in Illustration 
    *a
    Reference line

    HINT:
    Reference line is used as a guide when tapping-in the No. 2 intake valve guide bush.

  1. Place the cylinder block on wooden blocks with the combustion chamber side facing downward.

  1. Apply enough engine oil to the No. 2 intake valve guide bush, and set it on the cylinder head.


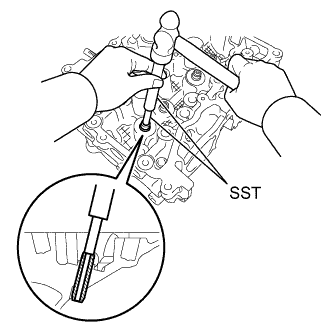
    A278777E01
  1. Using SST and a hammer, tap in the No. 2 intake valve guide bush to the reference line.

    SST
    09201-10000   (09201-01050)
    09950-70010   (09951-07100)

    NOTICE:
    1. Place wooden blocks wrapped in a cloth under the cylinder head and stabilize the cylinder head during servicing.
    2. Use special care not to damage the cylinder head.


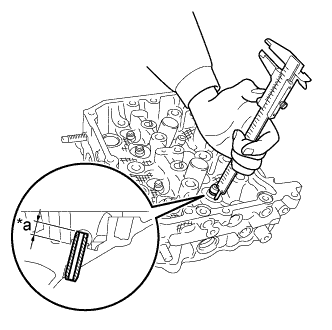
    A278778E01
  1. While measuring the No. 2 intake valve guide bush protrusion amount using a vernier caliper, tap in the No. 2 intake valve guide bush so that its height is within the standard.

    Standard protrusion height:
    11.4 to 11.8 mm (0.449 to 0.466 in.)

    NOTICE:
    1. Place wooden blocks wrapped in a cloth under the cylinder head and stabilize the cylinder head during servicing.
    2. Use special care not to damage the cylinder head.
    HINT:
    Use multiple small repetitions of tap-in and measurement in order not to excessively tap in the No. 2 intake valve guide bush.

    Text in Illustration 
    *a
    Protrusion height

  1. Place the cylinder block on wooden blocks with the combustion chamber side facing upward.

    NOTICE:
    1. Place wooden blocks wrapped in a cloth under the cylinder head and stabilize the cylinder head during servicing.
    2. Use special care not to damage the cylinder head.
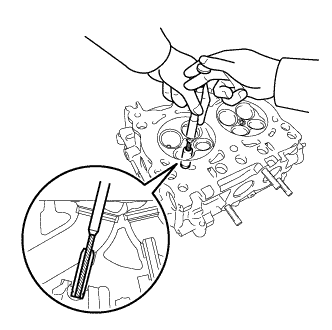


    A281465
  1. Using a reamer, ream the No. 2 intake valve guide bush to obtain the standard clearance between the No. 2 intake valve guide bush and valve stem.

    Standard inside diameter:
    5.500 to 5.512 mm (0.21654 to 0.21701 in.) at 20°C (68°F)

    NOTICE:
    While gradually widening the reamer diameter, ream the No. 2 intake valve guide bush uniformly so that the oil clearance is within the standard.

    HINT:
    1. Apply engine oil to the reamer when reaming.
    2. If the inner surface of No. 2 intake valve guide bush is damaged, slightly grind the edge of the reamer with 400-grit sandpaper.
    3. If the inner surface of No. 2 intake valve guide bush becomes lustrous and the reamer does not chip, use a new reamer or correct the reamer.

  1. After reaming, remove chips and clean the No. 2 intake valve guide bush.

  1. Measure the inside diameter of the No. 2 intake valve guide bush and confirm the oil clearance.

  1. Check the contact condition between the valve and valve seat.


2. REPLACE NO. 2 EXHAUST VALVE GUIDE BUSH
  1. Place the cylinder block on wooden blocks with the combustion chamber side facing upward.


    A279602E01
  1. Using SST and a hammer, tap out the No. 2 exhaust valve guide bush.

    SST
    09201-10000   (09201-01050)
    09950-70010   (09951-07100)

    NOTICE:
    1. Place wooden blocks wrapped in a cloth under the cylinder head and stabilize the cylinder head during servicing.
    2. Use special care not to damage the cylinder head.
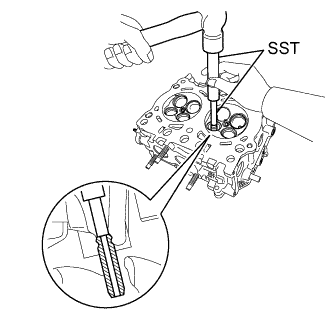
  1. Before installing the No. 2 exhaust valve guide bush, make sure that neither scratches nor damages exist on the inner surface of cylinder head valve guide bush holes.


    A278776E03
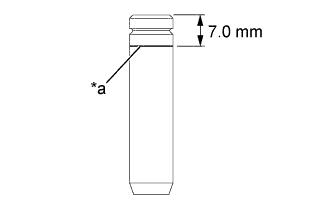
  1. Draw a reference line 7.0 mm (0.276 in.) below from the top face on a new No. 2 exhaust valve guide bush using a marker.
    Text in Illustration 
    *a
    Reference line

    HINT:
    Reference line is used as a guide when tapping-in the No. 2 exhaust valve guide bush.

  1. Place the cylinder block on wooden blocks with the combustion chamber side facing downward.

  1. Apply enough engine oil to the No. 2 exhaust valve guide bush, and set it on the cylinder head.


    A278777E01
  1. Using SST and a hammer, tap in the No. 2 exhaust valve guide bush to the reference line.

    SST
    09201-10000   (09201-01050)
    09950-70010   (09951-07100)

    NOTICE:
    1. Place wooden blocks wrapped in a cloth under the cylinder head and stabilize the cylinder head during servicing.
    2. Use special care not to damage the cylinder head.


    A278778E01
  1. While measuring the No. 2 exhaust valve guide bush protrusion amount using a vernier caliper, tap in the No. 2 exhaust valve guide bush so that its height is within the standard.

    Standard protrusion height:
    11.4 to 11.8 mm (0.449 to 0.466 in.)

    NOTICE:
    1. Place wooden blocks wrapped in a cloth under the cylinder head and stabilize the cylinder head during servicing.
    2. Use special care not to damage the cylinder head.

    HINT:
    Use multiple small repetitions of tap-in and measurement in order not to excessively tap in the No. 2 exhaust valve guide bush.

    Text in Illustration 
    *a
    Protrusion height

  1. Place the cylinder block on wooden blocks with the combustion chamber side facing upward.

    NOTICE:
    1. Place wooden blocks wrapped in a cloth under the cylinder head and stabilize the cylinder head during servicing.
    2. Use special care not to damage the cylinder head.


    A281465
  1. Using a reamer, ream the No. 2 exhaust valve guide bush to obtain the standard clearance between the No. 2 exhaust valve guide bush and valve stem.

    Standard inside diameter:
    5.500 to 5.512 mm (0.21654 to 0.21701 in.) at 20°C (68°F)

    NOTICE:
    While gradually widening the reamer diameter, ream the No. 2 exhaust valve guide bush uniformly so that the oil clearance is within the standard.

    HINT:
    1. Apply engine oil to the reamer when reaming.
    2. If the inner surface of No. 2 exhaust valve guide bush is damaged, slightly grind the edge of the reamer with 400-grit sandpaper.
    3. If the inner surface of No. 2 exhaust valve guide bush becomes lustrous and the reamer does not chip, use a new reamer or correct the reamer.

  1. After reaming, remove chips and clean the No. 2 exhaust valve guide bush.

  1. Measure the inside diameter of the No. 2 exhaust valve guide bush and confirm the oil clearance.

  1. Check the contact condition between the valve and valve seat.