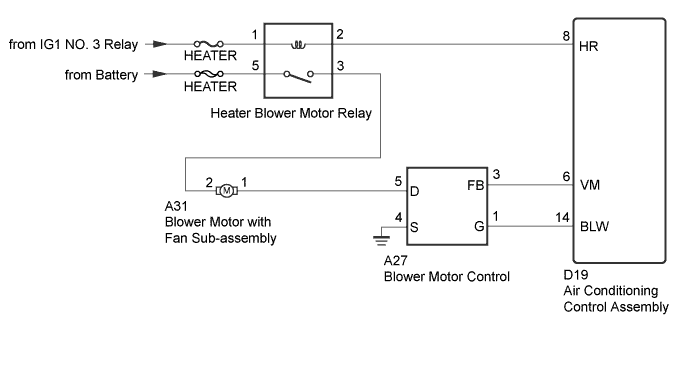
AIR CONDITIONING SYSTEM (for Automatic Air Conditioning System) > Blower Motor Circuit |
| 1.PERFORM ACTIVE TEST USING GTS |
Connect the GTS to the DLC3.
Turn the ignition switch to ON.
Turn the GTS on.
Enter the following menus: Body Electrical / Air Conditioner / Active Test.
Check the operation by referring to the table below.
| Tester Display | Test Part | Control Range | Diagnostic Note |
| Blower Motor | Blower motor with fan sub-assembly | Min.: 0, Max.: 31 | - |
| Result | Proceed to |
| OK | A |
| NG (Blower motor with fan sub-assembly does not operate) | B |
| NG (Blower motor with fan sub-assembly operates but does not change speed) | C |
|
| ||||
|
| ||||
| A | ||
 | ||
| ||
| 2.INSPECT HEATER BLOWER MOTOR RELAY ASSEMBLY |
Remove the heater blower motor relay assembly.
Inspect the heater blower motor relay assembly .
|
| ||||
| OK | |
 |
| 3.CHECK HARNESS AND CONNECTOR (HEATER BLOWER MOTOR RELAY ASSEMBLY - AIR CONDITIONING CONTROL ASSEMBLY) |
Inspect the heater blower motor relay assembly.
Disconnect the D19 air conditioning control assembly.
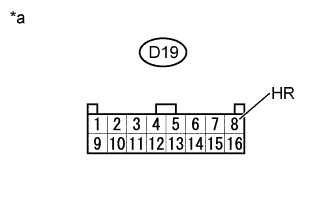 |
Measure the voltage according to the value(s) in the table below.
| Tester Connection | Condition | Specified Condition |
| D19-8(HR) - Body ground | Always | 11 to 14 V |
| *a | Front view of wire harness connector (to Air Conditioning Control Assembly) |
|
| ||||
| OK | |
|
| 4.CHECK HARNESS AND CONNECTOR (BLOWER MOTOR WITH FAN SUB-ASSEMBLY - POWER SOURCE) |
Disconnect the A31 blower motor with fan sub-assembly.
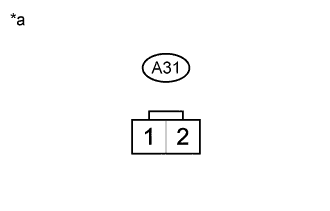 |
Measure the voltage according to the value(s) in the table below.
| Tester Connection | Condition | Specified Condition |
| A31-2 - Body ground | Ignition switch ON Blower switch ON | 11 to 14 V |
| *a | Front view of wire harness connector (to Blower Motor with Fan Sub-assembly) |
|
| ||||
| OK | |
|
| 5.INSPECT BLOWER MOTOR WITH FAN SUB-ASSEMBLY |
Reconnect the blower motor with fan sub-assembly .
Inspect the blower motor with fan sub-assembly .
|
| ||||
| OK | |
|
| 6.CHECK HARNESS AND CONNECTOR (BLOWER MOTOR FAN SUB-ASSEMBLY-BLOWER RESISTOR) |
Disconnect the A27 blower resistor.
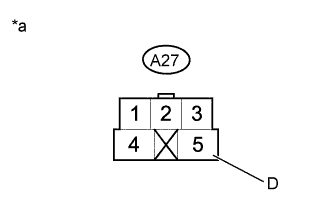 |
Measure the voltage according to the value(s) in the table below.
| Tester Connection | Condition | Specified Condition |
| A27-5(D) - Body ground | Ignition switch ON Blower switch ON | 11 to 14 V |
| *a | Front view of wire harness connector (to blower resistor) |
|
| ||||
| OK | |
|
| 7.CHECK HARNESS AND CONNECTOR (BLOWER MOTOR WITH FAN SUB-ASSEMBLY BODY GROUND) |
Disconnect the A27 air conditioning control assembly connector.
Measure the resistance according to the value(s) in the table below.
| Tester Connection | Condition | Specified Condition |
| A27-4(S) - Body ground | Always | Below 1 Ω |
|
| ||||
| OK | |
|
| 8.CHECK HARNESS AND CONNECTOR (AIR CONDITIONING AMPLIFIER ASSEMBLY - BLOWER MOTOR CONTROL) |
Disconnect the D19 air conditioning control assembly connector.
Measure the resistance according to the value(s) in the table below.
| Tester Connection | Condition | Specified Condition |
| A27-1(G) - D19-14(BLW) | Always | Below 1 Ω |
| A27-3(FB) - D19-6(VM) | Always | Below 1 Ω |
| A27-1(G) - Body ground | Always | 10 kΩ or higher |
| A27-3(FB) - Body ground | Always | 10 kΩ or higher |
|
| ||||
| OK | |
|
| 9.REPLACE BLOWER MOTOR CONTROL |
Replace the blower motor control with a new or normally functioning one .
| NEXT | |
|
| 10.PERFORM ACTIVE TEST USING GTS |
Connect the GTS to the DLC3.
Turn the ignition switch to ON.
Turn the GTS on.
Enter the following menus: Body Electrical / Air Conditioner / Active Test.
Check the operation by referring to the table below.
| Tester Display | Test Part | Control Range | Diagnostic Note |
| Blower Motor | Blower motor with fan sub-assembly | Min.: 0, Max.: 31 | - |
|
| ||||
| OK | ||
| ||
| ||

