Home › Engine / Hybrid System › FA20 ENGINE MECHANICAL › CYLINDER HEAD

CYLINDER HEAD > INSPECTION

for Preparation Click here


1. INSPECT CYLINDER HEAD SUB-ASSEMBLY
  1. Visually check that there are no cracks, scratches or other damage.

  1. Using a dye penetrant, check the important sections for fissures.

  1. Check that there are no signs of gas leak or water leak on gasket attachment surfaces.


  1. Using a precision straightedge and a feeler gauge, measure the surfaces that contact the cylinder block for warpage.
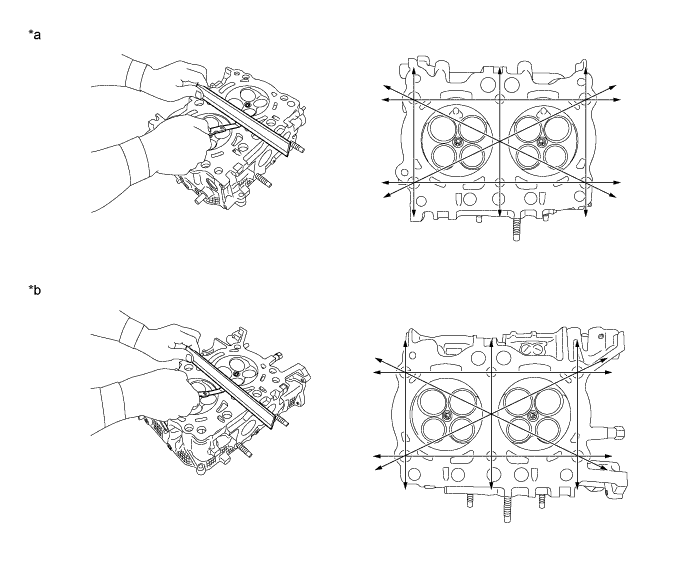

    A278772E01


    Text in Illustration 
    *a
    for Bank 1
    *b
    for Bank 2

    Maximum warpage:
    0.035 mm (0.00138 in.)

    Allowable minimum cylinder head height:
    98.4 mm (3.874 in.)

    Standard cylinder head height:
    98.5 mm (3.878 in.)

    If the warpage is more than the maximum, correct the surface by grinding it or replace the cylinder head sub-assembly.

    HINT:
    1. Measurement should be performed at a temperature of 20°C (68°F).
    2. If the cylinder head sub-assembly bolt tightening torques and tightening angles are uneven, cylinder head sub-assembly warpage may occur. During installation, make sure that tightening torques and tightening angles are correctly obtained.
    3. If the cylinder head sub-assembly is replaced, hand-lap the valve and valve seat with an abrasive compound.
2. INSPECT INTAKE VALVE
  1. Check the valve flange and valve stem for damage, wear or deformation.


    A121380E11
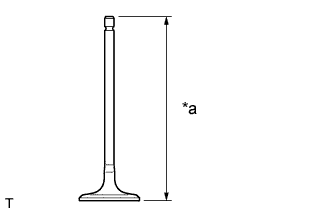
  1. Using a vernier caliper, measure the overall length of the valve.

    Standard overall length:
    104.95 mm (4.13 in.)

    Text in Illustration 
    *a
    Overall Length


    A121379E06
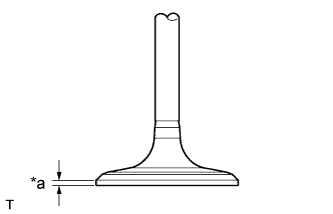
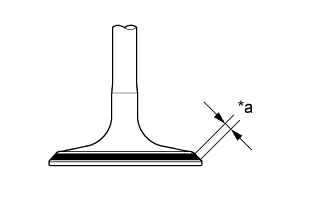
  1. Using a vernier caliper, measure the valve head margin thickness.

    Standard margin thickness:
    0.8 to 1.2 mm (0.0315 to 0.0472 in.)

    Text in Illustration 
    *a
    Margin thickness
    If the margin thickness is not as specified, replace the valve.

    HINT:
    1. It is possible to differentiate between the intake valve and the exhaust valve by their overall length.
    2. If the valve is replaced, hand-lap the valve and valve seat with an abrasive compound.


    A121381
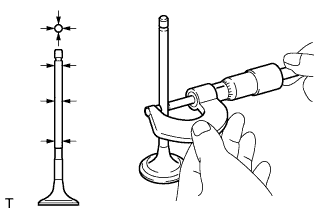
  1. Using a micrometer, measure the diameter of the valve stem.

    Standard valve stem diameter:
    5.455 to 5.470 mm (0.2148 to 0.2154 in.)

    If the valve stem diameter is not as specified, replace the valve.

    HINT:
    1. Measurement should be performed at a temperature of 20°C (68°F).
    2. Measure the valve stem diameter at the 6 locations as shown in the illustration, and take the minimum value.
    3. If the valve is replaced, hand-lap the valve and valve seat with an abrasive compound.


3. INSPECT EXHAUST VALVE
  1. Check the valve flange and valve stem for damage, wear or deformation.


    A121380E11
  1. Using a vernier caliper, measure the overall length of the valve.

    Standard overall length:
    97.57 mm (3.84 in.)

    Text in Illustration 
    *a
    Overall Length


    A121379E06
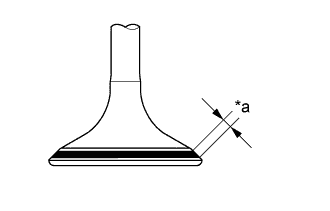
  1. Using a vernier caliper, measure the valve head margin thickness.

    Standard margin thickness:
    1.0 to 1.4 mm (0.039 to 0.055 in.)

    Text in Illustration 
    *a
    Margin thickness
    If the margin thickness is not as specified, replace the valve.

    HINT:
    1. It is possible to differentiate between the intake valve and the exhaust valve by their overall length.
    2. If the valve is replaced, hand-lap the valve and valve seat with an abrasive compound.


    A121381
  1. Using a micrometer, measure the diameter of the valve stem.

    Standard valve stem diameter:
    5.445 to 5.460 mm (0.21437 to 0.21496 in.)

    If the valve stem diameter is not as specified, replace the valve.

    HINT:
    1. Measurement should be performed at a temperature of 20°C (68°F).
    2. Measure the valve stem diameter at the 6 locations as shown in the illustration, and take the minimum value.
    3. If the valve is replaced, hand-lap the valve and valve seat with an abrasive compound.


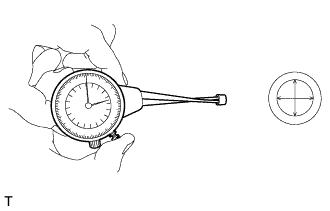
4. INSPECT VALVE GUIDE BUSH OIL CLEARANCE


    A278774
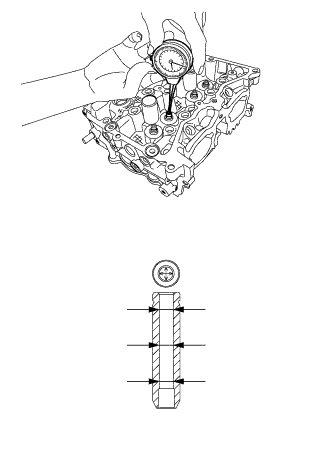
  1. Using a caliper gauge, measure the inside diameter of the valve guide bush.

    Standard valve guide bush inside diameter:
    5.500 to 5.512 mm (0.21654 to 0.21701 in.)

    If the inside diameter is not as specified, replace the valve guide bush.

    HINT:
    1. Measurement should be performed at a temperature of 20°C (68°F).
    2. Measure the inside diameter of the valve guide bush at the 6 locations as shown in the illustration, and take the maximum value.

  1. Calculate the clearance between the valve guide bush and valve stem.

    Standard Oil Clearance:
    Item
    Specified Condition
    Intake
    0.030 to 0.057 mm (0.00118 to 0.00224 in.)
    Exhaust
    0.040 to 0.067 mm (0.00157 to 0.00264 in.)

    If the clearance between valve guide bush and valve stem is more the standard, replace the valve guide bush or valve, whichever shows the greater amount of wear or damage.

    HINT:
    1. Subtract the valve stem diameter measurement from the inside diameter measurement of the valve guide bush.
    2. If the valve is replaced, hand-lap the valve and valve seat with an abrasive compound.


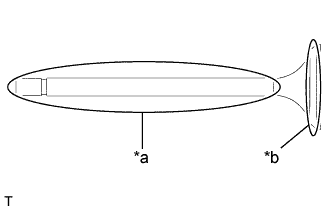
5. INSPECT VALVE ADJUSTING SHIM CLEARANCE
  1. Visually check the valve adjusting shim for damage.


    A278794
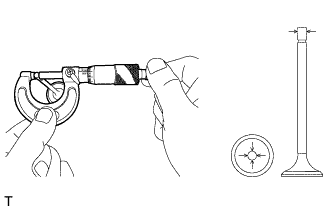
  1. Using a micrometer, measure the valve stem end diameter.

    Standard valve stem end diameter:
    Item
    Specified Condition
    Intake
    5.455 to 5.470 mm (0.21476 to 0.21535 in.)
    Exhaust
    5.445 to 5.460 mm (0.21437 to 0.21496 in.)

    If the valve stem end diameter is not as specified, replace the valve.

    HINT:
    1. Measurement should be performed at a temperature of 20°C (68°F).
    2. Measure the valve stem end diameter at the 2 locations as shown in the illustration, and take the minimum value.
    3. If the valve is replaced, hand-lap the valve and valve seat with an abrasive compound.


    A278780
  1. Using a caliper gauge, measure the inside diameter of the valve adjusting shim.

    Standard valve adjusting shim inside diameter:
    5.500 to 5.560 mm (0.21654 to 0.21890 in.)

    If the inside diameter is not as specified, replace the valve adjusting shim.

    HINT:
    1. Measurement should be performed at a temperature of 20°C (68°F).
    2. Measure the inside diameter of the valve adjusting shim at the 2 locations as shown in the illustration, and take the maximum value.
    3. If the valve adjusting shim needs to be replaced, check the valve clearance and select a suitable one.

  1. Calculate the clearance between the valve adjusting shim and valve stem end.

    Standard Oil Clearance:
    0.030 to 0.115 mm (0.00118 to 0.00453 in.)

    If the clearance between valve adjusting shim and valve stem end exceeds the standard, replace the valve adjusting shim or valve, whichever shows the greater amount of wear or damage.

    HINT:
    1. Subtract the valve stem end diameter measurement from the inside diameter measurement of the valve adjusting shim.
    2. If the valve is replaced, hand-lap the valve and valve seat with an abrasive compound.
    3. If the valve adjusting shim needs to be replaced, check the valve clearance and select a suitable one.


6. INSPECT INTAKE VALVE SEATS
  1. Visually check the valve seat for damage or deformation.

  1. Clean the valve and valve seat.


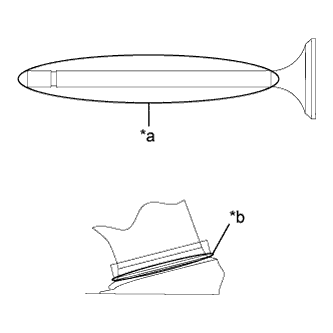
    A278781E01
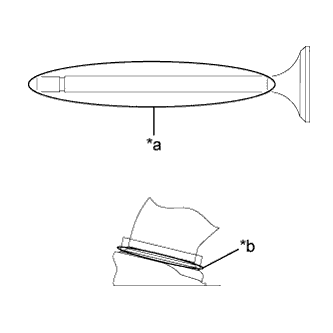
  1. Apply a light coat of engine oil to the valve stem, and a light coat of Prussian blue uniformly to the valve face.
    Text in Illustration 
    *a
    Valve stem
    *b
    Valve face

  1. Insert the valve, and without rotating the valve, lightly press the valve face against the valve seat, and then pull it out.


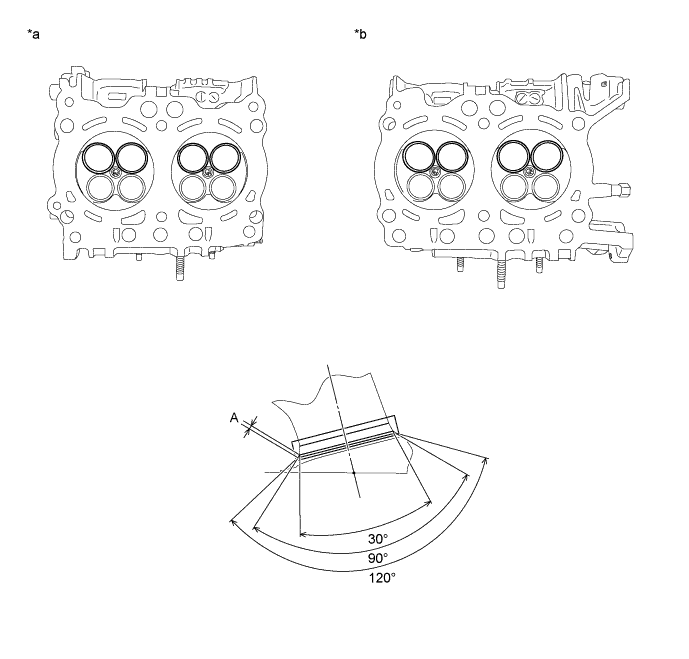
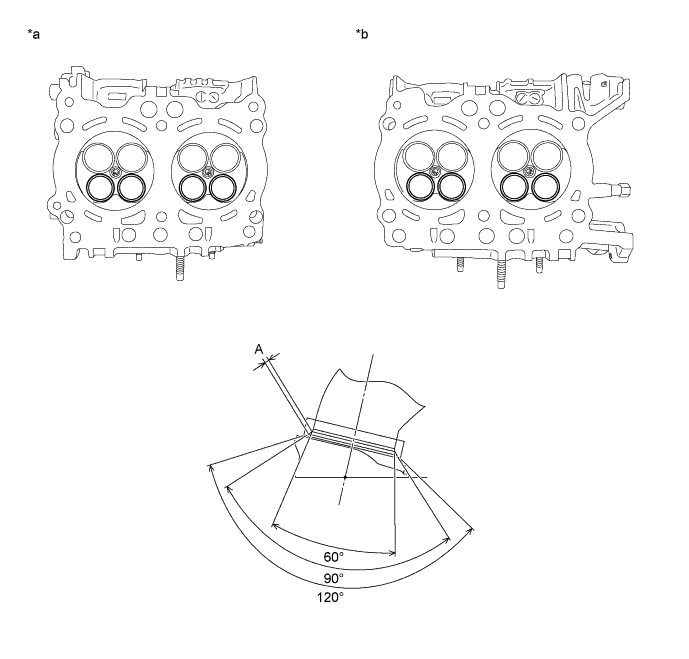
  1. Using a vernier caliper, measure the width of the contact face shown in the illustration.


    A279579E02


    Text in Illustration 
    *a
    for Bank 1
    *b
    for Bank 2

    Standard width (A):
    0.8 to 1.6 mm (0.032 to 0.063 in.)

    If the width is not as specified, repair the valve seat with a cutter.

    HINT:
    1. Measure the width of the Prussian blue adhering to the valve seat.
    2. If the Prussian blue is not continually adhered on the valve seat, hand-lap the valve and valve seat with an abrasive compound.
    3. If the Prussian blue is still not continually adhered on the valve seat after lapping, repair the valve seat with a cutter.

  1. Completely remove the Prussian blue from the valve and valve seat.


    A279580E01
  1. Apply a light coat of engine oil to the valve stem, and a light coat of Prussian blue uniformly to the valve seat face.
    Text in Illustration 
    *a
    Valve stem
    *b
    Contact face

  1. Insert the valve, and without rotating the valve, lightly press the valve face against the valve seat, and then pull it out.


    A281044E01
  1. Check the location of the contact face shown in the illustration.

    Standard contact face location:
    Middle of the valve face at all circumference

    Text in Illustration 
    *a
    Contact face location
    If the seat contact is not in the middle of the valve face, repair the valve seat with a cutter.

    HINT:
    Check the location of the Prussian blue adhering to the valve face.

  1. Completely remove the Prussian blue from the valve and valve seat.


7. INSPECT EXHAUST VALVE SEATS
  1. Visually check the valve seat for damage or deformation.

  1. Clean the valve and valve seat.


    A278781E01
  1. Apply a light coat of engine oil to the valve stem, and a light coat of Prussian blue uniformly to the valve face.
    Text in Illustration 
    *a
    Valve stem
    *b
    Valve face

  1. Insert the valve, and without rotating the valve, lightly press the valve face against the valve seat, and then pull it out.


  1. Using a vernier caliper, measure the width of the contact face shown in the illustration.


    A279603E01


    Text in Illustration 
    *a
    for Bank 1
    *b
    for Bank 2

    Standard width (A):
    1.1 to 1.7 mm (0.043 to 0.067 in.)

    If the width is not as specified, repair the valve seat with a cutter.

    HINT:
    1. Measure the width of the Prussian blue adhering to the valve seat.
    2. If the Prussian blue is not continually adhered on the valve seat, hand-lap the valve and valve seat with an abrasive compound.
    3. If the Prussian blue is still not continually adhered on the valve seat after lapping, repair the valve seat with a cutter.

  1. Completely remove the Prussian blue from the valve and valve seat.


    A279604E01
  1. Apply a light coat of engine oil to the valve stem, and a light coat of Prussian blue uniformly to the valve seat face.
    Text in Illustration 
    *a
    Valve stem
    *b
    Contact face

  1. Insert the valve, and without rotating the valve, lightly press the valve face against the valve seat, and then pull it out.


    A281045E01
  1. Check the location of the contact face shown in the illustration.

    Standard contact face location:
    Middle of the valve face at all circumference

    Text in Illustration 
    *a
    Contact face location
    If the seat contact is not in the middle of the valve face, repair the valve seat with a cutter.

    HINT:
    Check the location of the Prussian blue adhering to the valve face.

  1. Completely remove the Prussian blue from the valve and valve seat.


8. INSPECT VALVE SPRING
  1. Visually check the valve spring for damage or deformation.


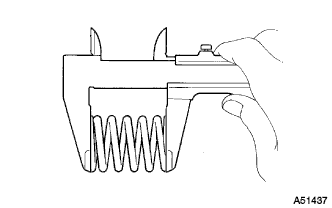
    A051437
  1. Using a vernier caliper, measure the free length of the valve spring.

    Standard free length:
    41.06 mm (1.617 in.)

    If the free length is not as specified, replace the spring.

    HINT:
    Measurement should be performed at a temperature of 20°C (68°F).


    A146307E01
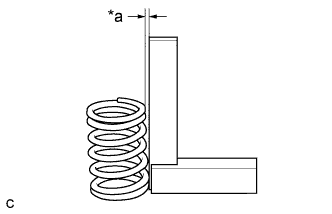
  1. Using a steel square, measure the deviation of the valve spring.

    Maximum deviation:
    Less than 1.8 mm (0.0710 in.)

    Maximum angle:
    2.5°

    Text in Illustration 
    *a
    Deviation
    If the result is not as specified, replace the valve spring.

    HINT:
    1. Measurement should be performed at a temperature of 20°C (68°F).
    2. To measure deviation of the valve spring, stand the valve spring on a level surface and measure its deviation at the top of the valve spring using a steel square.