Home › Drivetrain · TX6A AUTOMATIC TRANSMISSION / TRANSAXLE › AUTOMATIC TRANSMISSION FLUID

AUTOMATIC TRANSMISSION FLUID > ADJUSTMENT

for Preparation Click here


C210202E04

NOTICE:
  1. This transmission requires Toyota Genuine ATF WS.
  2. After servicing the transmission, you must follow the ATF adjustment procedure.
  3. Maintain the vehicle in a horizontal position while adjusting the fluid level.


1. BEFORE FILLING TRANSMISSION
  1. When you have replaced the entire automatic transmission, automatic transmission oil pan, drain plug, transmission valve body and/or torque converter, proceed to the "TRANSMISSION FILL" procedures.
  2. When you have replaced the automatic transmission extension housing oil seal and/or repaired a fluid leak, proceed to the "FLUID TEMPERATURE CHECK" procedures.


2. FILL TRANSMISSION PAN WITH FLUID
  1. Lift the vehicle.

    NOTICE:
    Set the vehicle on a lift so that the vehicle is kept level when it is lifted up (make sure that the tilt angle from the front to rear of the vehicle is within +/- 1°).

  1. Remove the No. 2 engine under cover .


    C258469E01
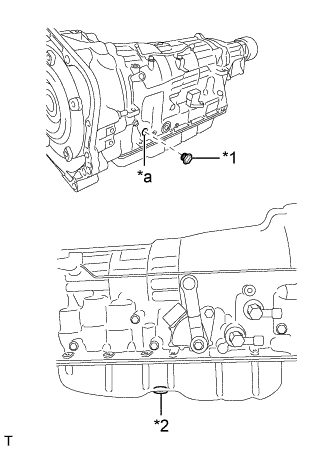
  1. Remove the refill plug with O-ring, overflow plug and gasket.
    Text in Illustration 
    *1
    Refill Plug
    *2
    Overflow Plug
    *a
    Refill Hole


    C113723E07
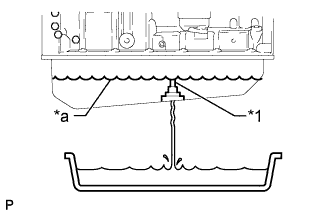
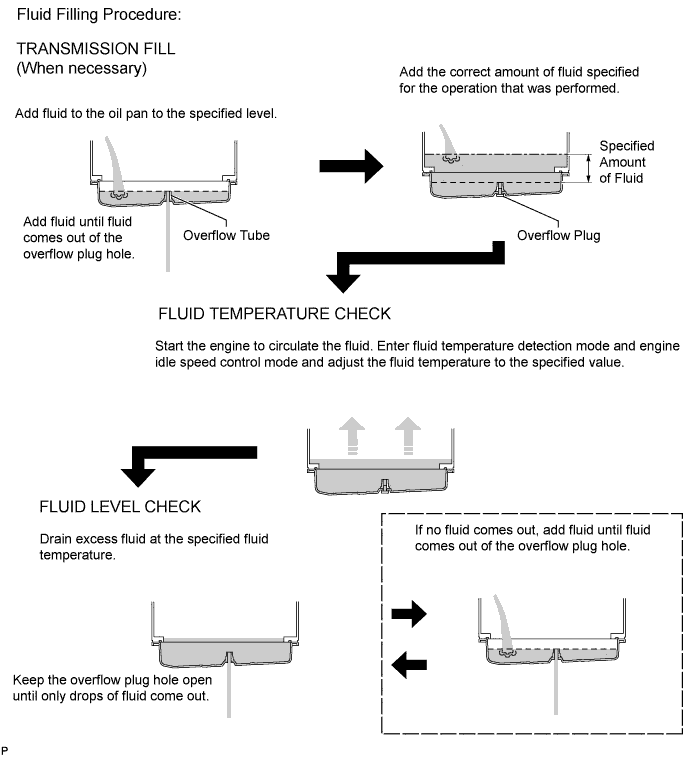
  1. Fill the transmission through the refill hole until fluid begins to trickle out of the overflow tube.
    Text in Illustration 
    *1
    Overflow Tube
    *a
    Specified Fluid Level

  1. Wait until the fluid flow slows and only drops come out.

  1. Temporarily install the overflow plug and gasket.

    HINT:
    Reuse the old gasket. The overflow plug will be removed again to adjust the fluid level.

  1. Fill the transmission with the amount of fluid listed in the table below.

    Reference Capacity:
    Performed Repair
    Fill Amount
    Automatic transmission oil pan and drain plug removal/installation
    2.0 liters (2.1 US qts, 1.8 Imp. qts)
    Transmission valve body removal/installation
    3.0 liters (3.2 US qts, 2.6 Imp. qts)
    Torque converter removal/installation
    4.5 liters (4.8 US qts, 4.0 Imp. qts)

    HINT:
    If you cannot fill the listed amount of fluid, perform the following:


    1. Temporarily install the refill plug with O-ring.

      HINT:
      Reuse the old O-ring. The refill plug will be removed again to adjust the fluid level.

    2. Start the engine and idle it.

      NOTICE:
      Check that electrical systems such as the air conditioning system, audio system and lighting system are off.

    3. Slowly move the shift lever from P to M. Then return the shift lever to P.

      HINT:
      Slowly move the shift lever to circulate the fluid through each part of the transmission.

    4. Wait for 30 seconds with the engine idling.

    5. Stop the engine.

    6. Remove the refill plug with O-ring.

    7. Fill the transmission with the remaining fluid until the amount in the table has been filled.

  1. Temporarily install the refill plug with O-ring.

    HINT:
    Reuse the old O-ring. The refill plug will be removed again to adjust the fluid level.

  1. Lower the vehicle.


3. FLUID TEMPERATURE CHECK

NOTICE:
The ATF temperature can be confirmed by using the GTS.

  1. Turn the ignition switch OFF.

  1. Connect the GTS to the DLC3.

  1. Turn the ignition switch to ON.

  1. Enter the following menus: Powertrain / ECT / Data List / A/T Oil Temperature 1.

  1. Check the ATF temperature.

    NOTICE:
    If the ATF temperature is higher than 43°C (109°F), turn the ignition switch OFF and wait until the fluid temperature drops to below 43°C (109°F).


4. FLUID LEVEL CHECK

CAUTION:
  1. It is necessary to change to temperature detection mode in order to idle the vehicle appropriately.
  2. The ATF temperature must be between 43 and 47°C (109 and 117°F) to accurately check the fluid level.

  1. When using the GTS:
    Enter the following menus: Powertrain / ECT / Active Test / Connect the TC and TE1.
    Standard condition:
    Indicator lights in the combination meter blink.


    C217398E02
  1. When not using the GTS:
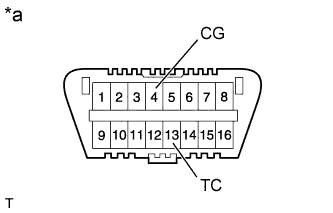
    Using SST, connect terminals 13 (TC) and 4 (CG) of the DLC3.
    Text in Illustration 
    *a
    Front view of DLC3

    SST
    09843-18040  

    Standard condition:
    Indicator lights in the combination meter blink.

  1. Start the engine and idle it.

    NOTICE:
    Check that electrical systems such as the air conditioning system, audio system and lighting system are off.

  1. Slowly move the shift lever from P to M. Then return the shift lever to P.
    HINT:
    Slowly move the shift lever to circulate the fluid through each part of the transmission.


    C258470
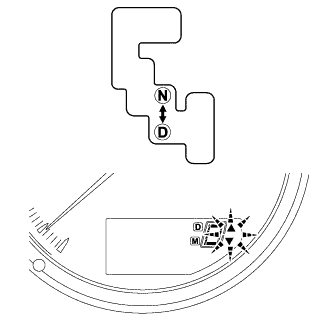
  1. Move the shift lever to D, and then quickly move it back and forth between N and D (once within 1.5 seconds) for at least 6 seconds. This will activate the fluid temperature detection mode.

    Standard condition:
    When switching to the oil temperature detecting mode, regardless of the shift position, the indicator lights [▲] and [▼] turn on for 2 seconds, and then go off.

  1. When using the GTS:
    Return the shift lever to P and terminate the Active Test on the GTS.

  1. When not using the GTS:
    Return the shift lever to P and disconnect SST from the DLC3.

  1. While watching the state of the indicator lights [▲] and [▼], idle the engine to rise the oil temperature.

    NOTICE:
    If only the indicator light [▲] turns on or the indicator lights [▲] and [▼] turn on simultaneously, stop the operation. And then, wait until the fluid temperature is lowered and only the indicator light [▼] turns on in the oil temperature detecting mode.

  1. Allow the engine to idle until the fluid temperature reaches 43 to 47°C (109 to 117°F).

    Indicator [D] Indication of ATF Temperature:

    Below Proper Temperature
    Proper Temperature
    Higher than Proper Temperature
    Below 43°C (109°F)
    43 to 47°C (109 to 117°F)
    Higher than 47°C (117°F)
    Indicator lights [▼] turns on
    Indicator lights [▲] and [▼] turn on
    Indicator lights [▲] turns on


    C113723E07
  1. Remove the overflow plug and gasket with the engine idling.
    Text in Illustration 
    *1
    Overflow Tube
    *a
    Specified Fluid Level

  1. Wait until the overflow slows to a trickle.

    NOTICE:
    If the fluid does not overflow, perform the following:


    1. Remove the refill plug with O-ring.

    2. Refill the transmission through the refill hole until fluid begins to trickle out of the overflow tube.

    3. Wait until the overflow slows to a trickle.

  1. Install the overflow plug and a new gasket.

    Torque:
    20 N*m{ 204 kgf*cm , 15 ft.*lbf }

  1. Coat a new O-ring with ATF and install it to the refill plug.

  1. Install the refill plug with O-ring.

    Torque:
    39 N*m{ 400 kgf*cm , 29 ft.*lbf }

  1. Install the No. 2 engine under cover .

  1. Lower the vehicle.


5. COMPLETE
  1. Turn the ignition switch OFF.

  1. When using the GTS:
    Disconnect the GTS from the DLC3.

  1. Inspect for automatic transmission fluid leak.