 |
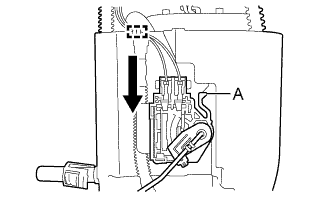
Slide the No. 2 fuel sender gauge assembly downwards and attach the claw labeled A to install the No. 2 fuel sender gauge assembly.
 | Slide |
FUEL SENDER GAUGE ASSEMBLY > INSTALLATION |
| 1. INSTALL NO. 2 FUEL SENDER GAUGE ASSEMBLY |
|
Slide the No. 2 fuel sender gauge assembly downwards and attach the claw labeled A to install the No. 2 fuel sender gauge assembly.
| Slide |
Connect the No. 2 fuel sender gauge assembly connector.
| 2. INSTALL FUEL TANK RETURN TUBE |
Install a new gasket to the fuel tank assembly.
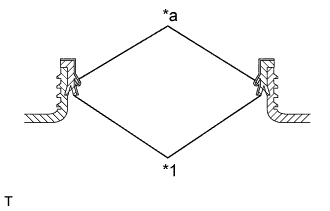 |
Apply a light coat of gasoline to a gasket.
| *1 | Gasket |
| *a | Application area |
Engage the clamp to install the tube and set the fuel tank return tube into the fuel tank assembly.
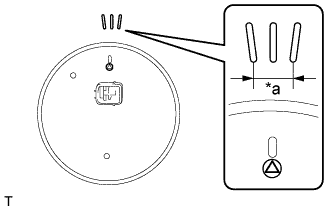 |
Set the fuel suction tube assembly with pump and gauge within the fuel tank assembly installation position marks.
| *a | Installation position marks |
Attach a new sheet ring and fuel pump gauge retainer, and temporarily tighten the fuel pump gauge retainer.
Temporarily install SST (plate and 4 claws) to the fuel pump gauge retainer.
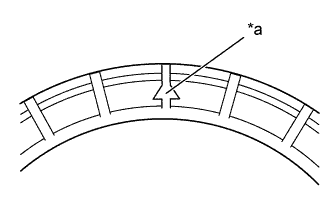 |
| *a | Marked Part |
While securely pressing SST (claws) against the fuel pump gauge retainer ribs, tighten the 4 bolts.
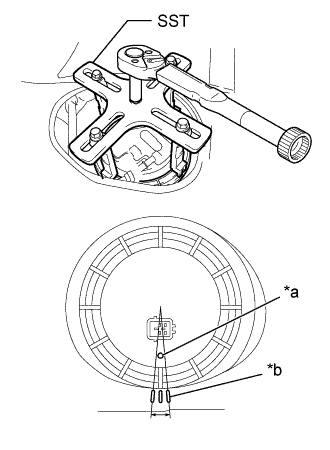 |
Using SST, tighten the fuel pump gauge retainer.
| *a | Position mark |
| *b | Installation position marks |
| 3. INSTALL FUEL SENDER GAUGE ASSEMBLY |
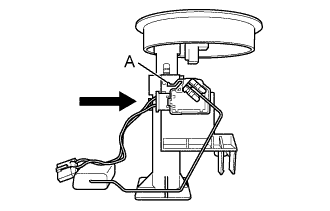 |
Slide the fuel sender gauge assembly downwards and attach the claw labeled A to install the fuel sender gauge assembly.
| Slide |
Connect the fuel pump harness to the 2 clamps.
Connect the fuel sender gauge assembly connector.
| 4. INSTALL FUEL SUCTION TUBE ASSEMBLY WITH PUMP AND GAUGE |
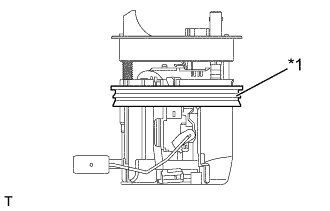 |
Set the new gasket to the fuel suction tube assembly with pump and gauge.
| *1 | Gasket |
Connect the fuel tank vent hose sub-assembly (Click here).
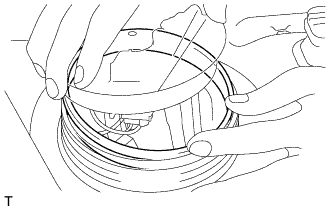 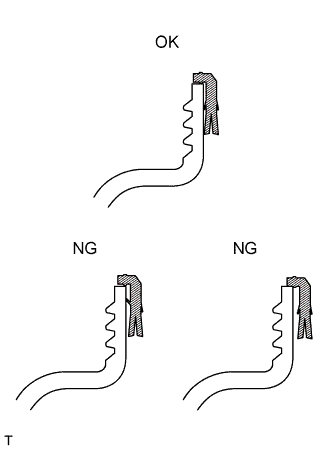 |
Insert the fuel suction tube assembly with pump and gauge inside the fuel tank assembly, and then attach the new gasket which has already been mounted on the fuel suction tube assembly with pump and gauge to the fuel tank assembly.
|
Apply a light coat of gasoline to a gasket.
| *1 | Gasket |
| *a | Application area |
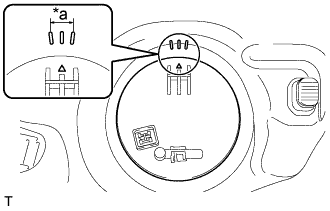 |
Set the fuel suction tube assembly with pump and gauge within the fuel tank assembly installation position marks.
| *a | Installation position marks |
Attach a new sheet ring and fuel pump gauge retainer, and temporarily tighten the fuel pump gauge retainer.
Temporarily install SST (plate and 4 claws) to the fuel pump gauge retainer.
|
| *a | Marked Part |
While securely pressing SST (claws) against the fuel pump gauge retainer ribs, tighten the 4 bolts.
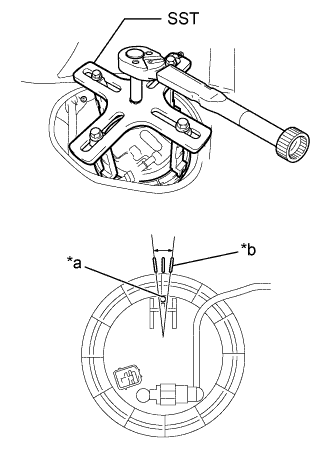 |
Using SST, tighten the fuel pump gauge retainer.
| *a | Position mark |
| *b | Installation position marks |
Engage the clamp to install the fuel tank main tube to the fuel tank assembly.
Connect the fuel tank main tube (Click here).
| 5. CONNECT CABLE TO NEGATIVE BATTERY TERMINAL |
| 6. INSPECT FOR FUEL LEAK |
Connect the GTS to the DLC3.
Turn the ignition switch to ON.
Turn the GTS on.
Enter the following menus: Power train / Engine / Active Test / Control the Fuel Pump / Speed.
Check the fuel pump operation.
Check for pressure in the fuel inlet tube from the fuel line. Check that sound of fuel flowing in the fuel tank can be heard.
If no sound can be heard, check the EFI MAIN 1 relay, fuel pump, ECM and wiring connector.
Inspect for fuel leaks.
Check that there are no fuel leaks anywhere on the system after performing maintenance.
If there is a fuel leak, repair or replace parts as necessary.
| 7. INSTALL NO. 2 REAR FLOOR SERVICE HOLE COVER |
Connect the fuel suction tube assembly with pump and gauge connector.
Install the No. 2 rear floor service hole cover with new butyl tape.
| 8. INSTALL REAR FLOOR SERVICE HOLE COVER |
Connect the fuel tank return tube connector.
Install the rear floor service hole cover with new butyl tape.
| 9. INSTALL SEPARATE TYPE REAR SEAT CUSHION ASSEMBLY LH |
Engage the hook and install the separate type rear seat cushion assembly LH.
Install the bolt.
| 10. INSTALL SEPARATE TYPE REAR SEAT CUSHION ASSEMBLY RH |