Home › Engine / Hybrid System › FA20 FUEL › FUEL SENDER GAUGE ASSEMBLY

FUEL SENDER GAUGE ASSEMBLY > REMOVAL

for Preparation Click here


1. DISCHARGE FUEL SYSTEM PRESSURE
(Click here)


2. DISCONNECT CABLE FROM NEGATIVE BATTERY TERMINAL


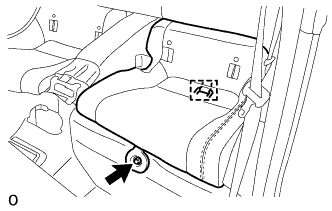
3. REMOVE SEPARATE TYPE REAR SEAT CUSHION ASSEMBLY LH


    B299993
  1. Remove the bolt.

  1. Disengage the hook and remove the separate type rear seat cushion assembly LH.


4. REMOVE SEPARATE TYPE REAR SEAT CUSHION ASSEMBLY RH

HINT:
Use the same procedure as for the LH side.


5. REMOVE NO. 2 REAR FLOOR SERVICE HOLE COVER


    A277991
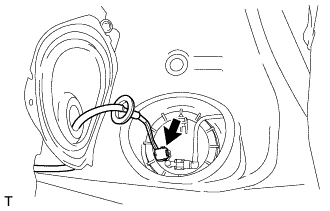
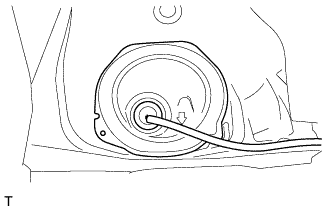
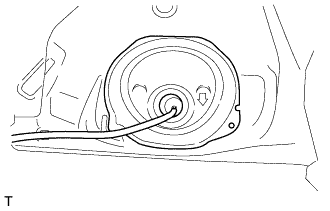
  1. Remove the No. 2 rear floor service hole cover.


    A277992
  1. Disconnect the fuel suction tube assembly with pump and gauge connector.


6. REMOVE FUEL SUCTION TUBE ASSEMBLY WITH PUMP AND GAUGE


    A277993
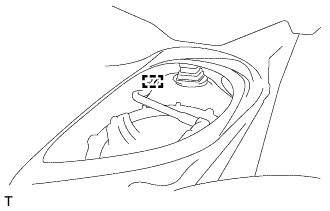
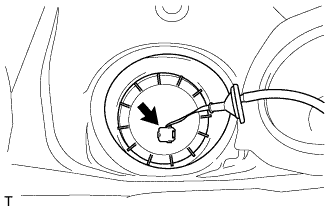
  1. Disconnect the fuel tank main tube (Click here).


    A278269
  1. Disengage the clamp and separate the fuel tank main tube from the fuel tank assembly.


  1. Remove the fuel pump gauge retainer.


      A291071E01
      A291075E01
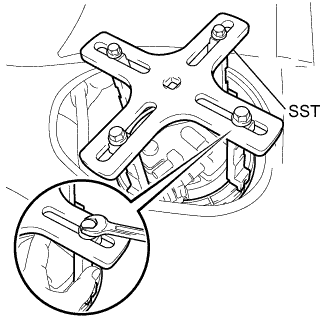
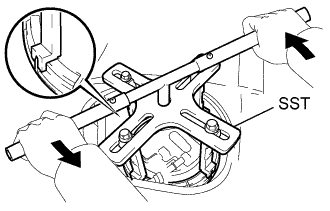
    1. Temporarily install SST to the fuel pump gauge retainer.

      SST
      09808-14030   (09808-01010, 09808-01020, 09808-01030, 09808-01050)
      09808-01071  

      NOTICE:
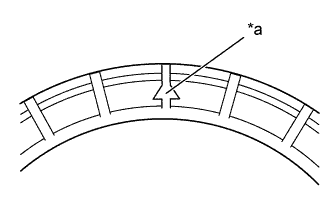
      Do not apply a claw of SST at the marked part.

      Text in Illustration 
      *a
      Marked Part

      HINT:
      1. Be sure to use SST (claws) as shown in the illustration.
      2. Engage SST (claws) securely with the fuel pump gauge retainer ribs to secure SST.

    2. While securely pressing SST (claws) against the fuel pump gauge retainer ribs, tighten the 4 bolts.

    3. Install SST (handle).


    4. A291072E01
    5. Lightly press down on SST to prevent it from separating from the fuel pump gauge retainer. While pressing SST, rotate the handle slowly to loosen the fuel pump gauge retainer.

      NOTICE:
      1. Do not use any tools other than those specified in this operation. Damage to the fuel pump gauge retainer or fuel tank may result.
      2. Do not press down on SST excessively as this may make the fuel pump gauge retainer hard to rotate and may damage components.
      3. Make sure to rotate SST (handle) horizontally. If SST (handle) is rotated at an angle, SST may come off.
      4. Do not spin SST too fast or use an impact wrench as this may result in damage to components.
      5. If SST comes off of the fuel pump gauge retainer, loosen SST (bolts) and reinstall SST.


    6. A280571
    7. Disconnect the fuel tank vent hose sub-assembly (Click here).

    8. Remove the fuel suction tube assembly with pump and gauge from the fuel tank assembly.

      NOTICE:
      1. Do not pull the fuel return vent tube sub-assembly forcibly when disconnecting the fuel return vent tube sub-assembly.
      2. Be careful not to bend the arm of the fuel sender gauge assembly.
      3. Do not rotate the fuel suction tube assembly inside the fuel tank assembly, as doing so may bend the fuel sender gauge arm section.
      4. Be sure not to spill the fuel remaining in the fuel suction tube assembly on the exterior of the fuel tank assembly or interior of the vehicle.

    9. Remove the gasket from the fuel tank assembly.


7. REMOVE FUEL SENDER GAUGE ASSEMBLY


    A278283
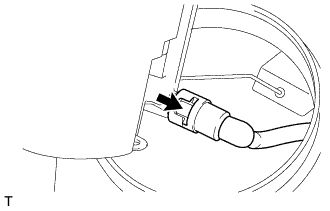
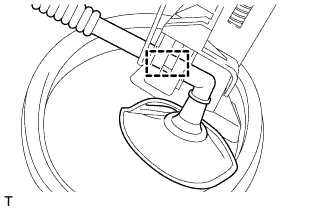
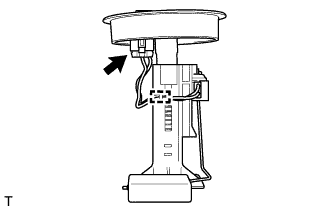
  1. Disconnect the fuel sender gauge assembly connector.

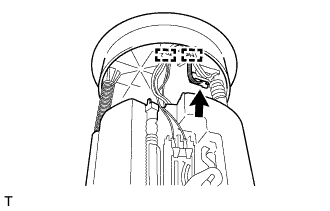
  1. Disconnect the fuel pump harness from the 2 clamps.


    A281943E01
  1. Disconnect the fuel pump harness from the clamp.

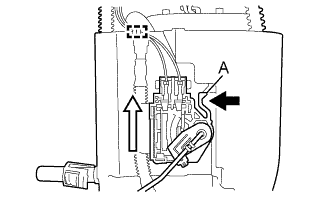
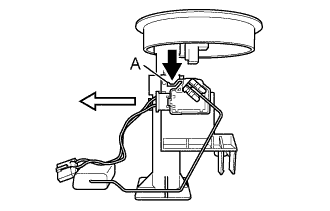
  1. Push the claw labeled A of the fuel sender gauge assembly, and then pull up the fuel sender gauge assembly to remove it.

    NOTICE:
    Be careful not to bend the arm of the fuel sender gauge assembly.

    Text in Illustration  
    V100135
    Push
    V100136
    Pull up


8. REMOVE REAR FLOOR SERVICE HOLE COVER


    A277986
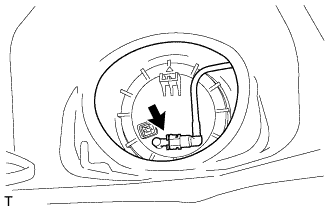
  1. Remove the rear floor service hole cover.


    A277987
  1. Disconnect the fuel tank return tube connector.


9. REMOVE FUEL TANK RETURN TUBE


    A291071E01
    A291075E01
  1. Temporarily install SST to the fuel pump gauge retainer.

    SST
    09808-14030   (09808-01010, 09808-01020, 09808-01030, 09808-01050)
    09808-01071  

    NOTICE:
    Do not apply a claw of SST at the marked part.

    Text in Illustration 
    *a
    Marked Part

    HINT:
    1. Be sure to use SST (claws) as shown in the illustration.
    2. Engage SST (claws) securely with the fuel pump gauge retainer ribs to secure SST.

  1. While securely pressing SST (claws) against the fuel pump gauge retainer ribs, tighten the 4 bolts.

  1. Install SST (handle).


    A291072E01
  1. Lightly press down on SST to prevent it from separating from the fuel pump gauge retainer. While pressing SST, rotate the handle slowly to loosen the fuel pump gauge retainer.

    NOTICE:
    1. Do not use any tools other than those specified in this operation. Damage to the fuel pump gauge retainer or fuel tank may result.
    2. Do not press down on SST excessively as this may make the fuel pump gauge retainer hard to rotate and may damage components.
    3. Make sure to rotate SST (handle) horizontally. If SST (handle) is rotated at an angle, SST may come off.
    4. Do not spin SST too fast or use an impact wrench as this may result in damage to components.
    5. If SST comes off of the fuel pump gauge retainer, loosen SST (bolts) and reinstall SST.

  1. Remove the fuel pump gauge retainer.


    A281946
  1. Disengage the clamp and separate the fuel tank vent hose sub-assembly from the fuel tank return tube.

  1. Remove the fuel tank return tube from the fuel tank assembly.

    NOTICE:
    Be careful not to bend the arm of the No. 2 fuel sender gauge assembly.

  1. Remove the gasket from the fuel tank assembly.


10. REMOVE NO. 2 FUEL SENDER GAUGE ASSEMBLY


    A277989
  1. Disconnect the No. 2 fuel sender gauge assembly connector.

  1. Disconnect the fuel pump harness from the clamp.


    A281944E01
  1. Push the claw labeled A of the No. 2 fuel sender gauge assembly, and then pull up the No. 2 fuel sender gauge assembly to remove it.
    Text in Illustration  
    V100135
    Push
    V100136
    Pull up