 |
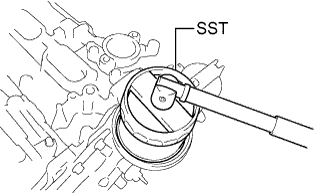
Using SST, remove the oil filter sub-assembly.
- SST
- 09228-22020
ENGINE UNIT > DISASSEMBLY |
| 1. REMOVE OIL FILLER CAP |
Remove the oil filler cap.
| 2. REMOVE OIL FILTER SUB-ASSEMBLY |
|
Using SST, remove the oil filter sub-assembly.
| 3. REMOVE OIL FILTER UNION |
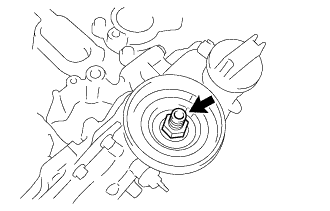 |
Remove the oil filter union.
| 4. REMOVE E.F.I. ENGINE COOLANT TEMPERATURE SENSOR |
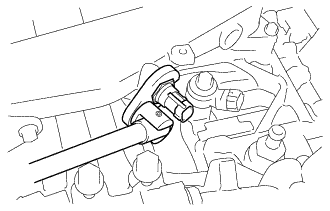 |
Using a 19 mm union nut wrench, remove the E.F.I. engine coolant temperature sensor.
| 5. REMOVE KNOCK CONTROL SENSOR |
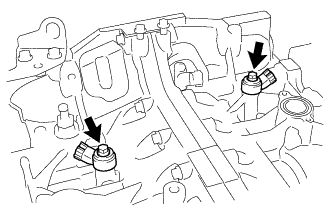 |
Remove the 2 bolts and 2 knock control sensors.
| 6. REMOVE CRANK POSITION SENSOR |
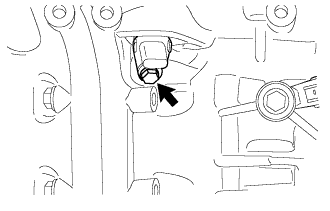 |
Remove the bolt and crank position sensor.
| 7. REMOVE VVT SENSOR |
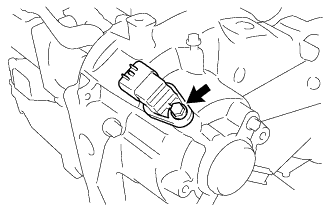 |
Remove the bolt and VVT sensor (for intake side of bank 1).
Remove the O-ring from the VVT sensor.
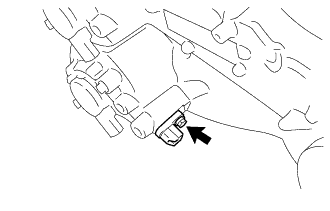 |
Remove the bolt and VVT sensor (for exhaust side of bank 1).
Remove the O-ring from the VVT sensor.
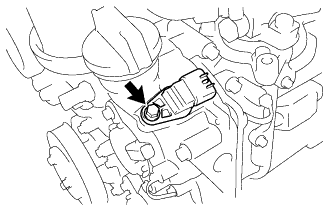 |
Remove the bolt and VVT sensor (for intake side of bank 2).
Remove the O-ring from the VVT sensor.
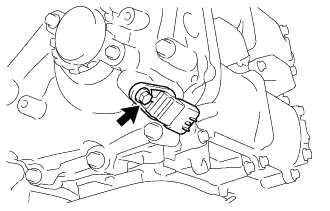 |
Remove the bolt and VVT sensor (for exhaust side of bank 2).
Remove the O-ring from the VVT sensor.
| 8. REMOVE CAMSHAFT TIMING OIL CONTROL VALVE |
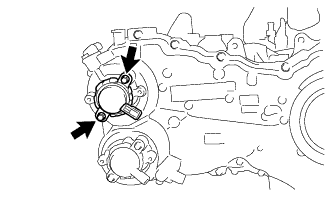 |
Remove the 2 bolts and camshaft timing oil control valve (for intake side of bank 1).
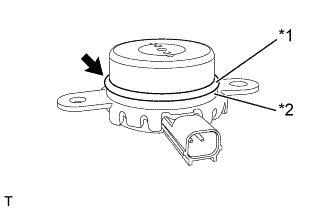 |
Remove the O-ring from the camshaft timing oil control valve.
Remove the back-up ring from the camshaft timing oil control valve.
| *1 | O-ring |
| *2 | Back-up Ring |
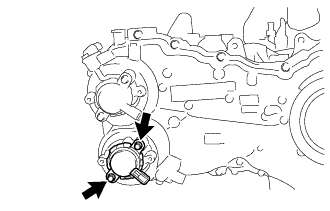 |
Remove the 2 bolts and camshaft timing oil control valve (for exhaust side of bank 1).
Remove the O-ring from the camshaft timing oil control valve.
Remove the back-up ring from the camshaft timing oil control valve.
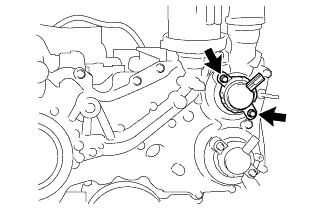 |
Remove the 2 bolts and camshaft timing oil control valve (for intake side of bank 2).
Remove the O-ring from the camshaft timing oil control valve.
Remove the back-up ring from the camshaft timing oil control valve.
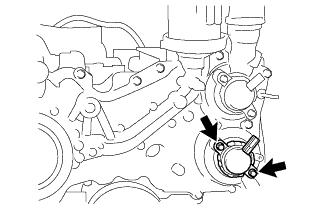 |
Remove the 2 bolts and camshaft timing oil control valve (for exhaust side of bank 2).
Remove the O-ring from the camshaft timing oil control valve.
Remove the back-up ring from the camshaft timing oil control valve.
| 9. REMOVE ENGINE OIL TEMPERATURE SENSOR |
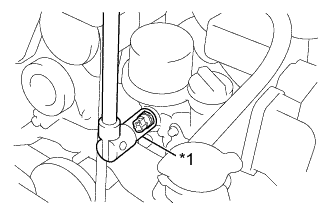 |
Using a 19 mm deep socket wrench, remove the engine oil temperature sensor.
| *1 | 19 mm Deep Socket Wrench |
| 10. REMOVE ENGINE OIL PRESSURE SWITCH ASSEMBLY |
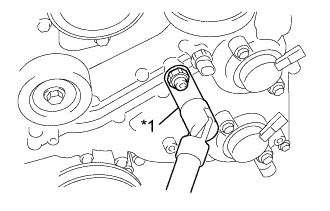 |
Using a 24 mm deep socket wrench, remove the engine oil pressure switch assembly.
| *1 | 24 mm deep socket wrench |
| 11. REMOVE PCV HOSE CONNECTOR |
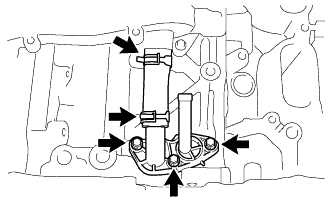 |
Remove the 3 bolts and PCV hose connector.
Loosen the 2 clips and remove the No. 2 water by-pass hose from the PCV hose connector.
| 12. REMOVE VACUUM PUMP ASSEMBLY (for Automatic Transmission) |
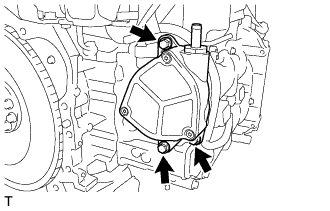 |
Remove the 3 bolts and vacuum pump assembly.
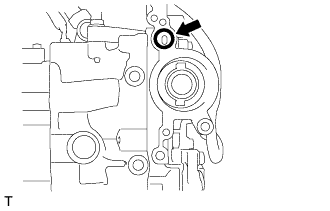 |
Remove the O-ring.
Remove the seal packing from the vacuum pump assembly and the engine.
| 13. REMOVE REAR CYLINDER HEAD PLATE (for Manual Transmission) |
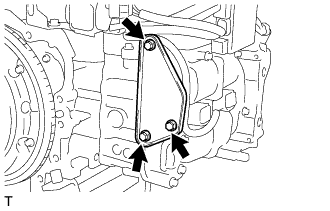 |
Remove the 3 bolts and rear cylinder head plate.
| 14. REMOVE WATER INLET PIPE |
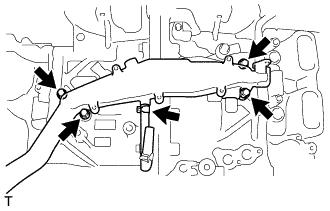 |
Disconnect the No. 3 water by-pass hose.
Remove the 4 bolts and water inlet pipe.
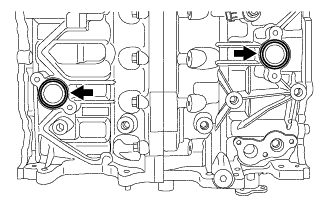 |
Remove the 2 O-rings from the cylinder block.
| 15. REMOVE PCV VALVE SUB-ASSEMBLY |
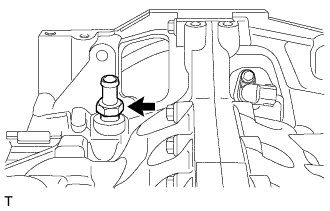 |
Using a 19 mm deep socket wrench, remove the PCV valve sub-assembly.
| 16. REMOVE NO. 1 IDLER PULLEY SUB-ASSEMBLY |
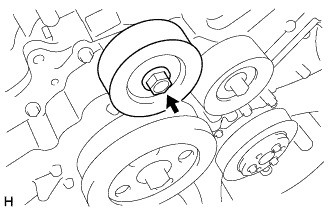 |
Remove the bolt, No. 1 idler pulley sub-assembly and idler pulley cover.
| 17. REMOVE NO. 1 IDLER PULLEY SUB-ASSEMBLY |
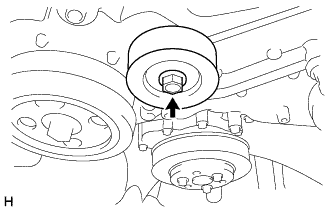 |
Remove the bolt, No. 1 idler pulley sub-assembly and idler pulley cover.
| 18. REMOVE WATER PUMP PULLEY |
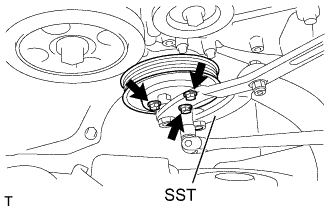 |
Using SST, hold the water pump pulley.
Remove the 3 bolts and water pump pulley.
| 19. REMOVE ENGINE WATER PUMP ASSEMBLY |
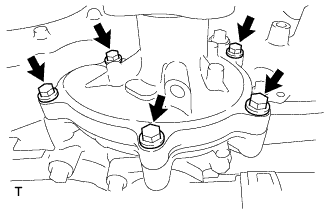 |
Remove the 5 bolts, engine water pump assembly and gasket.
| 20. REMOVE WATER OUTLET |
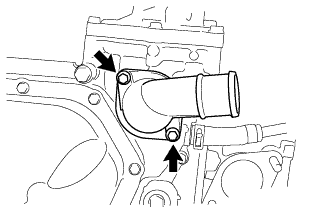 |
Remove the 2 bolts and water outlet.
| 21. REMOVE THERMOSTAT |
Remove the thermostat.
Remove the gasket from the thermostat.
| 22. REMOVE CRANKSHAFT PULLEY |
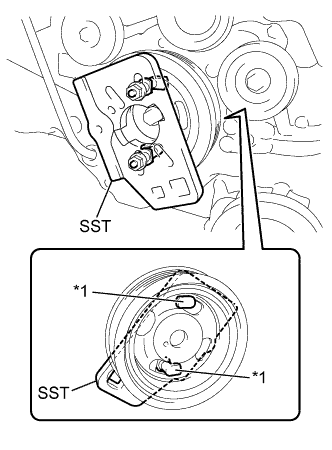 |
Install SST to the crankshaft pulley.
| *1 | Claw |
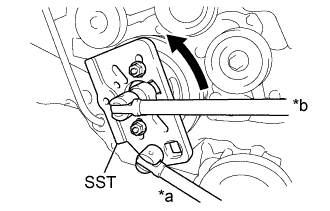 |
Using SST, hold the crankshaft pulley and loosen the crankshaft pulley set bolt.
| *a | Hold |
| *b | Turn |
Remove the crankshaft pulley.
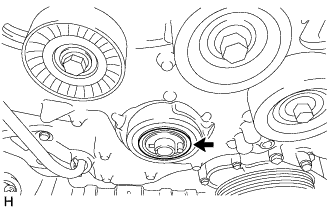 |
Remove the O-ring and crankshaft pulley spacer.
| 23. REMOVE TIMING CHAIN OR BELT COVER OIL SEAL |
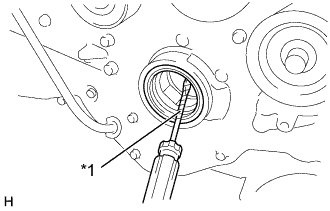 |
Using a screwdriver with its tip wrapped in protective tape, pry out the timing chain or belt cover oil seal.
| *1 | Protective Tape |
| 24. REMOVE TIMING CHAIN OR BELT COVER SUB-ASSEMBLY |
Remove the 32 bolts.
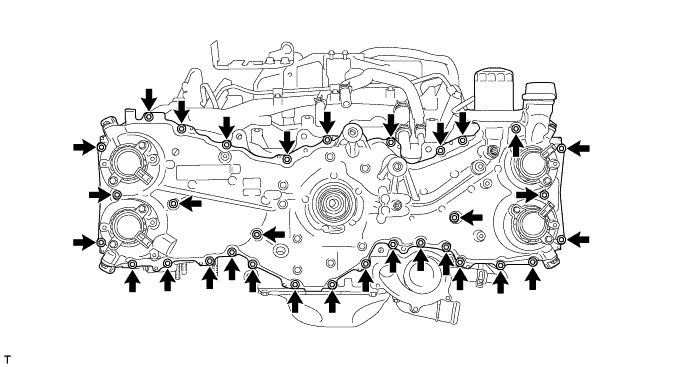
Using a screwdriver with its tip wrapped in protective tape, remove the timing chain or belt cover sub-assembly by prying between the timing chain or belt cover sub-assembly and cylinder head or cylinder block.
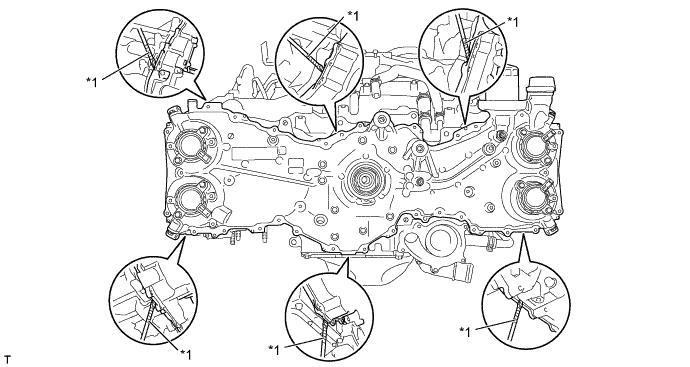
| *1 | Protective Tape | - | - |
Remove the 4 O-rings.
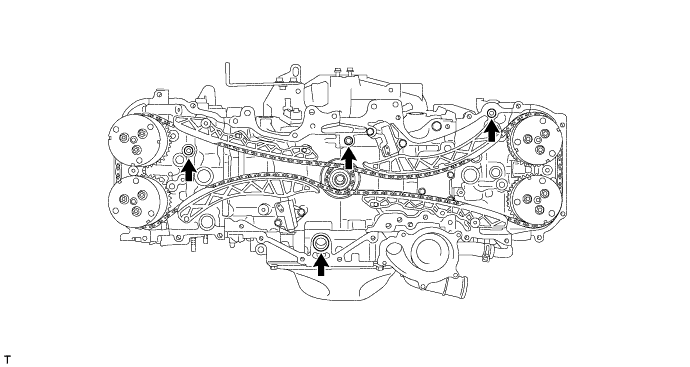
| 25. MAKE PAINT MARKS |
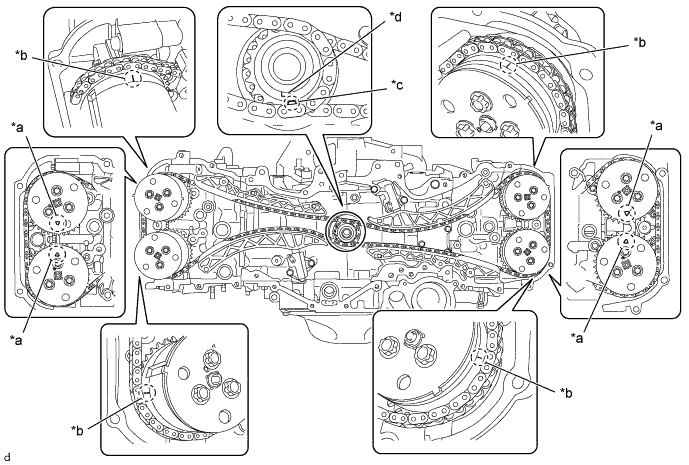
| *a | Triangular Mark | *b | Engraved Line |
| *c | Oval Mark | *d | Crankshaft Timing Gear key |
| 26. REMOVE CHAIN SUB-ASSEMBLY (for Bank 1) |
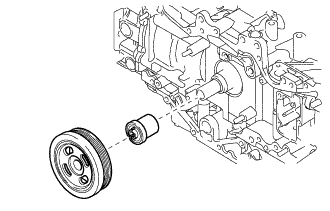 |
Temporarily install the crankshaft pulley spacer and crankshaft pulley.
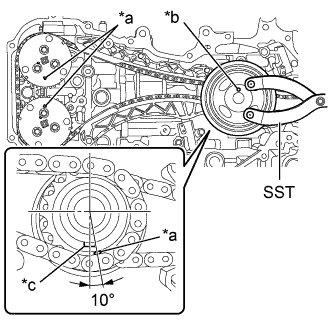 |
Using SST, turn the crankshaft pulley clockwise until the alignment marks on the camshaft timing intake gear assembly RH and the camshaft timing exhaust gear assembly RH, and the crankshaft pulley pin hole are aligned at the positions shown in the illustration.
| *a | Alignment Mark |
| *b | Crankshaft Pulley Pin Hole |
| *c | Crankshaft Timing Gear key |
Remove the crankshaft pulley and crankshaft pulley spacer.
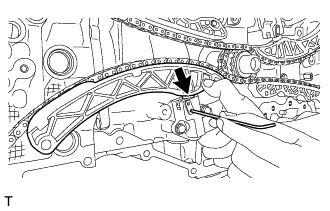 |
Push down the chain tensioner slipper and retain the plunger by inserting a 2.5 mm (0.098 in.) diameter hexagonal wrench into the No. 1 chain tensioner assembly through the stopper plate.
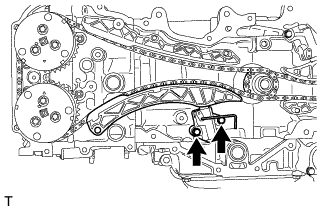 |
Remove the 2 bolts and No. 1 chain tensioner assembly.
Remove the chain tensioner slipper.
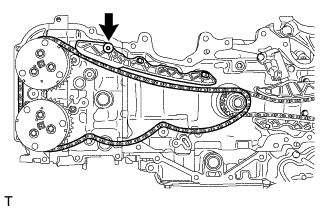 |
Using a 5 mm hexagonal wrench, remove the bolt and No. 1 chain vibration damper.
Remove the chain sub- assembly (for bank 1).
| 27. REMOVE CHAIN SUB-ASSEMBLY (for Bank 2) |
Temporarily install the crankshaft pulley spacer and crankshaft pulley.
Using SST, turn the crankshaft pulley clockwise until the alignment marks on the camshaft timing intake gear assembly LH and the camshaft timing exhaust gear assembly LH, and the crankshaft pulley pin hole are aligned at the positions shown in the illustration.
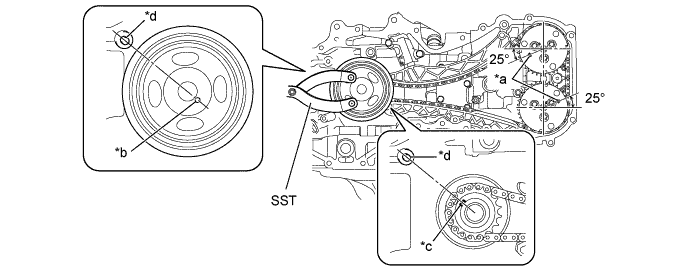
| *a | Alignment Mark | *b | Crankshaft Pulley Pin Hole |
| *c | Crankshaft Timing Gear key | *d | Cylinder Block Guide Pin |
Remove the crankshaft pulley and crankshaft pulley spacer.
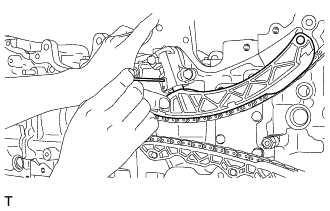 |
Push the chain tensioner slipper and retain the plunger by inserting an approximately 1 mm (0.039 in.) diameter wire into the No. 2 chain tensioner assembly through the stopper plate .
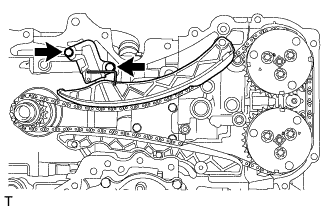 |
Remove the 2 bolts and No. 2 chain tensioner assembly.
Remove the chain tensioner slipper.
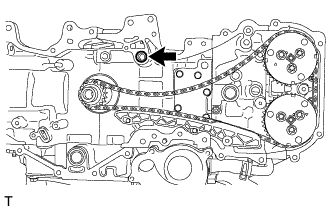 |
Remove the O-ring from the cylinder block.
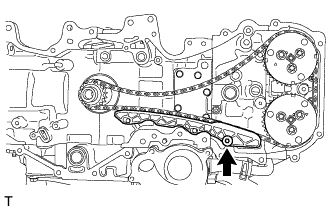 |
Using a 5 mm socket hexagon wrench, remove the bolt and No. 1 chain vibration damper.
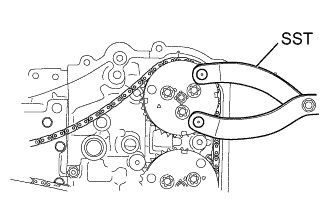 |
While releasing the tension of chain sub-assembly using SST, remove the chain sub-assembly.
| 28. ROTATE CRANK SHAFT AND CAMSHAFT |
Temporarily install the crankshaft pulley spacer and crankshaft pulley.
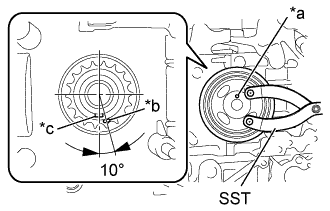 |
Using SST, turn the crankshaft about 200 degrees counterclockwise until the crankshaft pulley pin hole is aligned at the position shown in the illustration.
| *a | Crankshaft Pulley Pin Hole |
| *b | Alignment Mark |
| *c | Crankshaft Timing Gear Key |
Remove the crankshaft pulley and crankshaft pulley spacer.
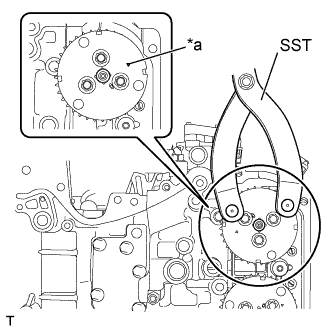 |
Using SST, turn the camshaft timing intake gear assembly LH approximately 180°clockwise, and align the alignment mark on the camshaft timing intake gear assembly LH to the position (zero-lift position) shown in the illustration.
| *a | Alignment Mark |
| 29. REMOVE CRANKSHAFT TIMING GEAR OR SPROCKET |
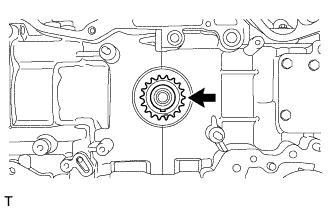 |
Remove the crankshaft timing gear or sprocket.
| 30. REMOVE CAMSHAFT TIMING INTAKE GEAR ASSEMBLY RH |
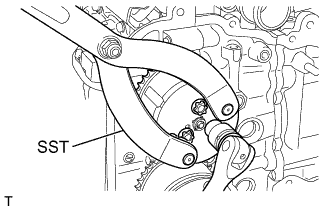 |
Using SST, hold the camshaft timing intake gear assembly RH and remove the 3 bolts with a "TORX" socket wrench E16.
Remove the camshaft timing intake gear assembly RH.
| 31. REMOVE CAMSHAFT TIMING EXHAUST GEAR ASSEMBLY RH |
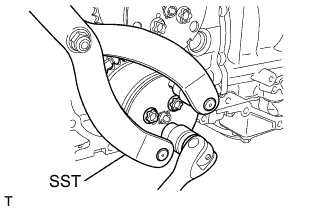 |
Using SST, hold the camshaft timing exhaust gear assembly RH and remove the 3 bolts with a "TORX" socket wrench E16.
Remove the camshaft timing exhaust gear assembly RH.
| 32. REMOVE CAMSHAFT TIMING INTAKE GEAR ASSEMBLY LH |
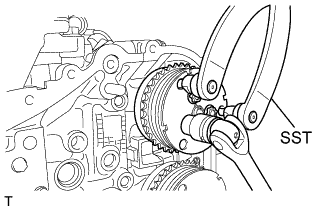 |
Using SST, hold the camshaft timing intake gear assembly LH and remove the 3 bolts with a "TORX" socket wrench E16.
Remove the camshaft timing intake gear assembly LH.
| 33. REMOVE CAMSHAFT TIMING EXHAUST GEAR ASSEMBLY LH |
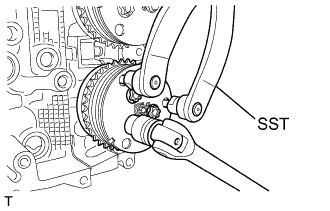 |
Using SST, hold the camshaft timing exhaust gear assembly LH and remove the 3 bolts with a "TORX" socket wrench E16.
Remove the camshaft timing exhaust gear assembly LH.
| 34. REMOVE SPARK PLUG |
Using a 14 mm spark plug wrench, remove the 4 spark plugs.
| 35. REMOVE INJECTOR DRIVER BRACKET |
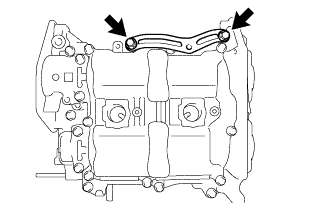 |
Remove the 2 bolts and injector driver bracket.
| 36. REMOVE CYLINDER HEAD COVER SUB-ASSEMBLY RH |
Operate the engine stand so that the bank 1 side faces upward.
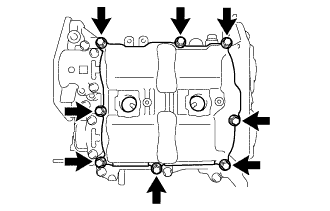 |
Remove the 8 bolts.
Using a screwdriver with its tip wrapped in protective tape, remove the cylinder head cover sub-assembly RH.
Remove the cylinder head cover gasket.
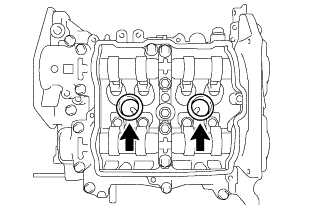 |
Remove the 2 spark plug tube gaskets.
| 37. REMOVE CAMSHAFT HOUSING SUB-ASSEMBLY RH |
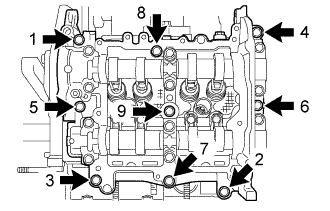 |
Loosen the 9 bolts in the order shown in the illustration and remove them.
Using a screwdriver with its tip wrapped in protective tape, remove the camshaft housing sub-assembly RH.
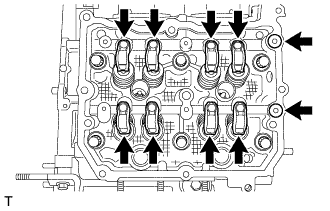 |
Remove the 2 O-rings and 8 No. 1 valve rocker arm sub-assemblies from the cylinder head sub-assembly.
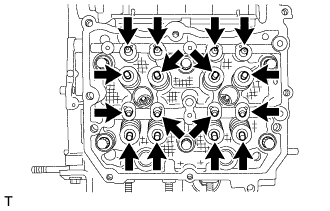 |
Remove the 8 valve adjusting shims and 8 roller rocker arm pivots from the cylinder head sub-assembly.
| 38. REMOVE CYLINDER HEAD SUB-ASSEMBLY RH |
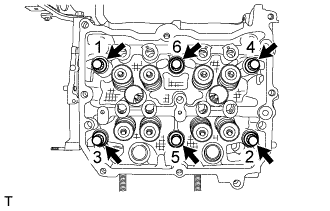 |
Loosen the 6 bolts in the order shown in the illustration.
Lightly tap the cylinder head sub-assembly RH to separate it from the cylinder block (bank 1).
Remove the cylinder head sub-assembly RH.
| 39. REMOVE CYLINDER HEAD GASKET |
Remove the cylinder head gasket.
| 40. REMOVE CYLINDER HEAD COVER SUB-ASSEMBLY LH |
Operate the engine stand so that the bank 2 side faces upward.
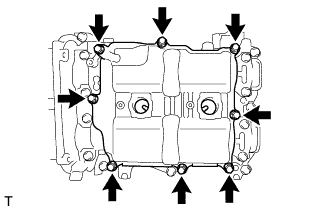 |
Remove the 8 bolts.
Using a screwdriver with its tip wrapped in protective tape, remove the cylinder head cover sub-assembly LH.
Remove the cylinder head cover gasket.
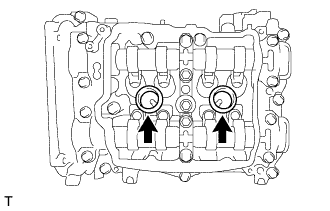 |
Remove the 2 spark plug tube gaskets.
| 41. REMOVE CAMSHAFT HOUSING SUB-ASSEMBLY LH |
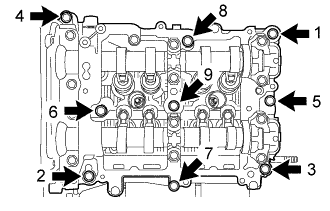 |
Loosen the 9 bolts in the order shown in the illustration and remove them.
Using a screwdriver with its tip wrapped in protective tape, remove the camshaft housing sub-assembly LH.
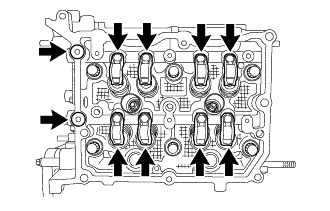 |
Remove the 2 O-rings and 8 No. 1 valve rocker arm sub-assemblies from the cylinder head sub-assembly LH.
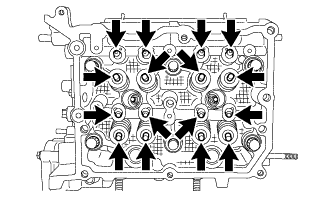 |
Remove the 8 valve adjusting shims and 8 roller rocker arm pivots from the cylinder head sub-assembly LH.
| 42. REMOVE CYLINDER HEAD SUB-ASSEMBLY LH |
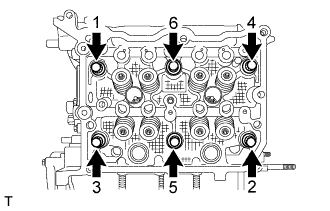 |
Loosen the 6 bolts in the order shown in the illustration.
Lightly tap the cylinder head sub-assembly LH to separate it from the cylinder block (bank 2).
Remove the cylinder head sub-assembly LH.
| 43. REMOVE NO. 2 CYLINDER HEAD GASKET |
Remove the No. 2 cylinder head gasket.
| 44. REMOVE NO. 2 ENGINE HANGER |
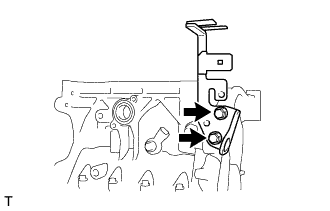 |
Remove the 2 bolts and No. 2 engine hanger from the cylinder block (for bank 1).
| 45. REMOVE NO. 2 OIL PAN SUB-ASSEMBLY |
Remove the drain plug and gasket.
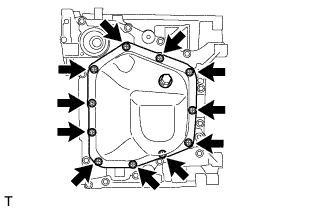 |
Remove the 11 bolts.
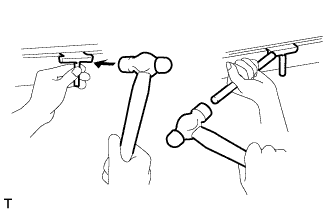 |
Using an oil pan seal cutter, remove the No. 2 oil pan sub-assembly.
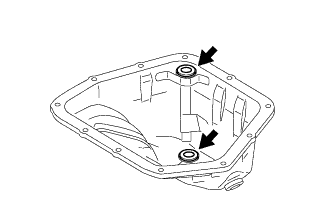 |
Remove the 2 seal rings from the No. 2 oil pan sub-assembly.
| 46. REMOVE OIL STRAINER SUB-ASSEMBLY |
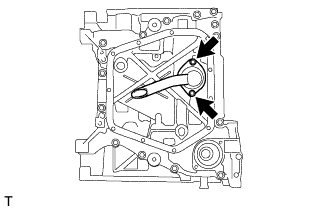 |
Remove the 2 bolts and oil strainer sub-assembly.
Remove the O-ring.
| 47. REMOVE OIL PAN SUB-ASSEMBLY |
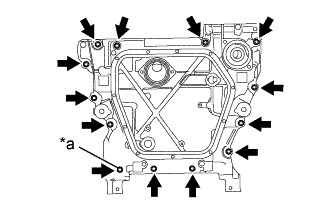 |
Remove the 13 bolts.
| *a | Use a TORX Socket Wrench T45 |
Using a screwdriver with its tip wrapped in protective tape, remove the oil pan sub-assembly.
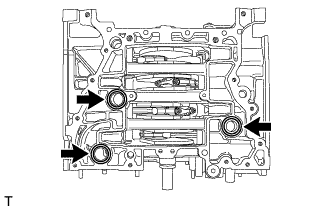 |
Remove the 3 O-rings from the cylinder block.
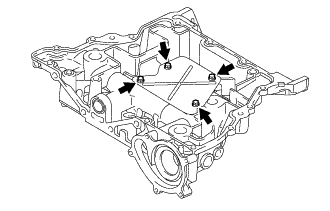 |
Remove the 4 bolts and baffle plate from the oil pan sub-assembly.
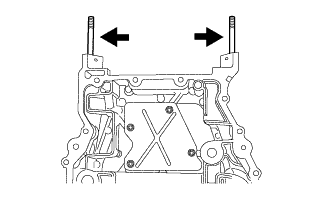 |
Remove the 2 stud bolts from the oil pan sub-assembly.
| 48. REMOVE CAMSHAFT BEARING CAP (for Bank 1) |
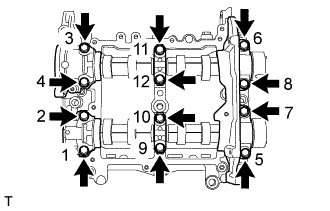 |
In several steps, uniformly loosen the 12 bolts in the order shown in the illustration, and remove the front camshaft cap RH, intake center camshaft cap RH, intake rear camshaft cap RH, exhaust center camshaft cap RH, and exhaust rear camshaft cap RH.
| 49. REMOVE CAMSHAFT (for Bank 1) |
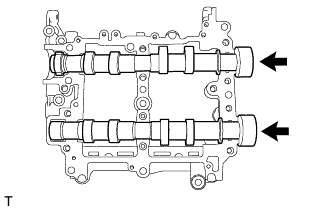 |
Remove the intake camshaft RH and exhaust camshaft RH from the camshaft housing sub-assembly RH.
| 50. REMOVE OIL CONTROL VALVE FILTER (for Bank 1) |
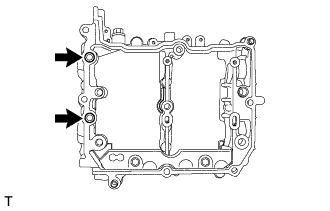 |
Remove the 2 oil control valve filters from the camshaft housing sub-assembly RH.
| 51. REMOVE OIL SPACER RH |
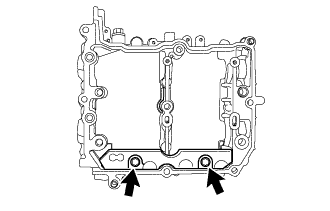 |
Remove the 2 bolts and oil spacer RH.
| 52. REMOVE CAMSHAFT OIL FEED PIPE SUB-ASSEMBLY (for Automatic Transmission) |
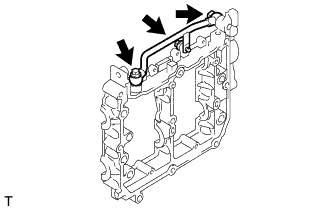 |
Remove the 2 union bolts, the bolt, camshaft oil feed pipe sub-assembly and 2 gaskets from the camshaft housing sub-assembly RH.
| 53. REMOVE HOLE PLUG (for Manual Transmission) |
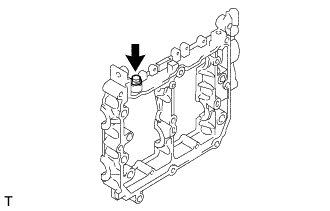 |
Remove the hole plug and gasket from the camshaft housing sub-assembly RH.
| 54. REMOVE CAMSHAFT BEARING CAP (for Bank 2) |
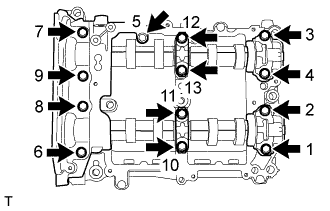 |
In several steps, uniformly loosen the 13 bolts in the order shown in the illustration, and remove the front camshaft cap LH, intake center camshaft cap LH, intake rear camshaft cap LH, exhaust center camshaft cap LH and exhaust rear camshaft cap LH.
| 55. REMOVE CAMSHAFT (for Bank 2) |
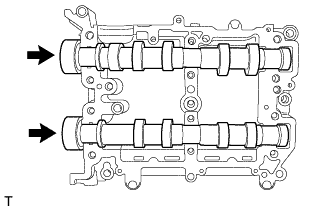 |
Remove the intake camshaft LH and exhaust camshaft LH from the camshaft housing sub-assembly LH.
| 56. REMOVE OIL CONTROL VALVE FILTER (for Bank 2) |
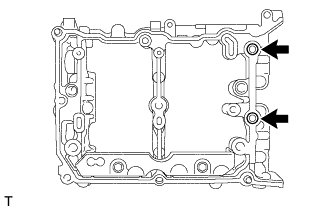 |
Remove the 2 oil control valve filters from the camshaft housing sub-assembly LH.
| 57. REMOVE OIL SPACER LH |
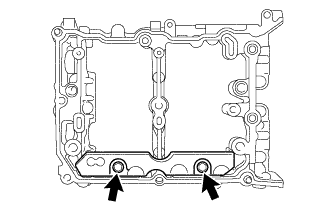 |
Remove the 2 bolts and oil spacer LH.