Home › Vehicle Exterior › LIGHTING (EXT) › AUTOMATIC HEADLIGHT BEAM LEVEL CONTROL SYSTEM

AUTOMATIC HEADLIGHT BEAM LEVEL CONTROL SYSTEM > INITIALIZATION

for Preparation Click here


NOTICE:
  1. Initialize the headlight leveling ECU assembly after the vehicle height changes due to replacement of the suspension or after performing such operations as removal and reinstallation or replacement of the rear height control sensor sub-assembly.
  2. Initialization is also necessary when the headlight leveling ECU assembly is replaced.
  3. Adjust the headlight aim after initializing the headlight leveling ECU assembly (Click here).
  1. When a malfunction is detected in the automatic headlight beam level control system, the height control sensor signal initialization is impossible. Perform troubleshooting before initialization.


HEIGHT CONTROL SENSOR SIGNAL INITIALIZATION


1.PREPARE VEHICLE FOR INITIALIZATION
  1. Unload the trunk and vehicle, and make sure that the spare tire, tools and jack are in their original positions.

  2. Check that there are no occupants in the vehicle.

  3. Turn off the headlights.

  4. Stop the vehicle on a level surface and keep the vehicle height unchanged.

  5. HINT:
    For the headlight leveling ECU assembly to initialize normally, all of the above mentioned processes must be completed.


NEXT


2.CHECK WARNING LIGHT
  1. Turn the ignition switch to ON and check the headlight beam level control system warning light.

    OK:
    Condition
    Specified Condition
    1. The headlight leveling ECU is replaced with a new one.
    2. Initialization is failed.
    Warning light continuously blinks 6 times at 2 Hz.
    Removal and reinstallation of the headlight leveling ECU, replacement of the rear height control sensor sub-assembly, removal and reinstallation of the rear height control sensor sub-assembly, replacement of the suspension, etc.
    Warning light comes on for approximately 3 seconds, and then goes off (bulb check function).

    HINT:
    1. If the warning light does not come on when turning the ignition switch to ON, perform inspections and repairs according to "Problem Symptoms Table" (Click here).


NG.
GO TO PROBLEM SYMPTOMS TABLE (Click here)
OK


3.INITIALIZATION
  1. Turn the ignition switch to ON.


  2. E106867E65
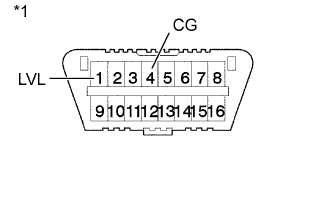
  3. Connect terminals 4 (CG) and 1 (LVL) of the DLC3 using SST.

  4. SST
    09843-18040  
    Text in Illustration 
    *1
    DLC3


    E247151E01
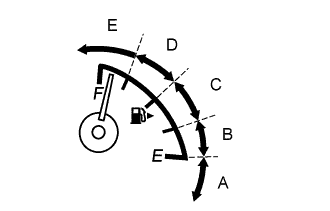
  5. Turn the low beam headlights on and off using the light control switch within 20 seconds after connecting the terminals.
    Fuel Level
    Number of Times to Turn Low Beam Headlights on and off
    Fuel level is within range A.
    1
    Fuel level is within range B.
    2
    Fuel level is within range C.
    3
    Fuel level is within range D.
    4
    Fuel level is within range E.
    5

    HINT:
    The number of times the low beam headlights need to be turned on and off is determined by the present fuel level as shown above.

    NOTICE:
    1. Turn the low beam headlights on and off at approximately 3-second intervals.
    2. Be sure to operate the light control switch from the outside of the vehicle.

  6. Check the warning light.

    Result:

    Condition
    Specified Condition
    Result
    The headlight leveling ECU assembly is replaced with a new one.
    Blinks 6 times at 2 Hz → Continuously blinks N*1 times at 2 Hz.
    Initialization is completed.
    Continuously blinks 6 times at 2 Hz.
    Initialization is failed.
    Removal and reinstallation of the headlight leveling ECU assembly, replacement of the rear height control sensor sub-assembly RH, removal and reinstallation of the rear height control sensor sub-assembly RH, replacement of the suspension, etc.
    Off → Continuously blinks N*1 times at 2 Hz.
    Initialization is completed.
    Continuously blinks 6 times at 2 Hz.
    Initialization is failed.

    HINT:
    1. *1: The number of times that the indicator blinks is determined by the number of times the low beam headlights or dimmer switch are turned on and off.
    2. If initialization cannot be finished normally, disconnect SST from the DLC3 and turn the ignition switch off. Then, restart from the first step.
    3. If the number of times the warning light blinks differs from the number of times the headlight control switch is operated, the initialization is not completed.
    4. If initialization cannot be finished normally, perform inspections and repairs according to "Problem Symptoms Table" (Click here).


NG.
PERFORM TROUBLESHOOTING (Click here)
OK

END