 |
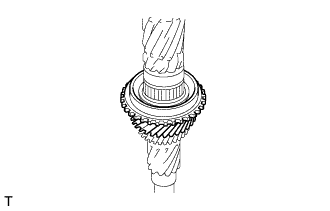
Apply manual transmission gear oil to the mounting point of the counter shaft, needle roller bearing and inside surface and taper cone of the counter shaft 3rd gear.
COUNTER GEAR > REASSEMBLY |
| 1. INSTALL COUNTER SHAFT 3RD GEAR |
|
Apply manual transmission gear oil to the mounting point of the counter shaft, needle roller bearing and inside surface and taper cone of the counter shaft 3rd gear.
Install the needle roller bearing and counter shaft 3rd gear.
| 2. INSTALL NO. 2 TRANSMISSION HUB SLEEVE |
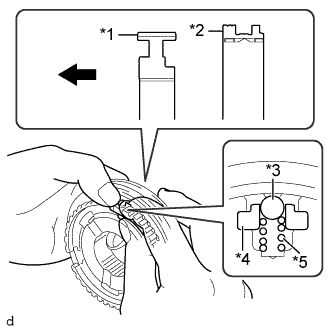 |
Apply manual transmission gear oil to the moving parts of the No. 2 transmission clutch hub.
| *1 | No. 2 Transmission Clutch Hub |
| *2 | No. 2 Transmission Hub Sleeve |
| *3 | Ball |
| *4 | No. 1 Synchromesh Shifting Key |
| *5 | No. 1 Synchromesh Shifting Key Spring |
 | Front Side |
As shown in the illustration, install the No. 2 transmission hub sleeve to the No. 2 transmission clutch hub. Install the 3 No. 1 synchromesh shifting keys and 3 No. 1 synchromesh shifting key springs all together, and then install the balls.
| 3. INSTALL NO. 2 TRANSMISSION CLUTCH HUB |
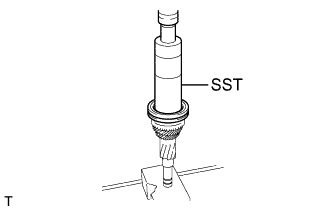 |
Install the No. 3 synchronizer ring set to the counter shaft 3rd gear.
Using SST and a press, install the No. 2 transmission clutch hub.
| 4. INSTALL COUNTER SHAFT 4TH GEAR |
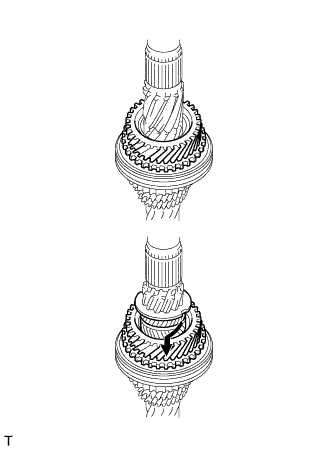 |
Install the No. 1 synchronizer ring to the No. 2 transmission clutch hub.
Apply manual transmission gear oil to the 4th gear bearing inner race and inside surface and taper cone of the counter shaft 4th gear.
Install the counter shaft 4th gear and 4th gear bearing inner race.
| 5. INSTALL 4TH INNER RACE THRUST WASHER |
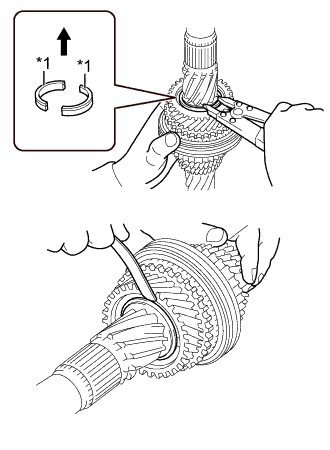 |
Select a 4th inner race thrust washer that is suitable to retain the specific thrust clearance between the 4th gear bearing inner race and 4th inner race thrust washer.
| *1 | 4th Inner Race Thrust Washer |
| Front Side |
| Part No. | Thickness mm (in.) | Mark |
| SU003-03500 | 3.75 (0.14763) | A |
| SU003-03501 | 3.80 (0.14960) | B |
| SU003-03502 | 3.85 (0.15157) | C |
| SU003-03503 | 3.90 (0.15354) | D |
| SU003-03504 | 3.95 (0.15551) | E |
| SU003-03505 | 4.00 (0.15748) | F |
| SU003-03506 | 4.05 (0.15944) | G |
| SU003-03507 | 4.10 (0.16141) | H |
Using a snap ring expander, as shown in the illustration, install a new 4th inner race thrust washer, new 4th washer retaining ring and new shaft snap ring to the counter shaft.
| 6. INSTALL COUNTER DRIVE GEAR |
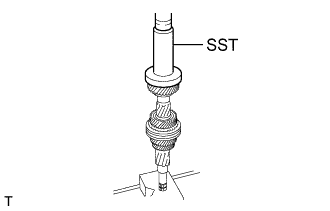 |
Using SST and a press, install the counter drive gear.
| 7. INSTALL SHAFT SNAP RING (for Counter Drive Gear) |
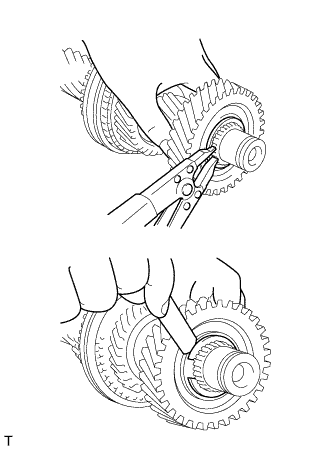 |
Select a shaft snap ring that is suitable to retain the specific thrust clearance between the counter drive gear and shaft snap ring.
| Part No. | Thickness: mm (in.) | Mark |
| SU003-03581 | 1.80 (0.07086) | A |
| SU003-03582 | 1.85 (0.07283) | B |
| SU003-03583 | 1.90 (0.07480) | C |
| SU003-03584 | 1.95 (0.07677) | D |
| SU003-03585 | 2.00 (0.07874) | E |
| SU003-03586 | 2.05 (0.08070) | F |
Using a snap ring expander, install a new shaft snap ring to the counter shaft.
| 8. INSTALL FRONT COUNTER GEAR BEARING |
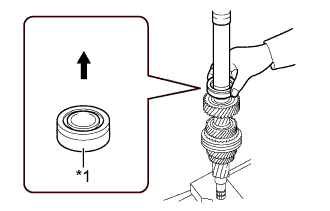 |
Using SST and a press, as shown in the illustration, install a new front counter gear bearing while holding it with your hand.
| *1 | Front Counter Gear Bearing |
| Front Side |
| 9. INSTALL SHAFT SNAP RING (for Front Counter Gear Bearing) |
 |
Select a shaft snap ring that is suitable to retain the specific thrust clearance between the counter gear front bearing and shaft snap ring.
| Part No. | Thickness: mm (in.) | Mark |
| SU003-03560 | 2.05 (0.08070) | 1 |
| SU003-03558 | 2.10 (0.08267) | 2 |
| SU003-03561 | 2.15 (0.08464) | 3 |
| SU003-03559 | 2.20 (0.08661) | 4 |
| SU003-03562 | 2.25 (0.08858) | 5 |
| SU003-03563 | 2.30 (0.09055) | 6 |
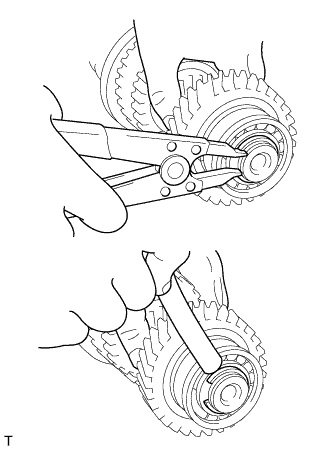
Using a snap ring expander, install a new shaft snap ring to the counter shaft.