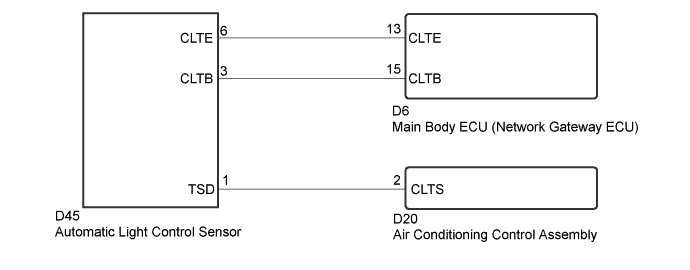
DTC B14A1/25 Open in Solar Sensor Circuit |
DTC B14A2/-25 Short in Solar Sensor Circuit |
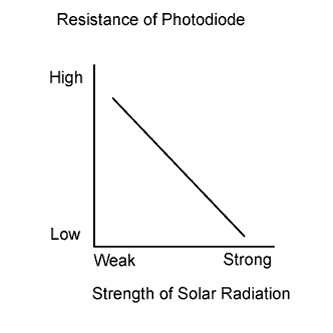
| DTC No. | DTC Detection Condition | Trouble Area |
| B14A1/25 | Open in Solar Sensor Circuit |
|
| B14A2/-25 | Short in Solar Sensor Circuit |
|
| 1.READ VALUE USING GTS |
Connect the GTS to the DLC3.
Turn the ignition switch to ON.
Turn the GTS on.
Enter the following menus: Body Electrical / Air Conditioner / Data List.
Check the value(s) by referring to the table below.
| Tester Display | Measurement Item/Range | Normal Condition | Diagnostic Note |
| Solar Sensor | Solar sensor / Min.: 0W/m2 Max.: 4448W/m2 | Solar sensor value increases as brightness increases | - |
| Result | Proceed to |
| OK (When troubleshooting according to the DTC) | A |
| OK (When troubleshooting according to Problem Symptoms Table) | B |
| NG | C |
|
| ||||
|
| ||||
| A | |
 |
| 2.CHECK FOR DTC |
Clear the DTCs (Click here).
Check the DTCs (Click here).
|
| ||||
| OK | ||
 | ||
| ||
| 3.CHECK HARNESS AND CONNECTOR (POWER SOURCE CIRCUIT) |
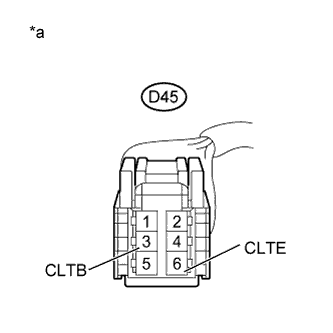 |
Disconnect the D45 solar automatic light control sensor connector.
Measure the voltage according to the value(s) in the table below.
| Tester Connection | Condition | Specified Condition |
| D45-6(CLTE) - D45-3(CLTB) | Ignition switch off | Below 1 V |
| D45-6(CLTE) - D45-3(CLTB) | Ignition switch ON | 11 to 14 V |
| *a | Front view of wire harness connector (to Automatic Light Control Sensor) |
|
| ||||
| OK | |
|
| 4.CHECK HARNESS AND CONNECTOR (AUTOMATIC LIGHT CONTROL SENSOR - AIR CONDITIONING CONTROL ASSEMBLY) |
Disconnect the D45 automatic light control sensor connector.
Disconnect the D20 air conditioning control assembly connector.
Measure the resistance according to the value(s) in the table below.
| Tester Connection | Condition | Specified Condition |
| D20-2(CLTS) - D45-1(TSD) | Always | Below 1 Ω |
| D20-2(CLTS) - Body ground | Always | 10 kΩ or higher |
|
| ||||
| OK | |
|
| 5.INSPECT AUTOMATIC LIGHT CONTROL SENSOR |
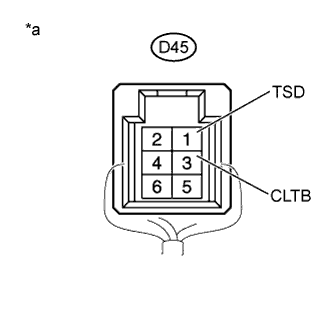 |
Remove the automatic light control sensor .
Reconnect the D45 automatic light control sensor connector.
Turn the ignition switch to ON.
Measure the voltage according to the value(s) in the table below.
| Tester Connection | Condition | Specified Condition |
| D45-1(TSD) - D45-3(CLTB) | Sensor is subjected to electric light | 0.8 to 4.3 V |
| D45-1(TSD) - D45-3(CLTB) | Sensor is covered with a cloth | Below 0.8 V |
| *a | Component with harness connected (Automatic Light Control Sensor) |
|
| ||||
| OK | ||
| ||
| ||
| 6.CHECK HARNESS AND CONNECTOR (MAIN BODY ECU (NETWORK GATEWAY ECU) - AUTOMATIC LIGHT CONTROL SENSOR) |
Disconnect the D6 main body ECU (network gateway ECU) connector.
Measure the resistance according to the value(s) in the table below.
| Tester Connection | Condition | Specified Condition |
| D6-13(CLTE) - D45-6(CLTE) | Always | Blow 1 Ω |
| D6-15(CLTB) - D45-3(CLTB) | Always | Blow 1 Ω |
| D6-13(CLTE) - Body ground | Always | 10 kΩ or higher |
| D6-15(CLTB) - Body ground | Always | 10 kΩ or higher |
|
| ||||
| OK | ||
| ||
| ||

