Home › Brake › BRAKE SYSTEM (OTHER) › BRAKE FLUID

BRAKE FLUID > BLEEDING

for Preparation Click here


NOTICE:
  1. Move the shift lever to P and apply the parking brake before bleeding the brakes (for automatic transmission).
  2. Apply the parking brake before bleeding the brakes (for manual transmission).
  3. Add brake fluid to keep the level between the MIN and MAX lines of the reservoir while bleeding the brakes.
  4. If brake fluid leaks onto any painted surface, immediately wash it off.
  5. Do not operate the brake actuator assembly while air is in the brake system or in the brake master cylinder sub-assembly. Doing so may cause air to enter the brake actuator assembly.
  6. If bleeding the brake actuator assembly is difficult due to air in the brake actuator assembly, replace it with a new one.

HINT:
If any work is done on the brake system or if air in the brake lines is suspected, bleed the air from the system.


1. FILL RESERVOIR WITH BRAKE FLUID
  1. Remove the brake master cylinder reservoir filler cap.

  1. Fill the reservoir with brake fluid.

    Brake Fluid:
    SAE J1703 or FMVSS No. 116 DOT 3

    NOTICE:
    Make sure that there is sufficient brake fluid in the reservoir.


2. BLEED BRAKE MASTER CYLINDER SUB-ASSEMBLY

HINT:
If the master cylinder has been disassembled or if the reservoir becomes empty, bleed the air from the master cylinder.


    C259955
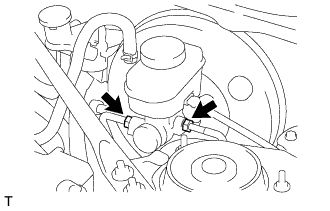
  1. Using a union nut wrench 12 mm, separate the 2 brake tubes from the master cylinder.


    C259957
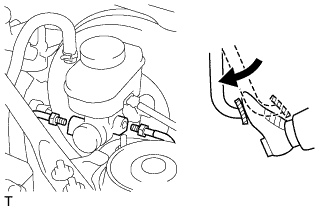
  1. Slowly depress the brake pedal and hold it there (Step A).
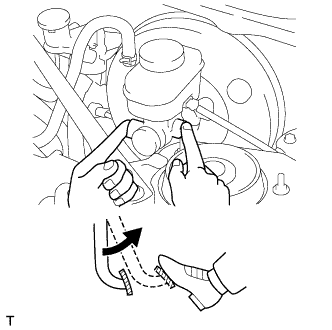


    C259959
  1. Block the outer holes with your fingers, and release the brake pedal (Step B).

  1. Repeat Steps A and B 3 or 4 times.


    C259955
  1. Using a union nut wrench 12 mm, install the 2 brake tubes into the master cylinder.

    Torque:
    19 N*m{ 194 kgf*cm , 14 ft.*lbf }

    NOTICE:
    1. Do not bend or damage the brake lines.
    2. Do not allow brake lines to twist and interfere with other parts or vehicle body during tightening.
    3. Do not allow any foreign matter such as dirt or dust to enter the brake lines.
    4. Use the formula to calculate special torque values for situations where a union nut wrench is combined with a torque wrench (Click here).


3. BLEED BRAKE LINE


C256648

NOTICE:
  1. Bleed the brake line of the wheel farthest from the master cylinder first.
  2. Add brake fluid to keep the level between the MIN and MAX lines of the reservoir while bleeding the brake lines.

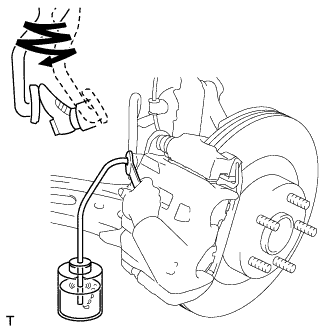
  1. Connect a vinyl tube to the bleeder plug.

  1. Depress the brake pedal several times, and then loosen the bleeder plug with the pedal depressed.*1

  1. When fluid stops coming out, tighten the bleeder plug and release the brake pedal.*2

  1. Repeat steps *1 and *2 until all the air in the brake fluid is completely bled out and a new brake fluid comes out.

  1. Tighten the bleeder plug completely.

    Torque:
    8.0 N*m{ 82 kgf*cm , 71 in.*lbf }

  1. Repeat the above steps to replace the brake fluid of the brake lines for each wheel.


4. INSPECT FOR BRAKE FLUID LEAK


5. INSPECT FLUID LEVEL


    C259961E01
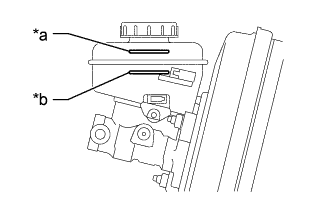
  1. Check the fluid level.
    Text in Illustration 
    *a
    MAX Line
    *b
    MIN Line
    If brake fluid level is lower than the MIN line, check for leaks and inspect the disc brake pads. If necessary, refill the reservoir with brake fluid to the MAX line after repair or replacement.

    Brake Fluid:
    SAE J1703 or FMVSS No. 116 DOT 3

    NOTICE:
    If using a dropper to adjust the fluid amount, make sure that the dropper has not been used with mineral oils, water or deteriorated brake fluid. Sealed areas may deteriorate and lead to fluid leaks, or the fluid may deteriorate and lead to decreased efficiency.