 |
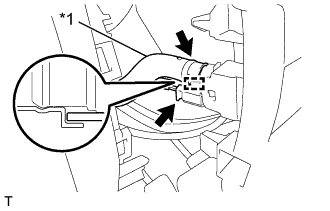
for Automatic Air Conditioning System for RHD:
Connect the connector.
Engage the guide and connect the aspirator hose.
Text in Illustration *1 Aspirator Hose
IGNITION KEY CYLINDER LIGHT > INSTALLATION |
| 1. INSTALL TRANSPONDER KEY AMPLIFIER |
Connect the connector.
Engage the 2 claws to install the transponder key amplifier.
| 2. INSTALL UPPER STEERING COLUMN COVER |
Engage the 4 claws and install the upper steering column cover.
| 3. INSTALL LOWER STEERING COLUMN COVER |
w/ Knee Airbag
Engage the 4 claws to install the lower steering column cover.
w/o Knee Airbag
Engage the 6 claws to install the lower steering column cover.
While turning the steering wheel assembly to the right and left, install the 2 screws.
| 4. INSTALL NO. 1 INSTRUMENT PANEL UNDER COVER SUB-ASSEMBLY (w/o Knee Airbag) |
Connect each connector.
|
for Automatic Air Conditioning System for RHD:
Connect the connector.
Engage the guide and connect the aspirator hose.
| *1 | Aspirator Hose |
Engage the 4 claws.
Engage the 4 clips to install the No. 1 instrument panel under cover sub-assembly.
Install the 2 screws.
| 5. INSTALL NO. 1 INSTRUMENT PANEL UNDER COVER SUB-ASSEMBLY (w/ Knee Airbag) |
Connect each connector.
Engage the 2 claws.
Engage the 6 clips to install the No. 1 instrument panel under cover sub-assembly.
Install the screw.
| 6. INSTALL UPPER INSTRUMENT PANEL METER ORNAMENT |
Engage the 4 clips and 2 claws to install the center instrument cluster finish panel sub-assembly.
| 7. INSTALL METER HOOD SUB-ASSEMBLY |
| 8. INSTALL CENTER INSTRUMENT CLUSTER FINISH PANEL SUB-ASSEMBLY |
Engage the 4 clips and 2 claws to install the center instrument cluster finish panel sub-assembly.
| 9. INSTALL INSTRUMENT SIDE PANEL LH |