Align the locating tape of the No. 2 antenna cord sub-assembly as shown in the illustration, and then engage the 2 clamps.
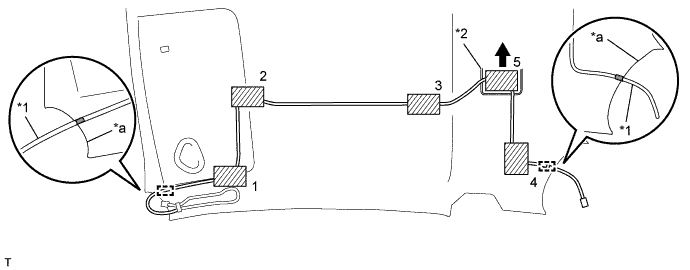
| *1 | No. 2 Antenna Cord Sub-assembly | *2 | Marking Line |
| *a | End of Roof Headlining Assembly | - | - |
 | Adhesive Tape |  | Locating Tape |
ROOF HEADLINING > REASSEMBLY |
| 1. INSTALL NO. 2 ANTENNA CORD SUB-ASSEMBLY |
Align the locating tape of the No. 2 antenna cord sub-assembly as shown in the illustration, and then engage the 2 clamps.
| *1 | No. 2 Antenna Cord Sub-assembly | *2 | Marking Line |
| *a | End of Roof Headlining Assembly | - | - |
| Adhesive Tape | | Locating Tape |
Fix the No. 2 antenna cord sub-assembly on the roof headlining assembly with adhesive tape as shown in the illustration.
| 2. INSTALL NO. 1 ROOF WIRE (w/ Illumination) |
Engage the 2 guides and position the No. 1 roof wire as shown in the illumination.
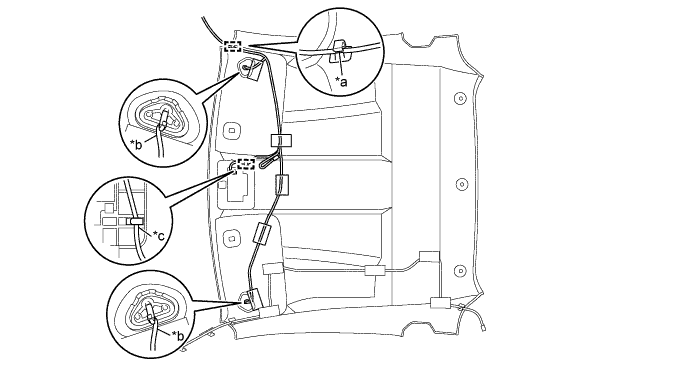
| *a | Align the center of the white tape on the wire with the edge of the trim, and fix the wire in place. | *b | Align the edge of the white tape on the wire with the sun visor mounting. |
| *c | Align the white tape on the wire with the clip, and fix the wire in place. | - | - |
 | Tape | - | - |
Apply tape as shown in the illustration.
| 3. INSTALL NO. 1 ROOF WIRE (w/o Illumination) |
Engage the 2 guides and position the No. 1 roof wire as shown in the illumination.
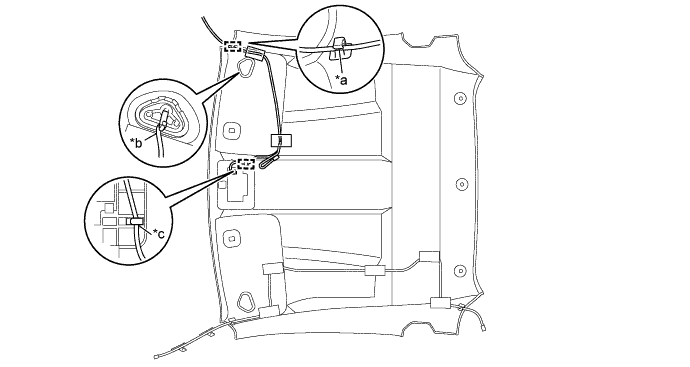
| *a | Align the center of the white tape on the wire with the edge of the trim, and fix the wire in place. | *b | Align the edge of the white tape on the wire with the sun visor mounting. |
| *c | Align the white tape on the wire with the clip, and fix the wire in place. | - | - |
| Tape | - | - |
Apply tape as shown in the illustration.