Home › Engine / Hybrid System › FA20 ENGINE MECHANICAL › CYLINDER HEAD GASKET

CYLINDER HEAD GASKET > INSTALLATION

for Preparation Click here


1. INSTALL NO. 2 CYLINDER HEAD GASKET
  1. Operate the engine stand so that the bank 2 side faces upward.

  1. Clean the bolt holes in the cylinder block (bank 2).

    NOTICE:
    To avoid erroneous tightening of the bolts, clean out the bolt holes sufficiently by blowing with compressed air to eliminate engine coolant, etc.


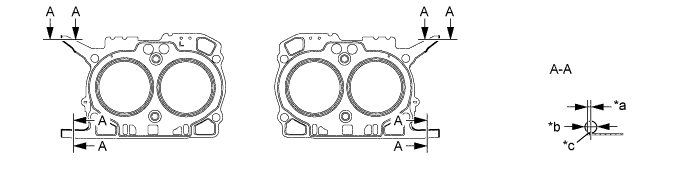
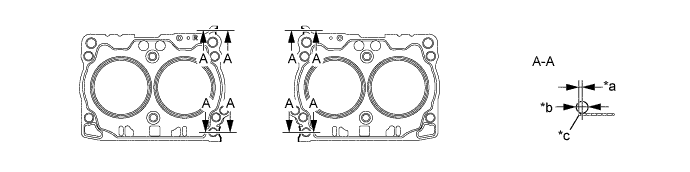
  1. Using a sealer gun, apply seal packing to both sides of the No. 2 cylinder head gasket as shown in the illustration.

    Seal packing:
    Three Bond 1217G, 1217H or equivalent


    A278764E01


    Text in Illustration 
    *a
    0 to 1.0 mm (0 to 0.039in.)
    *b
    φ2,0 to 4.0 mm (0.079 to 0.158 in.)
    *c
    Edge of the gasket
    -
    -

    NOTICE:
    1. Clean and degrease the contact surface.
    2. Install the cylinder head sub-assembly LH within 5 minutes of applying the seal packing.
  1. Place the No. 2 cylinder head gasket on the cylinder block (bank 2).


2. INSTALL CYLINDER HEAD SUB-ASSEMBLY LH
  1. Clean the threads of the cylinder head bolts and apply sufficient engine oil to the washers and threads of the bolts.

  1. Mount the cylinder head sub-assembly LH on the cylinder block (bank 2).


    A278739E06
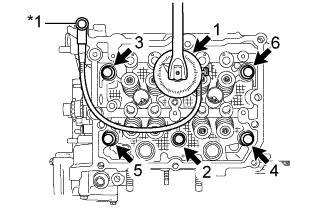
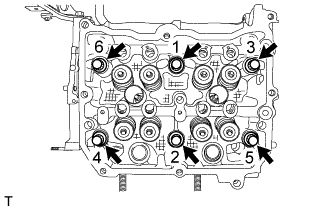
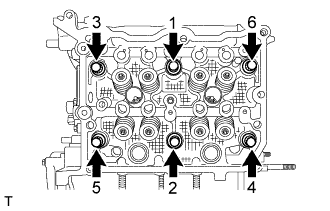
  1. Tighten the 6 cylinder head bolts in the order shown in the illustration.

    Torque:
    20 N*m{ 204 kgf*cm , 15 ft.*lbf }

  1. Tighten the 6 cylinder head bolts further in the same order above.

    Torque:
    100 N*m{ 1020 kgf*cm , 74 ft.*lbf }

    NOTICE:
    If the bolt makes a stick-slip sound during tightening, repeat the procedure from the cylinder head gasket installation after cleaning and completely drying the bolt holes and contact surfaces.

    HINT:
    In that case, the No. 2 cylinder head gasket can be reused.


    A278739E07
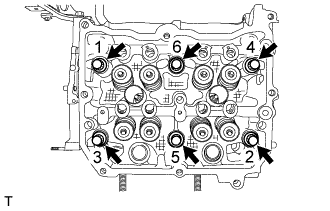
  1. Loosen the 6 cylinder head bolts by 360 ° in the order shown in the illustration.


    A278739E06
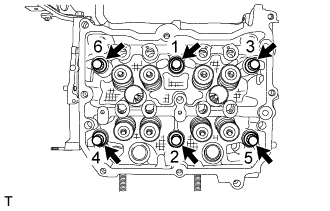
  1. Tighten the 6 cylinder head bolts in the order shown in the illustration.

    Torque:
    20 N*m{ 204 kgf*cm , 15 ft.*lbf }

  1. Tighten the 6 cylinder head bolts further in the same order above.

    Torque:
    42 N*m{ 428 kgf*cm , 31 ft.*lbf }


    A278765E07
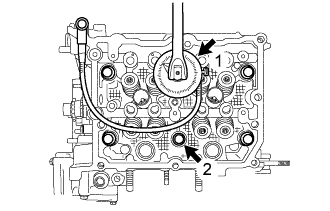
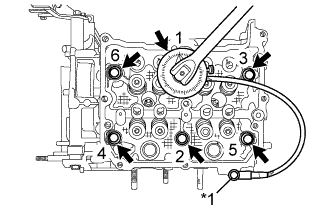
  1. Using an angle gauge, tighten the 6 cylinder head bolts another 100 ° in the order shown in the illustration.

    HINT:
    Temporarily install the appropriate bolt for angle gauge if necessary.

    Text in Illustration 
    *1
    Temporary Bolt


    A278765E08
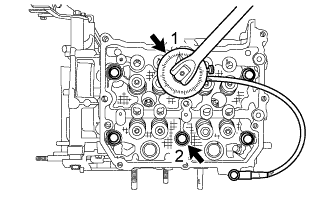
  1. Using an angle gauge, tighten the 2 cylinder head bolts another 100 ° in the order shown in the illustration.


    A278766E02
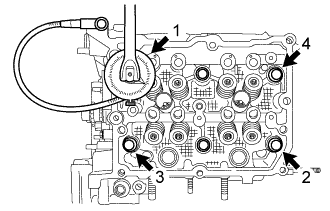
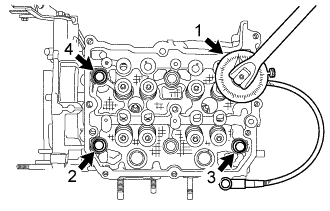
  1. Using an angle gauge, tighten the 4 cylinder head bolts another 50 ° in the order shown in the illustration.


3. INSTALL CAMSHAFT HOUSING SUB-ASSEMBLY LH
(Click here)


4. INSTALL CYLINDER HEAD GASKET
  1. Operate the engine stand so that the bank 1 side faces upward.

  1. Clean the bolt holes in the cylinder block (bank 1).

    NOTICE:
    To avoid erroneous tightening of the bolts, clean out the bolt holes sufficiently by blowing with compressed air to eliminate engine coolant, etc.


  1. Using a sealer gun, apply seal packing to both sides of the cylinder head gasket as shown in the illustration.

    Seal packing:
    Three Bond 1217G, 1217H or equivalent


    A278761E01


    Text in Illustration 
    *a
    0 to 1.0 mm (0 to 0.039in.)
    *b
    φ2,0 to 4.0 mm (0.079 to 0.158 in.)
    *c
    Edge of the gasket
    -
    -

    NOTICE:
    1. Clean and degrease the contact surface.
    2. Install the cylinder head sub-assembly RH within 5 minutes of applying the seal packing.
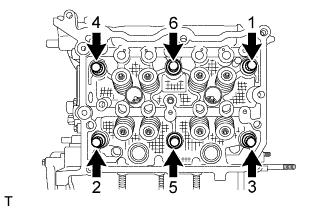
  1. Place the cylinder head gasket on the cylinder block (bank 1).


5. INSTALL CYLINDER HEAD SUB-ASSEMBLY RH
  1. Clean the threads of the cylinder head bolts and apply sufficient engine oil to the washers and threads of the bolts.

  1. Mount the cylinder head sub-assembly RH on the cylinder block (bank 1).


    A278735E03
  1. Tighten the 6 cylinder head bolts in the order shown in the illustration.

    Torque:
    20 N*m{ 204 kgf*cm , 15 ft.*lbf }

  1. Tighten the 6 cylinder head bolts further in the same order as above.

    Torque:
    100 N*m{ 1020 kgf*cm , 74 ft.*lbf }

    NOTICE:
    If the bolt makes a stick-slip sound during tightening, repeat the procedure from the cylinder head gasket installation after cleaning and completely drying the bolt holes and contact surfaces.

    HINT:
    In that case, the cylinder head gasket can be reused.


    A278735E04
  1. Loosen the 6 cylinder head bolts by 360 ° in the order shown in the illustration.


    A278735E05
  1. Tighten the 6 cylinder head bolts in the order shown in the illustration.

    Torque:
    20 N*m{ 204 kgf*cm , 15 ft.*lbf }

  1. Tighten the 6 cylinder head bolts further in the same order above.

    Torque:
    42 N*m{ 428 kgf*cm , 31 ft.*lbf }


    A278762E03
  1. Using an angle gauge, tighten the 6 cylinder head bolts another 100 ° in the order shown in the illustration.

    HINT:
    Temporarily install the appropriate bolt for angle gauge if necessary.

    Text in Illustration 
    *1
    Temporary Bolt


    A278762E02
  1. Using an angle gauge, tighten the 2 cylinder head bolts another 100 ° in the order shown in the illustration.


    A278763E02
  1. Using an angle gauge, tighten the 4 cylinder head bolts another 50 ° in the order shown in the illustration.


6. INSTALL CAMSHAFT HOUSING SUB-ASSEMBLY RH
(Click here)