ALIGNMENT / HANDLING DIAGNOSIS FRONT WHEEL ALIGNMENT ADJUSTMENT
PROCEDURE

 1.INSPECT TIRES
2.MEASURE VEHICLE HEIGHT
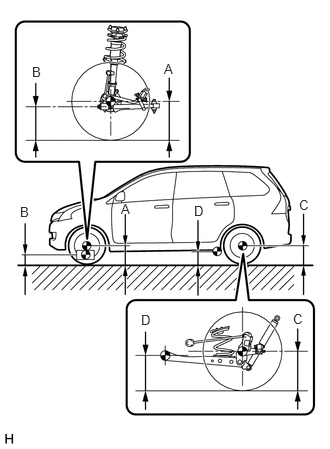
| Tire Size | Engine | Front A-B | Rear C-D |
|---|---|---|---|
| 185/70 R14 | K3-VE | 45.5 mm
(1.79 in.) |
47.1 mm
(1.85 in.) |
| 185/65 R15 | 3SZ-VE | 45.5 mm
(1.79 in.) |
46.9 mm
(1.85 in.) |
- Measuring points:
- A:
Ground clearance of front wheel center
- B:
Ground clearance of front lower suspension arm set front bolt center
- C:
Ground clearance of rear wheel center
- D:
Ground clearance of lower control arm set bolt center
- NOTICE:
- ·
Before inspecting the wheel alignment, check the vehicle height.
·The standard value shown here is a value that is used for adjusting the wheel alignment and does not indicate the height of an actual vehicle.
- HINT:
-
Bounce the vehicle up and down at the corners to stabilize the suspension before inspecting the vehicle height.
3.INSPECT WHEEL ANGLE
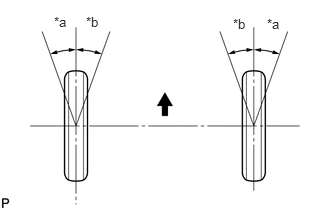
| *a | Inside |
| *b | Outside |

|
Front of the Vehicle |
Fully turn the steering wheel left and right, and measure the wheel turning angle.
| Tire Size | Engine | Inside Wheel | Outside Wheel |
|---|---|---|---|
| 185/70 R14 | K3-VE | 43°30' +/- 2°
(43.50° +/- 2°) |
37°36' +/- 2°
(37.60° +/- 2°) |
| 185/65 R15 | 3SZ-VE | 43°30' +/- 2°
(43.50° +/- 2°) |
37°36' +/- 2°
(37.60° +/- 2°) |
If the right and left inside wheel angles are not within the specified range, check the right and left rack end lengths.
4.INSPECT CAMBER, CASTER AND STEERING AXIS INCLINATION
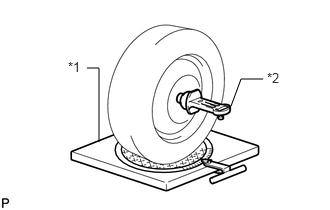
| *1 | Alignment tester |
| *2 | Camber-Caster-Steering Axis Inclination Gauge |
Put the front wheel on the center of the alignment tester.
Remove the wheel cap.
Set the camber-caster-steering axis inclination gauge at the center of the axle hub or drive shaft.
Inspect the camber, caster and steering axis inclination.
| Tire Size | Engine | Camber |
|---|---|---|
| 185/70 R14 | K3-VE | 0°30' +/- 45'
(0.5° +/- 0.75°) |
| 185/65 R15 | 3SZ-VE | 0°30' +/- 45'
(0.5° +/- 0.75°) |
| Tire Size | Engine | Caster |
|---|---|---|
| 185/70 R14 | K3-VE | 5°05' +/- 1°
(5.08° +/- 1°) |
| 185/65 R15 | 3SZ-VE | 5°05' +/- 1°
(5.08° +/- 1°) |
| Tire Size | Engine | Steering Axis Inclination
(Reference) |
|---|---|---|
| 185/70 R14 | K3-VE | 12°45' +/- 1°
(12.75°) |
| 185/65 R15 | 3SZ-VE | 12°45' +/- 1°
(12.75°) |
- NOTICE:
- ·
Perform the inspection while the vehicle is empty (without a spare tire or tools on board).
·The tolerance for the difference between the left and right wheels is 30' (0.5°) or less for both the camber and caster.
Remove the camber-caster-steering axis inclination gauge and attachment.
Install the wheel cap.
If the caster and steering axis inclination are not within the specified values after the camber has been correctly adjusted, recheck the suspension parts for damage and wear.
5.ADJUST CAMBER
- NOTICE:
-
Inspect toe-in after the camber has been adjusted.
Remove the front wheel.
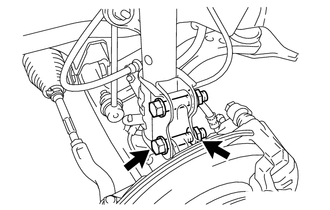
Loosen the lower mounting bolt and nut of the front shock absorber assembly and steering knuckle.
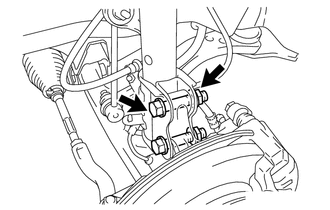
Replace the upper mounting bolt of the front shock absorber assembly and steering knuckle with a service bolt. (Part No.: 90041-05473)
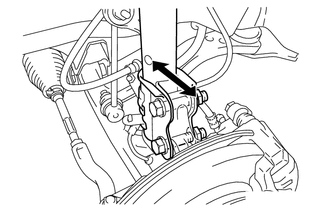
Pivot the lower mounting bolt to move the front shock absorber assembly and steering knuckle, and use the play between the bolt and bolt holds of the steering knuckle and front shock absorber assembly to adjust the camber.
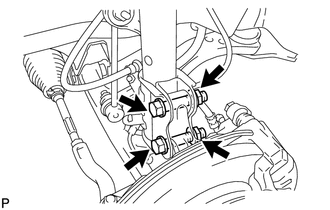
Tighten the 2 bolts and 2 new nuts.
- NOTICE:
-
Keep the bolts from rotating and turn the nuts.
- Torque:
- 135 N*m (1377 kgf*cm, 100 ft.*lbf)
Install the front wheel.
- Torque:
- 103 N*m (1050 kgf*cm, 76 ft.*lbf)
Lower the vehicle and bounce it up and down several times to stabilize the front suspension.
Check the camber.
Check the toe-in.
6.INSPECT TOE-IN
Bounce the vehicle up and down at the corners to stabilize the suspension.
Release the parking brake and move the shift lever to the neutral position.
Push the vehicle straight ahead approximately 5 m (16.4 ft.). (Step A)
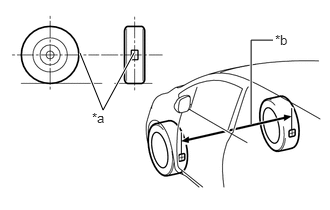
| *a | Tread Center Mark |
| *b | Dimension B |
Put tread center marks on the rearmost points of the front wheels and measure the distance between the marks (Dimension B).
Slowly push the vehicle straight ahead to cause the front wheels to rotate 180° using the front tire valve as a reference point.
- HINT:
-
Do not allow the wheels to rotate more than 180°. If the wheels rotate more than 180°, perform the procedure from (Step A) again.
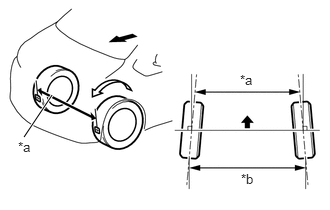
| *a | Dimension A |
| *b | Dimension B |
|
|
Front of the Vehicle |
Measure the distance between the tread center marks on the front side of the wheels (Dimension A).
| Tire Size | Engine | Specified Condition |
|---|---|---|
| 185/70 R14 | K3-VE | B-A: 0 +/- 2.0 mm
(0 +/- 0.0787 in.) |
| 185/65 R15 | 3SZ-VE | B-A: 0 +/- 2.0 mm
(0 +/- 0.0787 in.) |
If the toe-in is not within the specified value, adjust it at the rack ends.
7.ADJUST TOE-IN
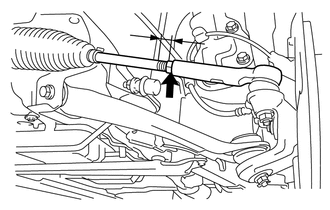
Measure the thread lengths of the right and left rack ends.
- Standard:
Difference in thread length of 1.5 mm (0.0591 in.) or less
Remove the rack boot set clips.
Loosen the tie rod end lock nuts.
Adjust the rack ends if the difference in thread length between the right and left rack ends is not within the specified range.
Extend the shorter rack end if the measured toe-in deviates toward the outer-side.
Shorten the longer rack end if the measured toe-in deviates toward the inner-side.
Turn the right and left rack ends by an equal amount to adjust the toe-in.
- HINT:
-
Try to adjust the toe-in to the center of the specified range.
Make sure that the lengths of the right and left rack ends are the same.
| Tire Size | Engine | Specified Condition |
|---|---|---|
| 185/70 R14 | K3-VE | B-A: 0 +/- 2.0 mm
(0 +/- 0.0787 in.) |
| 185/65 R15 | 3SZ-VE | B-A: 0 +/- 2.0 mm
(0 +/- 0.0787 in.) |
Tighten the tie rod end lock nuts to the specified torque.
- Torque:
- 47 N*m (480 kgf*cm, 35 ft.*lbf)
- NOTICE:
-
Provisionally tighten the lock nut while holding the hexagonal part of the steering rack end so that the lock nut and the steering rack end do not turn together. Hold the flat of the tie rod end and tighten the lock nut.
Place the boots on the seats.