STEERING GEAR / LINKAGE STEERING GEAR REASSEMBLY
CAUTION / NOTICE / HINT
- HINT:
- ·
Use the same procedure for both the RHD and LHD sides.
·The procedure described below is for the LHD side.
PROCEDURE

 45503
1.INSTALL STEERING RACK END SUB-ASSEMBLY
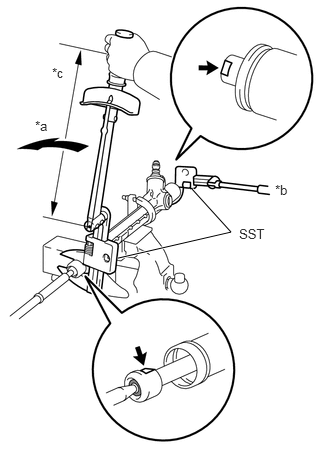
| *a | Turn |
| *b | Hold |
| *c | Fulcrum Length |

|
MP grease |
Fill up the ball joints of both rack ends with MP grease.
Using SST, hold the steering rack and install one steering rack end sub-assembly.
- SST
- 09922-10010
- Torque:
- 84 N*m (856 kgf*cm, 62 ft.*lbf)
- NOTICE:
- ·
Turn SST in the direction shown in the illustration.
·Securely hold the steering rack with the SST.
·Do not damage the steering rack.
·Use a torque wrench with a fulcrum length of 345 mm (13.58 in.).
·Use the formula to calculate special torque values for situations where a union nut wrench is combined with a torque wrench (See page General>INTRODUCTION>REPAIR INSTRUCTION>PRECAUTION).
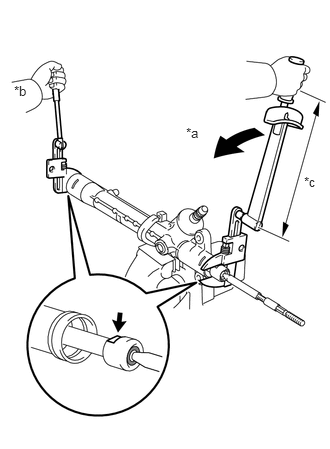
| *a | Turn |
| *b | Hold |
| *c | Fulcrum Length |
|
|
MP grease |
Using SST, hold the installed steering rack end sub-assembly and install the other.
- SST
- 09922-10010
- Torque:
- 84 N*m (856 kgf*cm, 62 ft.*lbf)
- NOTICE:
- ·
Turn SST in the direction shown in the illustration.
·Securely hold the steering rack end sub-assembly with the SST.
·Use a torque wrench with a fulcrum length of 345 mm (13.58 in.).
·Use the formula to calculate special torque values for situations where a union nut wrench is combined with a torque wrench (See page General>INTRODUCTION>REPAIR INSTRUCTION>PRECAUTION).
45514
2.INSTALL NO. 1 STEERING RACK HOUSING BRACKET
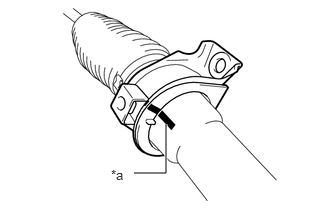
| *a | Matchmark |
Align the matchmarks and install the No. 1 steering rack housing bracket and the grommet onto the steering gear.
45535
3.INSTALL STEERING RACK BOOT LH
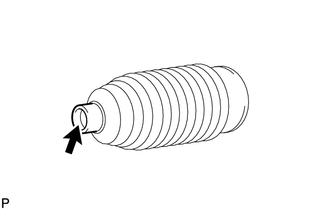
Apply silicon grease to the inside of the small opening of the steering rack boot LH.
Install the steering rack boot LH in the grooves of the rack housing.
After installing the steering rack boot LH, remove the grease adhering to the threaded portion of the steering rack end using a piece of cloth or piece of cloth.
- NOTICE:
-
Make sure that the rack boots are not twisted.
45535
4.INSTALL STEERING RACK BOOT RH
- HINT:
-
Use the same procedure for the RH side as for the LH side.
5.INSTALL STEERING RACK BOOT CLAMP LH
Install new steering rack boot clamp LH in the grooves on the steering rack boot LH.
- NOTICE:
-
Do not damage the steering rack boot LH.
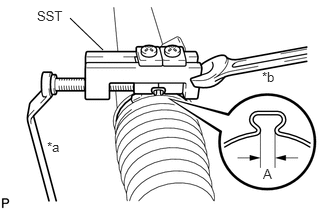
| *a | Turn |
| *b | Hold |
Using SST, pinch the boot clamps.
- SST
- 09521-24010
- Clearance A:
2 mm (0.08 in.) or less
- NOTICE:
-
If clearance is more than that specified, pinch the boot clamp again until the clearance is within the specified range.
6.INSTALL STEERING RACK BOOT CLAMP RH
- HINT:
-
Use the same procedure for the RH side as for the LH side.
45535B
7.INSTALL STEERING RACK BOOT CLIP LH
Using pliers, install the steering rack boot clip LH to the steering rack boot LH.
- NOTICE:
-
Do not twist the steering rack boot.
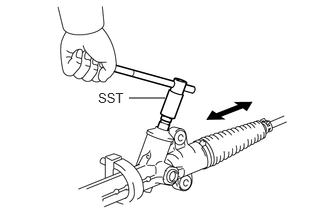
Using SST, check that the rack boot expands and contracts smoothly while the control valve is turned.
- SST
- 09616-00011
45535B
8.INSTALL STEERING RACK BOOT CLIP RH
- HINT:
-
Use the same procedure for the RH side as for the LH side.
45047
9.INSPECT TIE ROD END SUB-ASSEMBLY LH
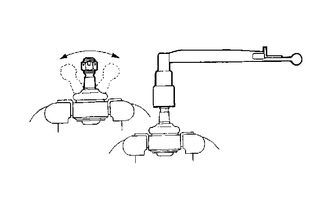
Lightly hold the tie rod end sub-assembly LH ball joint in a vise. Insert aluminum plates between the ball joint and the vise to prevent damage.
- NOTICE:
-
Do not overtighten the vise.
Temporarily install the castle nut.
Flip the ball joint back and forth 5 times.
Set a torque wrench to the nut and check the turning torque.
- Standard turning torque:
0.3 to 2.5 N*m (3 to 25 kgf*cm, 3 to 22 in.*lbf)
45046
10.INSPECT TIE ROD END SUB-ASSEMBLY RH
- HINT:
-
Use the same procedure for the RH side as for the LH side.
45047
11.INSTALL TIE ROD END SUB-ASSEMBLY LH
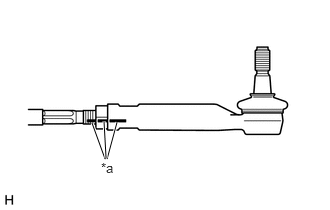
| *a | Matchmark |
Screw on the lock nut and the tie rod end sub-assembly LH until the matchmarks are aligned, and temporarily tighten the lock nut.
- HINT:
-
Fully tighten the lock nut after adjusting toe-in.
45046
12.INSTALL TIE ROD END SUB-ASSEMBLY RH
- HINT:
-
Use the same procedure for the RH side as for the LH side.