DRIVE SHAFT / PROPELLER SHAFT PROPELLER SHAFT ASSEMBLY REASSEMBLY
PROCEDURE

 37230
1.INSTALL NO. 1 CENTER SUPPORT BEARING ASSEMBLY
Hold the front propeller shaft assembly in a vise between aluminium plates.
- NOTICE:
-
Do not overtighten the vise.
Install a new No. 1 center support bearing assembly to the front propeller shaft assembly.
- NOTICE:
-
Install the No. 1 center support bearing assembly facing in the correct direction.
Install a new washer to the front propeller shaft assembly.
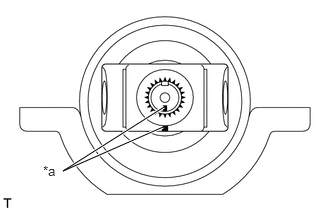
| *a | Matchmarks |
Align the matchmarks and install the center universal joint yoke sub-assembly to the front propeller shaft assembly.
Tighten a new lock nut.
- Torque:
- 117.5 N*m (1198 kgf*cm, 87 ft.*lbf)
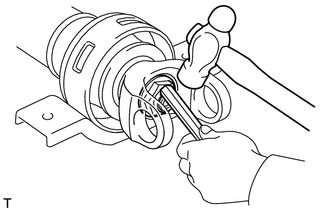
Using a chisel and hammer, stake the lock nut.
2.INSTALL UNIVERSAL JOINT SPIDER ASSEMBLY
- HINT:
-
Install the universal joint spiders on the opposite side using the same procedure as below.
Fit the universal joint spider assembly into the universal joint flange yoke.
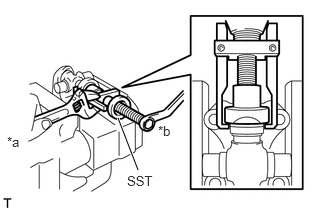
| *a | Hold |
| *b | Turn |
Hold the center universal joint yoke sub-assembly in a vise between aluminium plates.
- NOTICE:
-
Do not overtighten the vise.
Using SST, install the 2 universal joint spider bearings to the universal joint spider assembly.
- SST
- 09332-25010
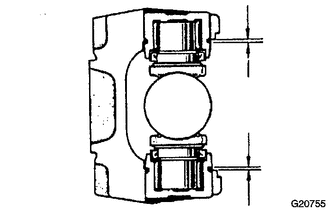
Using SST, adjust both universal joint spider bearings so that the snap ring grooves are at maximum and equal in width.
- SST
- 09332-25010
Install 2 new snap rings with the same thickness which will allow 0.05 mm (0.002 in.) axial play.
- Thickness of snap ring:
Part Number Thickness
mm (in.)9004B-52003 1.47 to 1.50
(0.0579 to 0.0591)9004B-52004 1.50 to 1.53
(0.0591 to 0.0602)9004B-52005 1.53 to 1.56
(0.0602 to 0.0614)9004B-52006 1.56 to 1.59
(0.0614 to 0.0626)9004B-52007 1.59 to 1.62
(0.0626 to 0.0638)9004B-52008 1.62 to 1.65
(0.0638 to 0.0650)9004B-52009 1.65 to 1.68
(0.0650 to 0.0661)9004B-52010 1.68 to 1.71
(0.0661 to 0.0673)
- NOTICE:
- ·
Use a new snap ring.
·Use snap rings as close as possible the same thickness on both sides.
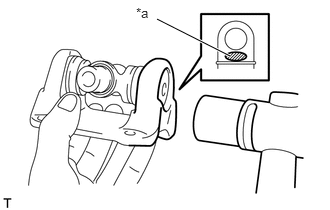
| *a | Hammering Point |
Using a hammer, tap the universal joint flange yoke until there is no clearance between the universal joint spider bearings and snap rings.
Align the matchmarks on the universal joint flange yoke and the rear propeller shaft assembly.
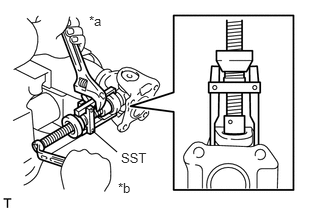
| *a | Hold |
| *b | Turn |
Hold the rear propeller shaft assembly in a vise between aluminium plates.
- NOTICE:
-
Do not overtighten the vise.
Using SST, install the 2 universal joint spider bearings to the universal joint spider assembly.
- SST
- 09332-25010
Using SST, adjust both universal joint spider bearings so that the snap ring grooves are at maximum and equal in width.
- SST
- 09332-25010
Install 2 new snap rings of equal thickness which will allow 0.05 mm (0.002 in.) axial play.
- Thickness of snap ring:
Part Number Thickness
mm (in.)9004B-52003 1.47 to 1.50
(0.0579 to 0.0591)9004B-52004 1.50 to 1.53
(0.0591 to 0.0602)9004B-52005 1.53 to 1.56
(0.0602 to 0.0614)9004B-52006 1.56 to 1.59
(0.0614 to 0.0626)9004B-52007 1.59 to 1.62
(0.0626 to 0.0638)9004B-52008 1.62 to 1.65
(0.0638 to 0.0650)9004B-52009 1.65 to 1.68
(0.0650 to 0.0661)9004B-52010 1.68 to 1.71
(0.0661 to 0.0673)
- NOTICE:
- ·
Use a new snap ring.
·Use snap rings as close as possible the same thickness on both sides.
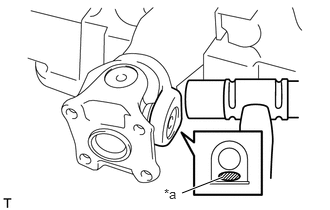
| *a | Hammering Point |
Using a hammer, tap the universal joint flange yoke until there is no clearance between the universal joint spider bearings and snap rings.
3.INSPECT UNIVERSAL JOINT SPIDER ASSEMBLY
Check that the joints move smoothly.
Check the spider bearing axial play by turning the yoke while holding the shaft tightly.
37206
4.INSTALL CENTER SUPPORT BEARING BRACKET SUB-ASSEMBLY
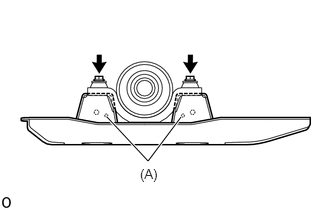
Install the center support bearing bracket sub-assembly to the No. 1 center support bearing with the 2 bolts.
- Torque:
- 36.8 N*m (375 kgf*cm, 27 ft.*lbf)
- NOTICE:
-
Install the center support bearing bracket sub-assembly so that holes (A) face the front propeller shaft.