INTRODUCTION WHEN REMOVING,INSTALLING,REPAIRING OR REPLACING PARTS WHEEL ALIGNMENT STANDARD
The necessary procedures (adjustment, calibration, initialization, or registration) that must be performed after completing the front wheel alignment procedure are shown below.
| Replaced Part or Performed Procedure | Necessary Procedure | Effect/Inoperative Function when Necessary Procedure not Performed | Note |
|---|---|---|---|
| Front wheel alignment adjustment | 1.
Clear zero point calibration data. 2.
Perform yaw rate and acceleration sensor zero point calibration. |
·
DTCs are stored ·
ABS warning light illuminates ·
Brake warning light / yellow (minor malfunction) illuminates ·
Slip indicator light illuminates ·
VSC disabled or malfunctions |
for Initialization
for Calibration |
| Replaced Part or Performed Procedure | Necessary Procedure | Effect/Inoperative Function when Necessary Procedure not Performed | Note |
|---|---|---|---|
| Rear wheel alignment adjustment | 1.
Clear zero point calibration data. 2.
Perform yaw rate and acceleration sensor zero point calibration. |
·
DTCs are stored ·
ABS warning light illuminates ·
Brake warning light / yellow (minor malfunction) illuminates ·
Slip indicator light illuminates ·
VSC disabled or malfunctions |
for Initialization
for Calibration |
MEASURE VEHICLE HEIGHT
- NOTICE:
- ·
Before inspecting the wheel alignment, adjust the vehicle height to the specified value.
·Be sure to perform measurement on a level surface.
·If it is necessary to go under the vehicle for measurement, confirm that the parking brake is applied and the vehicle is secured with chocks.
·Inspect while the vehicle is unloaded.
·The standard value shown here is a value that is used for performing a wheel alignment and does not indicate the height of an actual vehicle.
Bounce the vehicle up and down at the corners to stabilize the suspension.
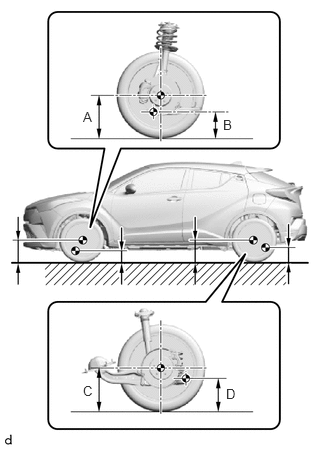
Measure the vehicle height.
A: Ground clearance of front wheel center
B: Ground clearance of front lower No. 1 suspension arm sub-assembly x front suspension crossmember sub-assembly set bolt center
C: Ground clearance of rear wheel center
D: Ground clearance of rear No. 2 suspension arm assembly x rear suspension member sub-assembly set bolt center
- Vehicle Height (Unloaded Vehicle):
Front A - B Rear C - D 121 mm (4.76 in.) 43 mm (1.69 in.)
INSPECT CAMBER, CASTER AND STEERING AXIS INCLINATION (FRONT WHEEL ALIGNMENT)
- NOTICE:
-
Inspect while the vehicle is unloaded.
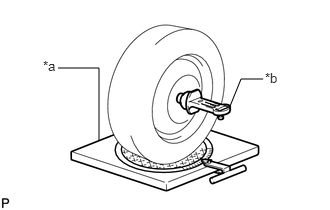
| *a | Turning Radius Gauge |
| *b | Camber-caster-kingpin Gauge |
Install a camber-caster-kingpin gauge and place the front wheels on the center of a turning radius gauge.
Inspect the camber, caster and steering axis inclination.
- Camber (Unloaded Vehicle):
Camber Inclination Right-left Difference 0°02' +/- 0°45' (0.03° +/- 0.75°) 0°45' (0.75°) or less
- Caster (Unloaded Vehicle):
Tire Size Caster Inclination Right-left Difference 215/65R16
215/60R176°46' +/- 0°45' (6.77° +/- 0.75°) 0°45' (0.75°) or less 225/50R18 6°47' +/- 0°45' (6.°78 +/- 0.75°) 0°45' (0.75°) or less
- Steering Axis Inclination (Unloaded Vehicle):
Caster Inclination 14°01' (14.02°)
INSPECT TOE-IN (FRONT WHEEL ALIGNMENT)
- NOTICE:
-
Inspect while the vehicle is unloaded.
Bounce the vehicle up and down at the corners to stabilize the suspension.
Release the parking brake and move the shift lever to N.
Push the vehicle straight ahead approximately 5 m (16.4 ft.). (Step C)
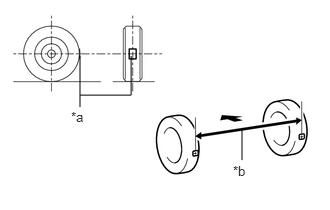
| *a | Tread Center Mark |
| *b | Dimension B |

|
Front of the Vehicle |
Put tread center marks on the rearmost points of the front wheels and measure the distance between the marks (dimension B).
Slowly push the vehicle straight ahead to cause the front wheels to rotate 180°. Use the front tire valve as a reference point.
- HINT:
-
Do not allow the wheels to rotate more than 180°. If the wheels rotate more than 180°, perform the procedure from step C again.
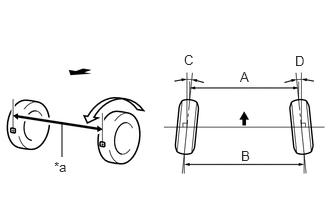
| *a | Dimension A |
|
|
Front of the Vehicle |
Measure the distance between the tread center marks on the front of the wheels (dimension A).
- Toe-in (Unloaded Vehicle):
Specified Condition C + D: 0°07' +/- 0°10' (0.12° +/- 0.17°) B - A: 1.5 +/- 2.0 mm (0.0591 +/- 0.0787 in.)
- HINT:
-
Measure "B - A" only when "C + D" cannot be measured.
If the toe-in is not within the specified range, adjust it at the steering rack ends.
INSPECT WHEEL ANGLE (FRONT WHEEL ALIGNMENT)
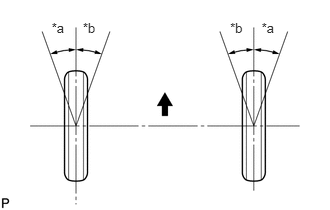
| *a | Inside |
| *b | Outside |
|
|
Front of the Vehicle |
Put tread center marks on the rearmost points of a turning radius gauge.
Turn the steering wheel fully to the left and right and measure the turning angle.
- NOTICE:
-
Inspect while the vehicle is unloaded.
- Wheel Turning Angle (Unloaded Vehicle):
Inside Wheel Outside Wheel 39°16' +/- 2°00' (39.27° +/- 2.00°) 33°35' (33.58°)
If the right and left inside wheel angles differ from the specified value, check and adjust the right and left steering rack end lengths.
INSPECT CAMBER (REAR WHEEL ALIGNMENT)
- NOTICE:
-
Inspect while the vehicle is unloaded.
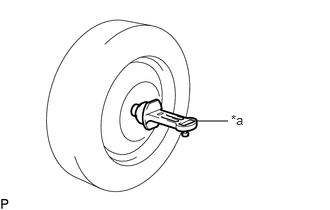
| *a | Camber-caster-kingpin Gauge |
Install a camber-caster-kingpin gauge.
Inspect the camber.
- Camber (Unloaded Vehicle):
Camber Inclination -0°51' +/- 0°45' (0.85° +/- 0.75°)
- HINT:
-
Camber is not adjustable. If the measurement is not within the specified range, inspect the suspension parts for damage and/or wear, and replace them if necessary.
INSPECT TOE-IN (REAR WHEEL ALIGNMENT)
- NOTICE:
-
Inspect while the vehicle is unloaded.
Bounce the vehicle up and down at the corners to stabilize the suspension.
Release the parking brake and move the shift lever to N.
Push the vehicle straight ahead approximately 5 m (16.4 ft.). (Step A)
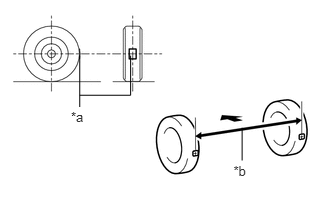
| *a | Tread Center Mark |
| *b | Dimension B |
|
|
Front of the Vehicle |
Put tread center marks on the rearmost points of the rear wheels and measure the distance between the marks (dimension B).
Slowly push the vehicle straight ahead to cause the rear wheels to rotate 180°. Use the rear tire valve as a reference point.
- HINT:
-
Do not allow the wheels to rotate more than 180°. If the wheels rotate more than 180°, perform the procedure from step A again.
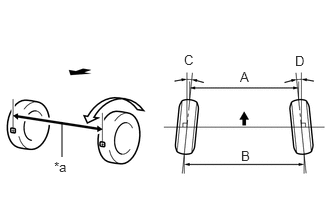
| *a | Dimension A |
|
|
Front of the Vehicle |
Measure the distance between the tread center marks on the front of the rear wheels (dimension A).
- Toe-in (Unloaded Vehicle):
Specified Condition C + D: 0°15' +/- 0°10' (0.25° +/- 0.17°) B - A: 3.0 +/- 2.0 mm (0.118 +/- 0.0787 in.)
- HINT:
-
Measure "B - A" only when "C + D" cannot be measured.
If the toe-in is not within the specified range, adjust it at the rear suspension toe adjust cam sub-assembly.