HEATING / AIR CONDITIONING AIR CONDITIONING SYSTEM PTC Heater Circuit
DESCRIPTION
The air conditioning amplifier assembly sends operation signals to the PTC heater relays when quick heater assembly operation conditions are met. Based on the signals from the air conditioning amplifier assembly, the PTC heater relays turn on, and power is supplied to the quick heater assembly installed in the air conditioning radiator assembly.
| Control ECU | Condition |
|---|---|
| Air Conditioning Amplifier Assembly | Power switch on (READY) |
| ECO mode: Off | |
| Blower switch: On | |
| Temperature setting: MAX HOT | |
| Light control switch off | |
·
Engine coolant temperature 65°C (149°F) or lower (3 PTC heater relays operating) ·
Engine coolant temperature 70°C (158°F) or lower (2 PTC heater relays operating) ·
Engine coolant temperature 75°C (167°F) or lower (1 PTC heater relay operating) |
|
·
Ambient temperature -7°C (19°F) or lower (3 PTC heater relays operating) ·
Ambient temperature 16°C (61°F) or lower (2 PTC heater relays operating) ·
Ambient temperature 25°C (77°F) or lower (1 PTC heater relay operating) |
WIRING DIAGRAM
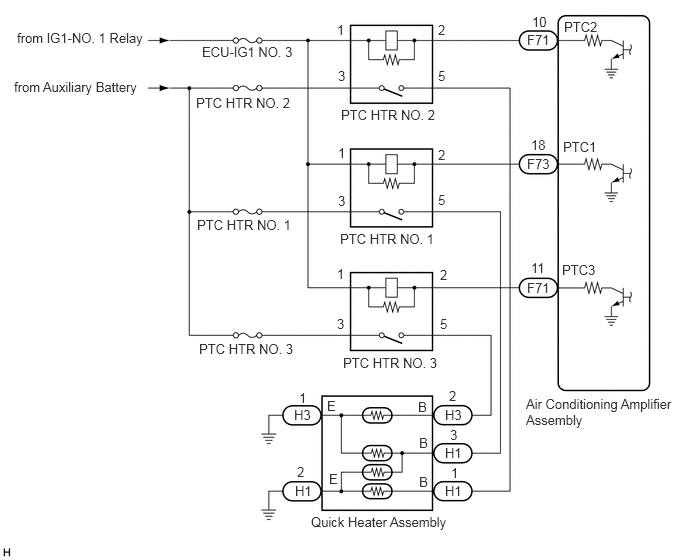
CAUTION / NOTICE / HINT
- NOTICE:
-
Inspect the fuses for circuits related to this system before performing the following procedure.
PROCEDURE
Connect the GTS to the DLC3.
Turn the power switch on (IG).
Turn the GTS on.
Enter the following menus: Body Electrical / Air Conditioner / Active Test.
Perform the Active Test according to the display on the GTS.
- Body Electrical > Air Conditioner > Active Test
-
Tester Display Measurement Item Control Range Diagnostic Note Heater Active Level Quick heater assembly Min.: 0, Max.: 3 -
- Body Electrical > Air Conditioner > Active Test
-
Tester Display Heater Active Level - 50004 121 33
- OK:
Heater Active Level changes normally.
- Result:
Proceed to OK NG
OK
NG
Click hereVehicle Interior>HEATING / AIR CONDITIONING>AIR CONDITIONING SYSTEM>PROBLEM SYMPTOMS TABLE
Remove the PTC heater relays.
Inspect the PTC heater relays.
Click hereVehicle Interior>HEATING / AIR CONDITIONING>RELAY>ON-VEHICLE INSPECTION
- Result:
Proceed to OK NG
OK
NG
Measure the voltage according to the value(s) in the table below.
- Standard Voltage:
- PTC HTR NO. 1:
Tester Connection Condition Specified Condition Relay terminal 3 - Body ground Power switch off 11 to 14 V Relay terminal 1 - Body ground Power switch off Below 1 V Relay terminal 1 - Body ground Power switch on (IG) 11 to 14 V
- Standard Voltage:
- PTC HTR NO. 2:
Tester Connection Condition Specified Condition Relay terminal 3 - Body ground Power switch off 11 to 14 V Relay terminal 1 - Body ground Power switch off Below 1 V Relay terminal 1 - Body ground Power switch on (IG) 11 to 14 V
- Standard Voltage:
- PTC HTR NO. 3:
Tester Connection Condition Specified Condition Relay terminal 3 - Body ground Power switch off 11 to 14 V Relay terminal 1 - Body ground Power switch off Below 1 V Relay terminal 1 - Body ground Power switch on (IG) 11 to 14 V
- Result:
Proceed to OK NG
OK
NG
Disconnect the F71 and F73 air conditioning amplifier assembly connectors.
Measure the resistance according to the value(s) in the table below.
- Standard Resistance:
- PTC HTR NO. 1:
Tester Connection Condition Specified Condition Relay terminal 2 - F73-18 (PTC1) Always Below 1 Ω Relay terminal 2 or F73-18 (PTC1) - Body ground Always 10 kΩ or higher
- Standard Resistance:
- PTC HTR NO. 2:
Tester Connection Condition Specified Condition Relay terminal 2 - F71-10 (PTC2) Always Below 1 Ω Relay terminal 2 or F71-10 (PTC2) - Body ground Always 10 kΩ or higher
- Standard Resistance:
- PTC HTR NO. 3:
Tester Connection Condition Specified Condition Relay terminal 2 - F71-11 (PTC3) Always Below 1 Ω Relay terminal 2 or F71-11 (PTC3) - Body ground Always 10 kΩ or higher
- Result:
Proceed to OK NG
OK
NG
Disconnect the H1 and H3 quick heater assembly connectors.
Measure the resistance according to the value(s) in the table below.
- Standard Resistance:
- PTC HTR NO. 1:
Tester Connection Condition Specified Condition Relay terminal 5 - H1-3 (B) Always Below 1 Ω H1-2 (E) - Body ground Always Below 1 Ω H3-1 (E) - Body ground Always Below 1 Ω H1-3 (B) - Body ground Always 10 kΩ or higher
- Standard Resistance:
- PTC HTR NO. 2:
Tester Connection Condition Specified Condition Relay terminal 5 - H1-1 (B) Always Below 1 Ω H1-2 (E) - Body ground Always Below 1 Ω H1-1 (B) - Body ground Always 10 kΩ or higher
- Standard Resistance:
- PTC HTR NO. 3:
Tester Connection Condition Specified Condition Relay terminal 5 - H3-2 (B) Always Below 1 Ω H3-1 (E) - Body ground Always Below 1 Ω H3-2 (B) - Body ground Always 10 kΩ or higher
- Result:
Proceed to OK NG
OK
NG
Remove the quick heater assembly.
Click hereVehicle Interior>HEATING / AIR CONDITIONING>PTC HEATER ASSEMBLY>REMOVAL
Inspect the quick heater assembly.
Click hereVehicle Interior>HEATING / AIR CONDITIONING>PTC HEATER ASSEMBLY>INSPECTION
- Result:
Proceed to OK NG
OK
NG