M20A-FXS ENGINE MECHANICAL CYLINDER HEAD DISASSEMBLY
CAUTION / NOTICE / HINT
The necessary procedures (adjustment, calibration, initialization or registration) that must be performed after parts are removed and installed, or replaced during cylinder head removal/installation are shown below.
| Replaced Part or Performed Procedure | Necessary Procedure | Effect/Inoperative Function when Necessary Procedure not Performed | Link |
|---|---|---|---|
| Replacement of inverter with converter assembly | Resolver learning | ·
DTCs are stored ·
Slight vibration at a vehicle speed of 5 km/h (3 mph) or less ·
Shock or vibration during acceleration |
( ) |
for SFI system
Replacement of ECM |
Perform Vehicle Identification Number (VIN) registration | MIL comes on | ()
|
for SFI system
·
Replacement of throttle body assembly ·
Replacement of cylinder head sub-assembly ·
Replacement of camshaft (for intake or exhaust camshaft) ·
Replacement of camshaft timing gear assembly ·
Replacement of fuel injector assembly ·
Replacement of spark plug ·
Replacement of ignition coil assembly ·
Replacement of EGR valve assembly ·
Gas leak from exhaust system is repaired ·
Replacement of knock sensor |
Inspection After Repair | ·
Poor idle, etc. ·
Engine start function, etc. |
()
|
| Suspension, tires, etc.
(The vehicle height changes because of suspension or tire replacement) |
Initialize No. 1 headlight ECU sub-assembly LH | Automatic headlight beam level control system | ()
|
| Front wheel alignment adjustment | 1.
Clear zero point calibration data. 2.
Perform yaw rate and acceleration sensor zero point calibration. |
·
DTCs are stored ·
ABS warning light illuminates ·
Brake warning light/yellow (minor malfunction) illuminates ·
Slip indicator light illuminates ·
VSC disabled or malfunctions |
for Initialization:
( )
for Calibration: ( )
|
| Replacement of hybrid vehicle transaxle assembly | ·
Resolver learning ·
Initialize resolver |
·
DTCs are stored ·
Slight vibration at a vehicle speed of 5 km/h (3 mph) or less ·
Shock or vibration during acceleration |
()
|
PROCEDURE

 13711
1.REMOVE INTAKE VALVE
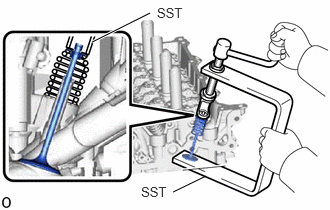
Using SST, compress each compression spring and remove the 8 valve spring retainer locks.
- SST
- 09202-70020 (09202-01010, 09202-01020)
09202-00021
- HINT:
-
Arrange the removed parts in such a way that they can be reinstalled to their original locations.
Remove the 8 valve spring retainers, 8 compression springs and 8 intake valves from the cylinder head sub-assembly.
- HINT:
-
Arrange the removed parts in such a way that they can be reinstalled to their original locations.
13715
2.REMOVE EXHAUST VALVE
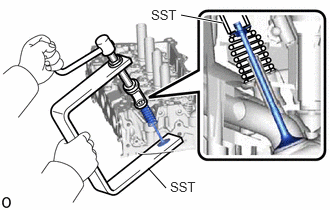
Using SST, compress each compression spring and remove the 8 valve spring retainer locks.
- SST
- 09202-70020 (09202-01010, 09202-01020)
09202-00021
- HINT:
-
Arrange the removed parts in such a way that they can be reinstalled to their original locations.
Remove the 8 valve spring retainers, 8 compression springs and 8 exhaust valves from the cylinder head sub-assembly.
- HINT:
-
Arrange the removed parts in such a way that they can be reinstalled to their original locations.
3.REMOVE VALVE STEM OIL SEAL
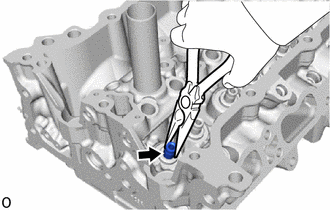
Using needle-nose pliers, remove the 16 valve stem oil seals.
4.REMOVE VALVE SPRING SEAT
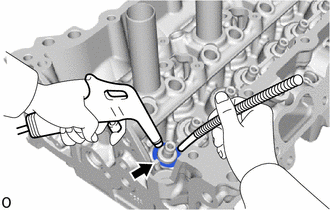
Using compressed air and a Magnet Hand, remove the 16 valve spring seats from the cylinder head sub-assembly by blowing air onto them.
11117E
5.REMOVE NO. 1 STRAIGHT SCREW PLUG
- NOTICE:
-
If coolant leaks from a No. 1 straight screw plug or a plug is corroded, replace it.
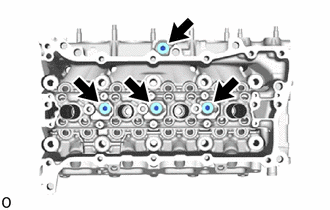
Using a 6 mm straight hexagon wrench, remove the 4 No. 1 straight screw plugs from the cylinder head sub-assembly.
6.REMOVE STUD BOLT
- NOTICE:
-
If a stud bolt is deformed or its threads are damaged, replace it.
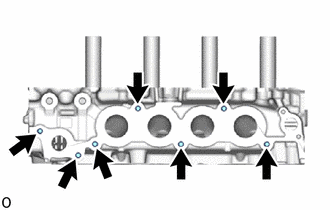
Using an E8 "TORX" socket wrench, remove the 7 stud bolts.