LIGHTING (EXT) LIGHTING SYSTEM(w/ Headlight ECU) B1244 Light Sensor Circuit Malfunction
DESCRIPTION
The automatic light control sensor detects ambient light. The sensor creates an electrical signal based on the amount of light detected, and sends the signal to the main body ECU (multiplex network body ECU). The main body ECU (multiplex network body ECU) turns on or off the headlights and taillights according to the signal.
| DTC No. | Detection Item | DTC Detection Condition | Trouble Area | Note |
|---|---|---|---|---|
| B1244 | Light Sensor Circuit Malfunction | Any of the following conditions is met:
·
Malfunction in automatic light control sensor ·
Open in automatic light control sensor circuit ·
Short in automatic light control sensor circuit |
·
Automatic light control sensor ·
Harness or connector ·
Main body ECU (multiplex network body ECU) |
- |
| Vehicle Condition | ||||
|---|---|---|---|---|
| Pattern 1 | Pattern 2 | Pattern 3 | ||
| Diagnosis Condition | Power switch ON | ○ | ○ | ○ |
| Malfunction Status | Malfunction in automatic light control sensor | ○ | - | - |
| Open in automatic light control sensor circuit | - | ○ | - | |
| Short in automatic light control sensor circuit | - | - | ○ | |
| Detection Time | - | - | - | |
| Number of Trips | 1 trip | 1 trip | 1 trip | |
- HINT:
-
DTC will be output when conditions for either of the patterns in the table above are met.
WIRING DIAGRAM
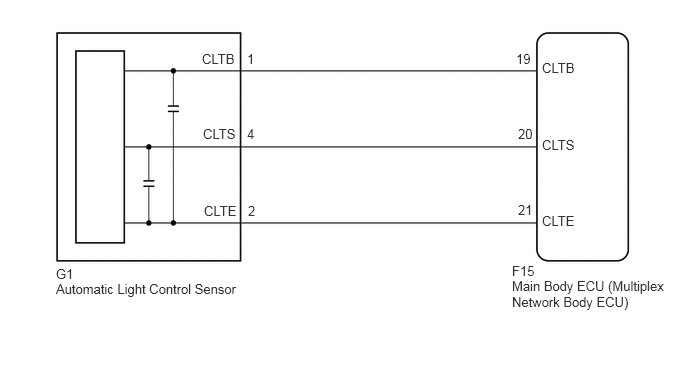
CAUTION / NOTICE / HINT
- NOTICE:
-
Before replacing the main body ECU (multiplex network body ECU), refer to Service Bulletin.*1
-
*1: w/ Entry and Start System
PROCEDURE
Connect the GTS to the DLC3.
Turn the power switch to on (IG).
Turn the GTS on.
Enter the following menus: Body Electrical / Main Body / Data List.
Read the Data List according to the display on the GTS.
- Body Electrical > Main Body > Data List
-
Tester Display Measurement Item Range Normal Condition Diagnostic Note Light Sensor Illuminance Light control sensor illuminance 0 to 8191 lx Value is output according to ambient light level -
- Body Electrical > Main Body > Data List
-
Tester Display Light Sensor Illuminance - 50003 123 279
- OK:
Normal condition listed above is displayed.
- Result:
Result Proceed to OK (for LHD) A OK (for RHD) B NG C
A
B
C
Disconnect the G1 automatic light control sensor connector.
Disconnect the F15 main body ECU (multiplex network body ECU) connector.
Measure the resistance according to the value(s) in the table below.
- Standard Resistance:
Tester Connection Condition Specified Condition F15-21 (CLTE) - G1-2 (CLTE) Always Below 1 Ω F15-20 (CLTS) - G1-4 (CLTS) Always Below 1 Ω F15-19 (CLTB) - G1-1 (CLTB) Always Below 1 Ω F15-21 (CLTE) or G1-2 (CLTE) - Body ground Always 10 kΩ or higher F15-20 (CLTS) or G1-4 (CLTS) - Body ground Always 10 kΩ or higher F15-19 (CLTB) or G1-1 (CLTB) - Body ground Always 10 kΩ or higher
- Result:
Proceed to OK NG
OK
NG
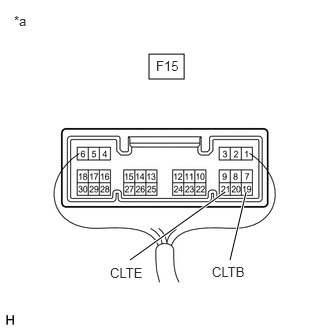
| *a | Component with harness connected
(Main Body ECU (Multiplex Network Body ECU)) |
Reconnect the main body ECU (multiplex network body ECU) connector.
Measure the voltage according to the value(s) in the table below.
- Standard Voltage:
Tester Connection Switch Condition Specified Condition F15-19 (CLTB) - F15-21 (CLTE) Power switch off Below 1 V Power switch on (IG) 11 to 14 V
- Result:
Result Proceed to OK A NG (for LHD) B NG (for RHD) C
A
B
C
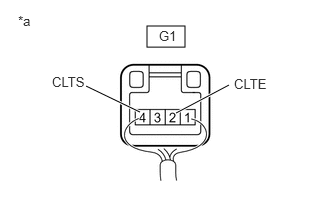
| *a | Component with harness connected
(Automatic Light Control Sensor) |
Reconnect the automatic light control sensor connector.
Connect an oscilloscope to the automatic light control sensor connector.
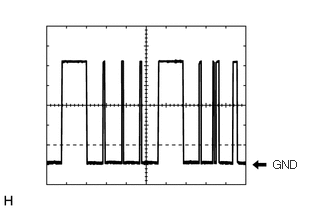
Check the waveform.
- OK:
Tester Connection Tool Setting Condition Specified Condition G1-2 (CLTE) - G1-4 (CLTS) 2 V/DIV., 10 ms./DIV. Power switch ON, light control switch in AUTO position Correct waveform is as shown
- HINT:
-
The communication waveform changes according to the surrounding brightness.
- Result:
Result Proceed to OK (for LHD) A OK (for RHD) B NG C
A
B
C