AXLE AND DIFFERENTIAL STEERING KNUCKLE REMOVAL
CAUTION / NOTICE / HINT
The necessary procedures (adjustment, calibration, initialization, or registration) that must be performed after parts are removed and installed, or replaced during steering knuckle removal/installation are shown below.
| Replacement Part or Procedure | Necessary Procedures | Effect/Inoperative Function When Necessary Procedures are not Performed | Link |
|---|---|---|---|
|
*1: The vehicle height changes because of suspension or tire replacement. |
|||
| Auxiliary battery terminal is disconnected/reconnected | Memorize steering angle neutral point | Panoramic view monitor system | ( ) |
| Front wheel alignment adjustment | 1.
Clear zero point calibration data. 2.
Perform yaw rate and acceleration sensor zero point calibration. |
·
DTCs are stored ·
ABS warning light illuminates ·
Brake warning light / yellow (minor malfunction) illuminates ·
Slip indicator light illuminates ·
VSC disabled or malfunctions |
for Initialization:()
for Calibration:( )
|
| Suspension, tires, etc.*1 | ·
Measurement of ultrasonic sensor detection angle ·
Ultrasonic sensor detection angle registration |
·
Parking support brake system ·
Simple intelligent parking assist system |
()
|
·
Parking assist ECU initialization ·
Adjust steering angle |
Panoramic view monitor system | ()
|
|
- NOTICE:
- ·
When removing or installing the front disc brake caliper assembly, pushing back the disc brake piston may cause a large clearance between the brake pads and brake disc. When the brake pedal is depressed with a large clearance between the brake pads and the brake disc, DTC C1214 related to abnormal brake fluid pressure may be stored. Make sure to clear any DTCs after performing this step.
·While the auxiliary battery is connected, even if the power switch is off, the brake control system activates when the brake pedal is depressed or any door courtesy switch turns on. Therefore, when servicing the brake system components, do not operate the brake pedal or open/close the doors while the auxiliary battery is connected.
- HINT:
- ·
When the cable is disconnected/reconnected to the auxiliary battery terminal, systems temporarily stop operating. However, each system has a function that completes learning the first time the system is used.
-Learning completes when vehicle is driven
Effect/Inoperative Function When Necessary Procedures are not Performed Necessary Procedures Link *1: When performing learning using the GTS
Click here(
)
Lane tracing assist system Drive the vehicle straight ahead at 35 km/h (22 mph) or more for 5 seconds or more. ( )
Pre-collision system Simple intelligent parking assist system*1 Parking support brake system*1 Toyota parking assist-sensor system*1
-Learning completes when vehicle is operated normally
Effect/Inoperative Function When Necessary Procedures are not Performed Necessary Procedures Link Power door lock control system
·Back door opener
Perform door unlock operation with door control switch or electrical key transmitter sub-assembly switch. ( )
Air conditioning system After the ignition switch is turned to ON, the servo motor standard position is recognized. -
·Use the same procedure for the RH side and LH side.
·The following procedure is for the LH side.
PROCEDURE

 1.REMOVE FRONT AXLE ASSEMBLY
43340A
2.REMOVE FRONT LOWER BALL JOINT ASSEMBLY
43212
3.REMOVE STEERING KNUCKLE
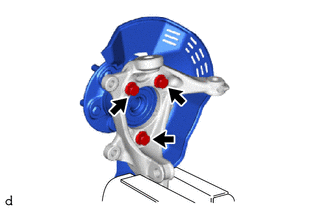
Secure the front axle assembly between aluminum plates in a vise.
- NOTICE:
-
Do not overtighten the vise.
Remove the 3 bolts, front axle hub sub-assembly and front disc brake dust cover from the steering knuckle.
- NOTICE:
- ·
Do not drop the front axle hub sub-assembly.
·Be careful not to damage the speed sensor rotor or contact surfaces.
·Do not allow foreign matter to contact the speed sensor rotor or contact surfaces.