EXTERIOR PANELS / TRIM FRONT DOOR OUTSIDE MOULDING REASSEMBLY
CAUTION / NOTICE / HINT
- HINT:
- ·
Use the same procedure for the RH and LH sides.
·The procedure listed below is for the LH side.
PROCEDURE

 75734C
1.INSTALL FRONT DOOR REAR OUTSIDE MOULDING (w/ Plated Moulding)
When using a new front door outside moulding:
Clean the surface of the front door outside moulding.
When reusing the front door outside moulding:
Remove the double-sided tape from the front door outside moulding.
Wipe off any tape adhesive residue with cleaner.
Install a new front door rear outside moulding.
Remove the release paper from the front door rear outside moulding.
- HINT:
-
After removing the release paper, keep the exposed adhesive free from foreign matter.
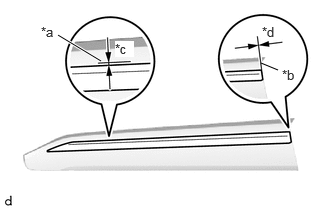
| *a | Mark-off Line |
| *b | Front Door Outside Moulding Edge |
| *c | 2.3 mm (0.091 in.) |
| *d | 1.1 mm (0.043 in.) |
Install the front door rear outside moulding as shown in the illustration.
75734C
2.INSTALL FRONT DOOR REAR OUTSIDE MOULDING (for TMMT Made GR SPORT)
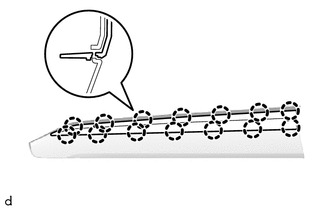
Engage the claws to install the front door rear outside moulding.
75392F
3.INSTALL OUTSIDE MOULDING RETAINER
When using a new front door outside moulding:
Clean the surface of the front door outside moulding.
When reusing the front door outside moulding:
Remove the double-sided tape from the front door outside moulding.
Wipe off any tape adhesive residue with cleaner.
Install a new outside moulding retainer.
Remove the release paper from the outside moulding retainer.
- HINT:
-
After removing the release paper, keep the exposed adhesive free from foreign matter.
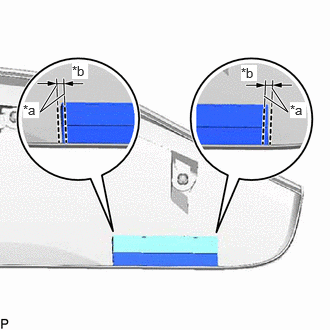
| *a | Mark-off Line |
| *b | 4.0 mm (0.157 in.) |
Install the outside moulding retainer as shown in the illustration.
75793
4.INSTALL FRONT DOOR UPPER OUTSIDE MOULDING PAD
When using a new front door outside moulding:
Clean the surface of the front door outside moulding.
When reusing the front door outside moulding:
Remove the double-sided tape from the front door outside moulding.
Wipe off any tape adhesive residue with cleaner.
Install a new front door upper outside moulding pad.
Remove the release paper from the front door upper outside moulding pad.
- HINT:
-
After removing the release paper, keep the exposed adhesive free from foreign matter.
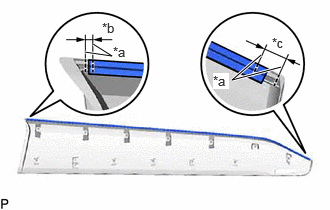
| *a | Mark-off Line |
| *b | 3.0 mm (0.118 in.) |
| *c | 23.0 mm (0.906 in.) |
Install the front door upper outside moulding pad as shown in the illustration.