SEAT POWER SEAT TRACK RAIL ASSEMBLY REMOVAL
CAUTION / NOTICE / HINT
The necessary procedures (adjustment, calibration, initialization, or registration) that must be performed after parts are removed and installed, or replaced during upper seat track rail sub-assembly removal/installation are shown below.
| Replaced Part or Performed Procedure | Necessary Procedure | Effect/Inoperative Function when Necessary Procedure not Performed | Link |
|---|---|---|---|
|
*1: When performing learning using the GTS. Click here( |
|||
| Disconnect cable from negative auxiliary battery terminal | Perform steering sensor zero point calibration | Lane departure alert system (w/ Steering Control) | ( ) |
| Toyota parking assist-sensor system*1 | |||
| Parking support brake system*1 | |||
| Simple intelligent parking assist system*1 | |||
| Pre-collision system | |||
| Memorize steering angle neutral point | Panoramic view monitor system | ()
|
|
| Initialize back door lock | Power door lock control system | ()
|
|
- CAUTION:
- ·
Be sure to read Precaution thoroughly before servicing.
Click hereVehicle Interior>SUPPLEMENTAL RESTRAINT SYSTEMS>AIRBAG SYSTEM>PRECAUTION
·Wear protective gloves. Sharp areas on the parts may injure your hands.
- HINT:
- ·
Power seat is available only on the driver side.
·Use the same procedure for RHD and LHD vehicles.
·The following procedure is for LHD vehicles.
PROCEDURE

 1. PRECAUTION
- NOTICE:
-
After turning the power switch off, waiting time may be required before disconnecting the cable from the negative (-) auxiliary battery terminal. Therefore, make sure to read the disconnecting the cable from the negative (-) auxiliary battery terminal notices before proceeding with work.
-
Click hereGeneral>INTRODUCTION>REPAIR INSTRUCTION>PRECAUTION
2.REMOVE FRONT SEAT ASSEMBLY LH
71868A
3.REMOVE FRONT SEAT INNER NO. 1 CUSHION SHIELD LH
71812D
4.REMOVE FRONT SEAT CUSHION SHIELD LH
72108
5.REMOVE UPPER SEAT TRACK RAIL SUB-ASSEMBLY LH
- NOTICE:
- ·
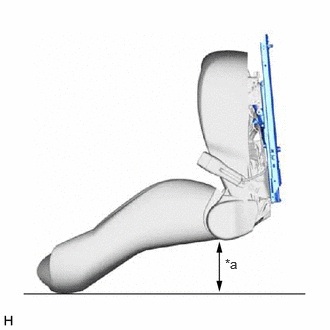 2.344,2.667 2.563,2.854 0.219,0.188 10 false *a
*a 80 mm (3.15 in.)
In order to reduce the risk of damage to the part and to ensure ease of operations, secure a space of 80 mm (3.15 in.) or more as shown in the illustration.
·Secure enough space to ensure that the upper seat track rail sub-assembly LH does not contact any other objects during installation.
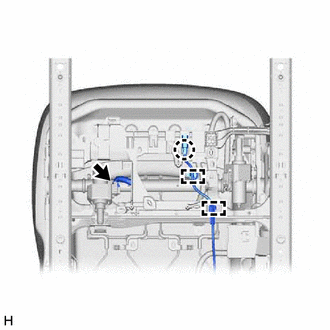
Disconnect the slide motor connector.
Disengage the claw and 2 clamps.
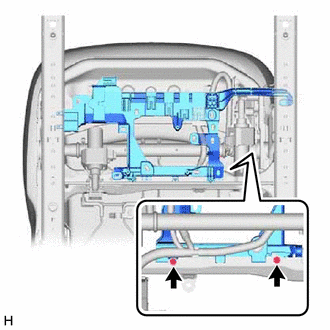
Remove the 2 screws.
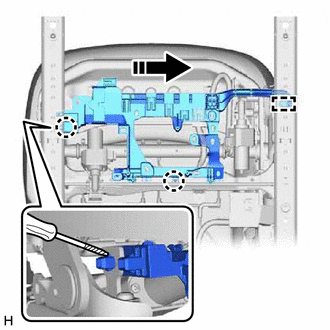

|
Remove in this direction |

|
Protective Tape |
Using a screwdriver with its tip wrapped with protective tape, disengage the 2 claws.
Disengage the guide to remove the front seat cushion wire harness holder LH as shown in the illustration.
- NOTICE:
-
When remove the front seat cushion wire harness holder LH, take care not to damage each connector and wire harness.
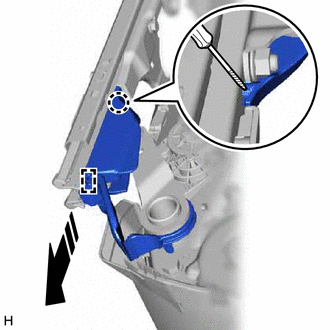
|
|
Remove in this direction |
|
|
Protective Tape |
Using a screwdriver with its tip wrapped with protective tape, disengage the claw.
Disengage the guide to remove the front seat lower cushion shield LH from the upper seat track rail sub-assembly LH as shown in the illustration.
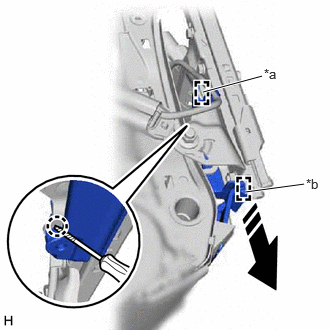
| *a | Clamp |
| *b | Guide |
|
|
Remove in this direction |
|
|
Protective Tape |
Using a screwdriver with its tip wrapped with protective tape, disengage the claw.
Disengage the clamp.
Disengage the guide to remove the front seat lower cushion shield RH from the upper seat track rail sub-assembly LH as shown in the illustration.
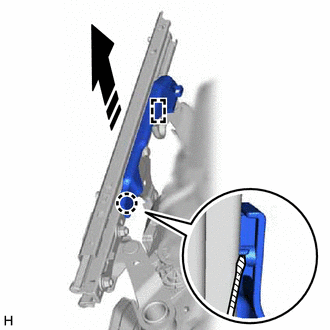
|
|
Remove in this direction |
|
|
Protective Tape |
Using a screwdriver with its tip wrapped with protective tape, disengage the claw.
Disengage the guide to remove the front seat lower No. 1 cushion shield LH from the upper seat track rail sub-assembly LH as shown in the illustration.
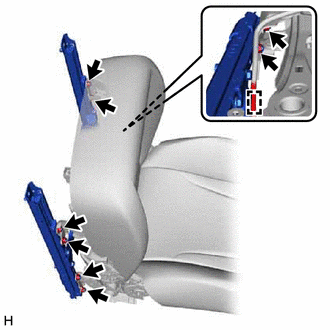
Disengage the clamp.
Remove the 8 nuts and upper seat track rail sub-assembly LH.
- NOTICE:
-
Do not reuse the upper seat track rail sub-assembly LH.