NAVIGATION / MULTI INFO DISPLAY ANTENNA CORD INSTALLATION
PROCEDURE

 86101D
1.INSTALL NO. 3 ANTENNA CORD SUB-ASSEMBLY
w/ Manual (SOS) Switch:
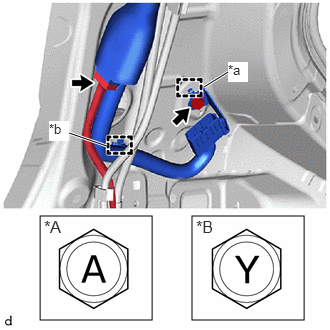
| *A | for Type A |
| *B | for Type B |
| *a | Guide |
| *b | Clamp |
Engage the clamp and guide to temporarily install the No. 3 antenna cord sub-assembly.
Install the bolt.
- Torque:
- for Type A : 10.5 N*m (107 kgf*cm, 8 ft.*lbf)
- for Type B : 10 N*m (102 kgf*cm, 7 ft.*lbf)
Connect the connector of the floor wire.
w/o Manual (SOS) Switch:
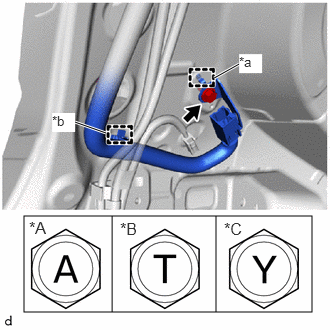
| *A | for Type A |
| *B | for Type B |
| *C | for Type C |
| *a | Guide |
| *b | Clamp |
Engage the clamp and guide to temporarily install the No. 3 antenna cord sub-assembly.
Install the bolt.
- Torque:
- for Type A : 10.5 N*m (107 kgf*cm, 8 ft.*lbf)
- for Type B : 10 N*m (102 kgf*cm, 7 ft.*lbf)
- for Type C : 10 N*m (102 kgf*cm, 7 ft.*lbf)
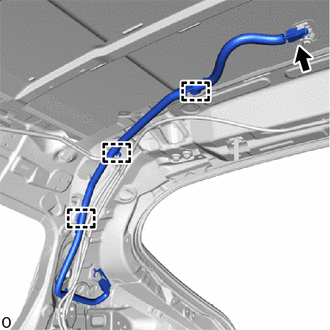
Engage the clamps to install the No. 3 antenna cord sub-assembly.
Connect the connector.
for Glass Antenna Type:
Connect the connector of the No. 4 antenna cord sub-assembly.
86101J
2.INSTALL NO. 2 ANTENNA CORD SUB-ASSEMBLY
for Type A:
Remove the old double-sided tape from the roof headlining.
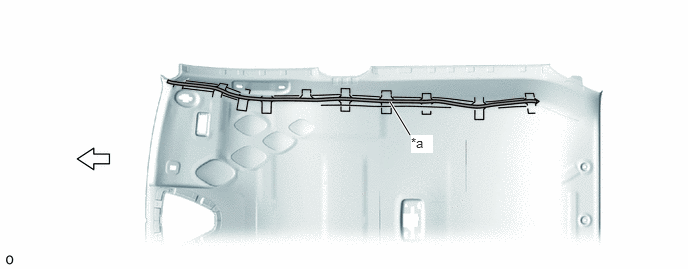
| *a | Marking | - | - |

|
Double-sided Tape | 
|
Front |
Prepare an appropriate amount of new double-sided tape.
- HINT:
-
Be careful not to touch the adhesive surface.
Apply the double-sided tape to the roof headlining while aligning the tape with the markings on the roof headlining.
Peel off the release paper from the double-sided tape.
Align the marking tape (A) on the No. 2 antenna cord sub-assembly with the protrusion on the front of the roof headlining and wrap tape around the No. 2 antenna cord sub-assembly and protrusion of the roof headlining.
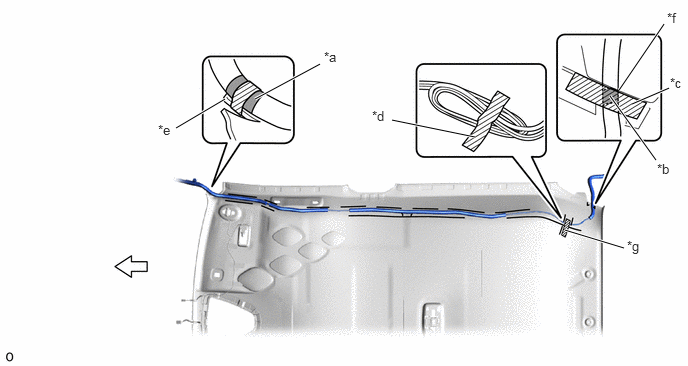
| *a | Marking Tape (A) | *b | Marking Tape (B) |
| *c | Adhesive Tape (A) | *d | Adhesive Tape (B) |
| *e | Protrusion | *f | Edge of the roof headlining |
| *g | Adjustment Area | - | - |
|
|
Front | - | - |
Install the No. 2 antenna cord sub-assembly on the double-sided tape of the roof headlining.
- NOTICE:
- ·
Make sure that there are no gaps between the roof headlining and No. 2 antenna cord sub-assembly, and that the No. 2 antenna cord sub-assembly is not twisted.
·Make sure the No. 2 antenna cord assembly is securely installed. If any part of the No. 2 antenna cord sub-assembly is loose, it will cause an abnormal noise.
Align the marking tape (B) on the No. 2 antenna cord sub-assembly with the edge of roof headlining on the roof headlining and secure the No. 2 antenna cord sub-assembly with the adhesive tape (A) as shown in the illustration.
- NOTICE:
-
Make sure that there are no gaps between the roof headlining and No. 2 antenna cord sub-assembly, and that the No. 2 antenna cord sub-assembly is not twisted.
Apply the adhesive tape (B) as shown in the illustration to secure the No. 2 antenna cord subassembly.
- HINT:
-
Secure the extra length of the No. 2 antenna cord sub-assembly in the adjustment area as shown in the illustration.
for Type B:
Align the marking tape (A) on the No. 2 antenna cord sub-assembly with the protrusion on the front of the roof headlining and wrap tape around the No. 2 antenna cord sub-assembly and protrusion of the roof headlining.
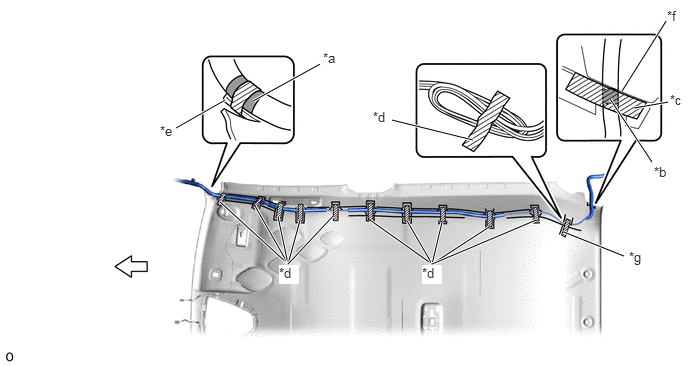
| *a | Marking Tape (A) | *b | Marking Tape (B) |
| *c | Adhesive Tape (A) | *d | Adhesive Tape (B) |
| *e | Protrusion | *f | Edge of the roof headlining |
| *g | Adjustment Area | - | - |
|
|
Front | - | - |
Install the No. 2 antenna cord sub-assembly on the butyl tape of the roof headlining.
- NOTICE:
- ·
Make sure that there are no gaps between the roof headlining and No. 2 antenna cord sub-assembly, and that the No. 2 antenna cord sub-assembly is not twisted.
·Make sure the No. 2 antenna cord assembly is securely installed. If any part of the No. 2 antenna cord sub-assembly is loose, it will cause an abnormal noise.
Align the marking tape (B) on the No. 2 antenna cord sub-assembly with the edge of roof headlining on the roof headlining and secure the No. 2 antenna cord sub-assembly with the adhesive tape (A) as shown in the illustration.
- NOTICE:
-
Make sure that there are no gaps between the roof headlining and No. 2 antenna cord sub-assembly, and that the No. 2 antenna cord sub-assembly is not twisted.
Apply the 11 adhesive tapes (B) as shown in the illustration to secure the No. 2 antenna cord subassembly.
- HINT:
-
Secure the extra length of the No. 2 antenna cord sub-assembly in the adjustment area as shown in the illustration.
for Type C:
Align the marking tape (A) on the No. 2 antenna cord sub-assembly with the protrusion on the front of the roof headlining and wrap tape around the No. 2 antenna cord sub-assembly and protrusion of the roof headlining.
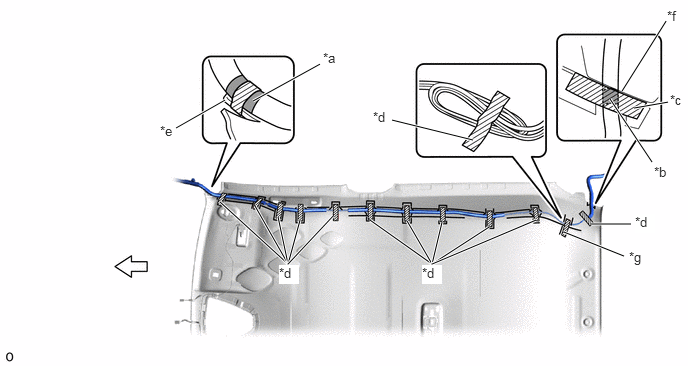
| *a | Marking Tape (A) | *b | Marking Tape (B) |
| *c | Adhesive Tape (A) | *d | Adhesive Tape (B) |
| *e | Protrusion | *f | Edge of the roof headlining |
| *g | Adjustment Area | - | - |
|
|
Front | - | - |
Install the No. 2 antenna cord sub-assembly on the butyl tape of the roof headlining.
- NOTICE:
- ·
Make sure that there are no gaps between the roof headlining and No. 2 antenna cord sub-assembly, and that the No. 2 antenna cord sub-assembly is not twisted.
·Make sure the No. 2 antenna cord assembly is securely installed. If any part of the No. 2 antenna cord sub-assembly is loose, it will cause an abnormal noise.
Align the marking tape (B) on the No. 2 antenna cord sub-assembly with the edge of roof headlining on the roof headlining and secure the No. 2 antenna cord sub-assembly with the adhesive tape (A) as shown in the illustration.
- NOTICE:
-
Make sure that there are no gaps between the roof headlining and No. 2 antenna cord sub-assembly, and that the No. 2 antenna cord sub-assembly is not twisted.
Apply the 12 adhesive tapes (B) as shown in the illustration to secure the No. 2 antenna cord subassembly.
- HINT:
-
Secure the extra length of the No. 2 antenna cord sub-assembly in the adjustment area as shown in the illustration.
63311C
3.INSTALL ROOF HEADLINING
86101
4.INSTALL ANTENNA CORD SUB-ASSEMBLY (for LHD)
for Radio and Display Type with Dual Knob Type:
Engage the clamps and connect the connector to install the antenna cord sub-assembly.
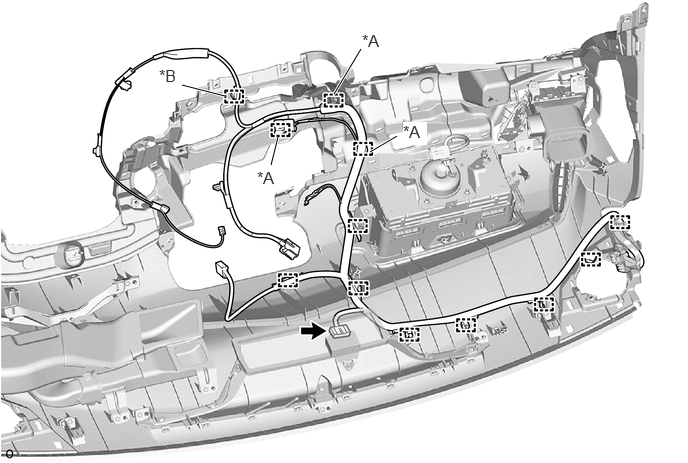
| *A | w/ USB Audio System | *B | w/ Manual (SOS) Switch |
w/ Manual (SOS) Switch:
Connect the connector.
for Radio and Display Type with Single Knob Type:
Engage the clamps and connect the connector to install the antenna cord sub-assembly.
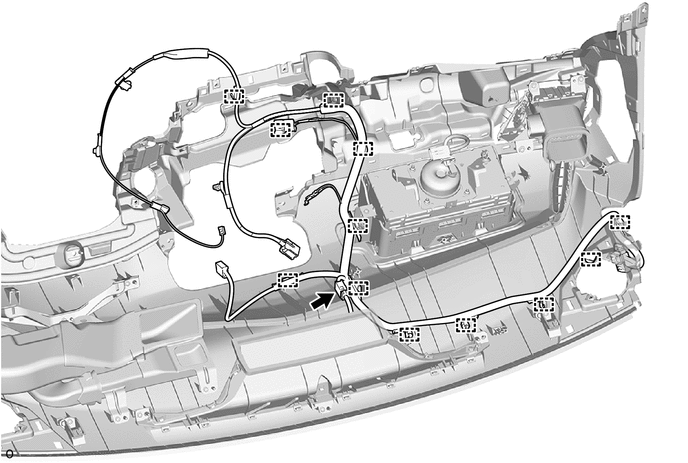
86101
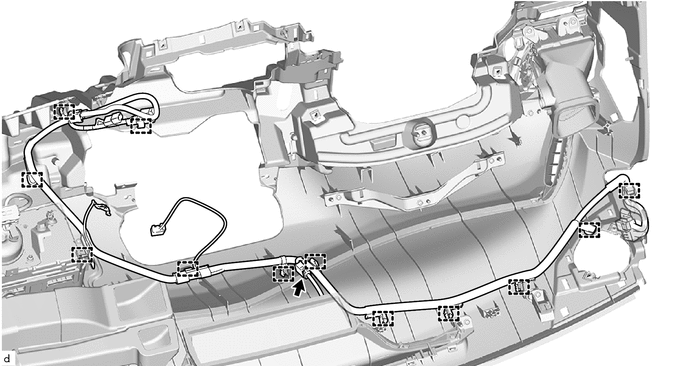
5.INSTALL ANTENNA CORD SUB-ASSEMBLY (for RHD)
for Radio and Display Type with Dual Knob Type:
Engage the clamps to install the antenna cord sub-assembly.
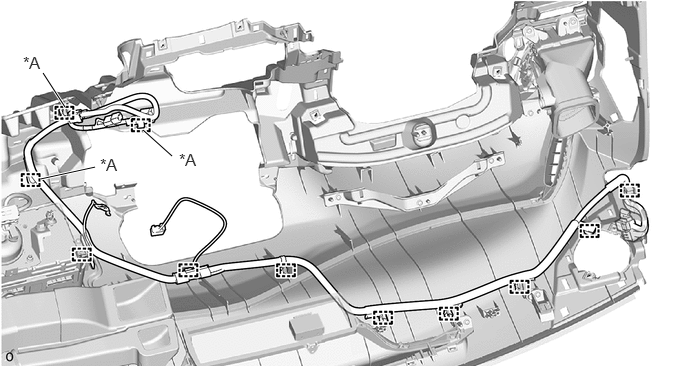
| *A | w/ USB Audio System | - | - |
for Radio and Display Type with Single Knob Type:
Engage the clamps and connect the connector to install the antenna cord sub-assembly.
55086
6.INSTALL NO. 3 HEATER TO REGISTER DUCT SUB-ASSEMBLY (for LHD)
55084E
7.INSTALL NO. 1 HEATER TO REGISTER DUCT SUB-ASSEMBLY (for RHD)
55401E
8.INSTALL INSTRUMENT PANEL SAFETY PAD SUB-ASSEMBLY