PARK ASSIST / MONITORING PANORAMIC VIEW MONITOR SYSTEM CONTROL PANORAMIC VIEW MONITOR CONTROL
FUNCTION OF MAIN COMPONENTS
| Component | Function |
|---|---|
| Front Television Camera Assembly | Outputs a video signal of the area in front of the vehicle to the parking assist ECU. |
| Rear Television Camera Assembly | Outputs a video signal of the area to the rear of the vehicle to the parking assist ECU. |
| Side Television Camera Assembly LH | Outputs a video signal of the area to the left side of the vehicle to the parking assist ECU. |
| Side Television Camera Assembly RH | Outputs a video signal of the area to the right side of the vehicle to the parking assist ECU. |
| Parking Assist ECU | ·
Combines video signals from the front, rear, left and right television camera assemblies to create a seamless overhead image. ·
Calculates each guide line based on information signals from each ECU and sensor, combines the lines with the panoramic view and images from each television camera assembly, and outputs a video signal to the radio and display receiver assembly. ·
Turns each television camera assembly on and off according to the input shift position signal and panoramic view monitor switch signal. ·
Combines detection information with the currently displayed panoramic view monitor system screen according to signals from the clearance warning ECU assembly or blind spot monitor sensor RH/LH and outputs a video signal to the radio and display receiver assembly. |
| Radio and Display Receiver Assembly | ·
Displays image information received from the parking assist ECU. ·
Sends the screen button operation signal to the parking assist ECU. |
| Panoramic View Monitor Switch | Switches the panoramic view monitor system screen display. |
| Spiral Cable with Sensor Sub-assembly | Detects the angle of the steering wheel and sends the resulting signals to the parking assist ECU. |
| Park/Neutral Position Switch Assembly | Sends shift position signals to the ECM. |
| ECM | Sends received shift position signals to the parking assist ECU. |
| Brake Actuator Assembly
·
Skid Control ECU |
Sends received vehicle speed signals to the parking assist ECU. |
| Main Body ECU (Multiplex Network Body ECU) | Sends the front door and back door opening and closing signals, etc., to the parking assist ECU. |
| Clearance Warning ECU Assembly | Sends clearance sonar information signal to the parking assist ECU. |
| Blind Spot Monitor Sensor LH | Sends RCTA information signal to the parking assist ECU. |
SYSTEM CONTROL
Each screen of the panoramic view monitor system displays guide lines, estimated course lines, etc., together according to the selected screen display mode to inform the driver of the tire positions and trajectories which cannot be directly seen from the driver seat.
When the TOYOTA parking assist-sensor system detects an obstacle or the blind spot monitor system detects a vehicle approaching from the right or left at the rear of the vehicle, clearance sonar information or RCTA information is displayed superimposed on the screen according to each screen display mode.
OPERATING CONDITION
Manual display mode and automatic display mode are provided for the display method of the panoramic view monitor system.
Manual Display Mode
Manual display mode is a method of displaying the panoramic view monitor system screen according to the needs of the driver via operation of the panoramic view monitor switch.
The screen displayed when the panoramic view monitor switch is pressed differs according to the shift position.
When the vehicle speed exceeds 20 km/h (12 mph), the panoramic view monitor system screen ends and switches to display the navigation screen or information screen.
Automatic Display Mode
When starting off and stopping the vehicle in automatic display mode, it is possible to display the "panoramic view and wide front view" or "side views" automatically instead of by pressing the panoramic view monitor switch. Refer to the following chart for the screen display conditions.
The automatic display mode can be set with the auto mode button displayed on the screen.
| Display | Screen Display Conditions | Assumed Situation |
|---|---|---|
| Display when starting off | Vehicle speed is 10 km/h (6 mph) or less and shift lever is not in P or R | 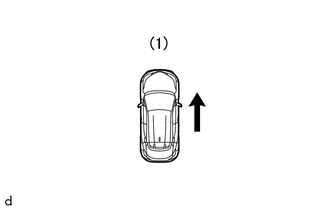
|
| (1) Check surroundings | ||
| Display when stopping vehicle | Shift lever is not in P or R and vehicle speed becomes 10 km/h (6 mph) or less | 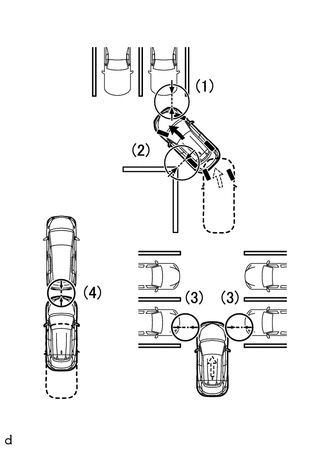
|
| (1) Forward blind spot
(2) Inside blind spot (3) Vehicle width (4) Vehicle-to-vehicle distance |
When the TOYOTA parking assist-sensor system detects an obstacle while driving at a vehicle speed of 10 km/h or less, the monitor screen automatically changes from the current screen (navigation screen, DVD screen, etc.) to the clearance information screen with the "panoramic view and wide front view" screen.
When all of the following conditions are met, the panoramic view and wide front view will be displayed.
The shift lever is not in P or R.
The TOYOTA parking assist-sensor system has detected an obstacle.
When either of the following conditions is met, the panoramic view and wide front view will be canceled and return to its original screen.
The vehicle speed is 0 km/h (0 mph).
The TOYOTA parking assist-sensor system does not detect an obstacle.
FUNCTION
Panoramic View Monitor System Display Range
Panoramic View
The display range of the panoramic view image is as follows. However, the range differs according to the vehicle and road surface conditions.
- NOTICE:
-
The panoramic view image display range is limited and objects in the blind spot close to the vehicle or objects taller than the road surface may not be displayed. Also, the clearness at the four corners may be reduced. Take care when driving.
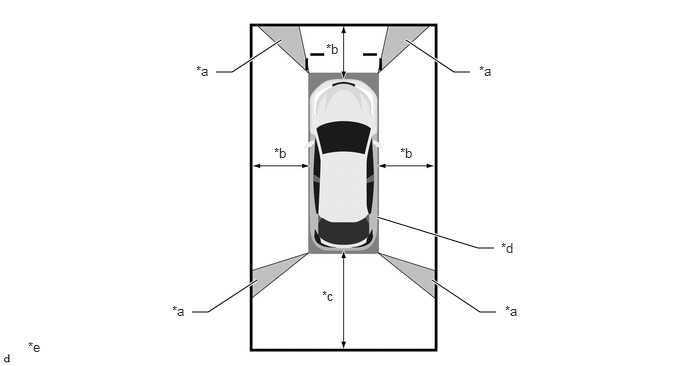
| *a | Image Combination Processing Area | *b | Approximately 2.0 m (6.6 ft.) |
| *c | Approximately 3.0 m (9.8 ft.) | *d | Blind Spot |
| *e | The illustration is an example only. The illustration may differ from the actual vehicle screen. | - | - |
Wide Front View
The wide front view image displays the area behind the vehicle as shown in the illustration. However, the range differs according to the vehicle and road surface conditions.
- HINT:
-
Since the lens of the front television camera assembly may affect the perceived distance to objects in certain areas of the image, masking is used.
- NOTICE:
-
The image display range is limited. Also, since objects near either end of the bumper and objects positioned directly under and near the bumper may not be displayed, take care when driving.
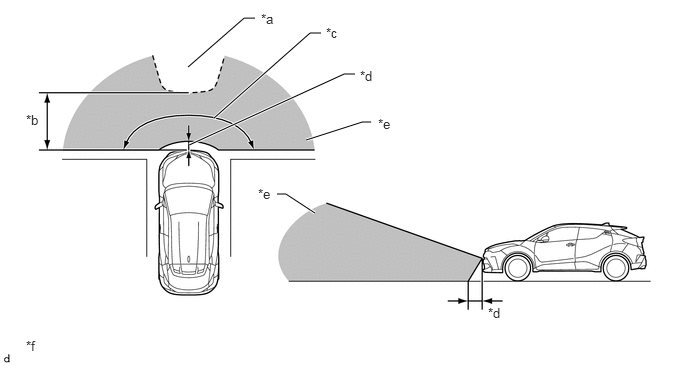
| *a | Mask Area | *b | Approximately 5.0 m (16.4 ft.) |
| *c | Approximately 180° | *d | Approximately 0.4 m (1.3 ft.) |
| *e | Front Television Camera Assembly Imaging Range | *f | The illustrations shown are examples only. |
Rear View
The rear view image displays the area behind the vehicle as shown in the illustration. However, the range differs according to the vehicle and road surface conditions.
- NOTICE:
-
The image display range is limited. Also, since objects near either end of the bumper and objects positioned directly under and near the bumper may not be displayed, take care when driving.
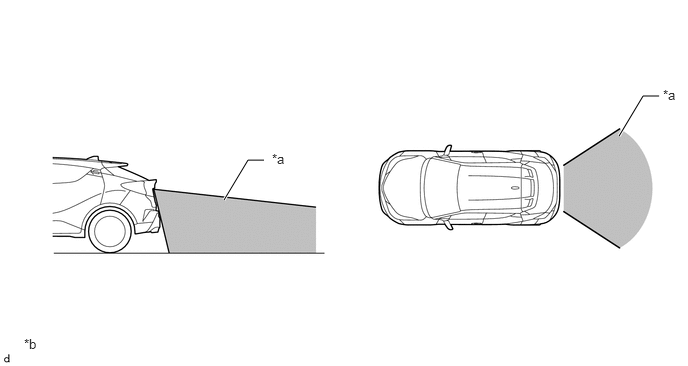
| *a | Rear Television Camera Assembly Imaging Range | *b | The illustrations shown are examples only. |
Dual Side View
The dual side view displays the areas to the side of the vehicle as shown in the illustration. However, the range differs according to the vehicle and road surface conditions.
- NOTICE:
-
The image display range is limited, take care when driving.
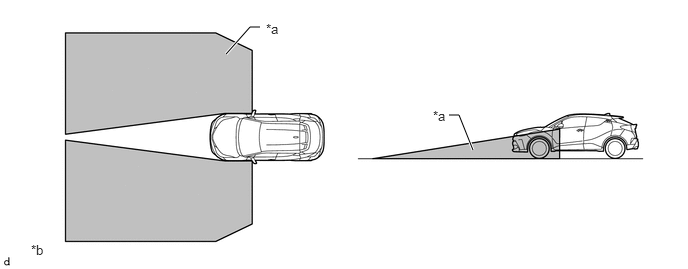
| *a | Side Television Camera Assembly Imaging Range | *b | The illustrations shown are examples only. |
Panoramic View Monitor System Screen and Operation
Each screen of the panoramic view monitor system displays guide lines, estimated course lines, etc., to inform the driver of the tire positions and trajectories which cannot be directly seen from the driver seat, according to the selected screen display mode.
When the TOYOTA parking assist-sensor system detects an obstacle or the blind spot monitor system detects a vehicle approaching from the right or left at the rear of the vehicle, clearance sonar information or RCTA information is superimposed on the screen according to the selected screen display mode.
Panoramic View and Wide Front View
Panoramic View and Wide Front View Display Contents
The panoramic view created by combining images from each television camera assembly and the image from the front television camera assembly are displayed simultaneously. The images assist the driver to confirm the safety of the surroundings and areas to the left and right of the vehicle at locations with poor visibility, such as intersections and T-junctions.
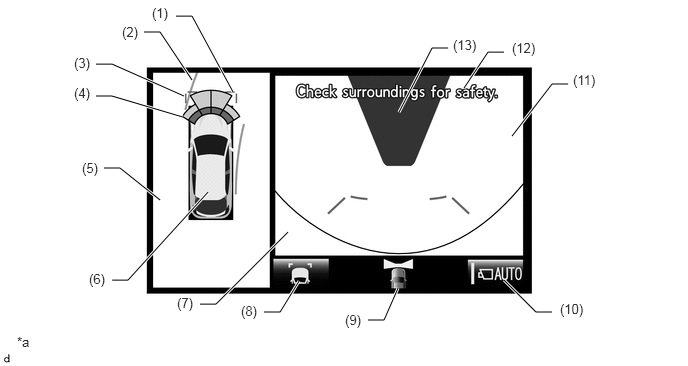
| *a | The illustration shown is an example only. The illustration may differ from the actual vehicle screen. | - | - |
| Item | Description | |
|---|---|---|
|
*: Displayed when the guide line display is set to "Estimated Course Line Display Mode" and the steering angle is not positioned straight ahead. |
||
| (1) | Front Distance Guide Line (Blue) | These lines are distance guide lines showing the distance forward from the edge of the front bumper. (Approximately 1.0 m (3.3 ft.)) |
| (2) | Forward Estimated Course Line* (Yellow) | ·
Displays the estimated course calculated from the steering angle. ·
Displays the estimated course in front of the front of the vehicle on the outside of the turn, and the estimated course ahead of the rear of the vehicle on the inside of the turn. |
| (3) | Front Vehicle Width Extension Line (Blue) | These lines are vehicle width extension lines. The lines displayed are wider than the actual vehicle width. |
| (4) | TOYOTA Parking Assist-sensor Information | If a stationary object is detected when the TOYOTA parking assist-sensor is activated, the approximate distance between the vehicle and the stationary object is displayed. |
| (5) | Panoramic View | An overhead image of the vehicle created by combining images from the front, rear, left and right side television camera assemblies. |
| (6) | Panoramic View Vehicle Icon | Displays the vehicle position in the panoramic view. |
| (7) | Vehicle Reflection | Parts of the vehicle (grille and bumper) are displayed. |
| (8) | Display Mode Switch Button | Changes the display mode. |
| (9) | Camera Direction Display Vehicle Icon | Indicates that the wide front view is displayed on the right side of the screen. |
| (10) | Auto Mode Button | Is used to turn the automatic display mode on and off. When the automatic display mode is on, the switch indicator illuminates. |
| (11) | Wide Front View | An image captured by the front television camera assembly of the area in front of the vehicle. |
| (12) | Warning Message | Warns the driver according to the message on the display. |
| (13) | Masking | Since the lens of the front television camera assembly may affect the perceived distance to objects in certain areas of the image, masking is used. |
Estimated Course Line Display Mode
The forward estimated course lines represent the estimated course of the vehicle. By turning the steering wheel so that no objects are within the estimated course lines, the driver can easily maneuver the vehicle around objects.
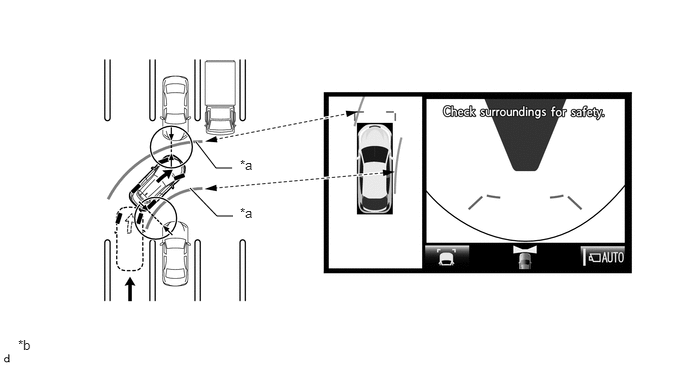
| *a | Forward Estimated Course Line | *b | The illustration shown is an example only. The illustration may differ from the actual vehicle screen. |
Distance Guide Line Display Mode
The front distance guide lines inform the driver of the vehicles relative location when driving into a parking space. By aligning the front distance guide lines with the end of the parking space and the parking space lines, the driver can easily position the vehicle within the parking space.
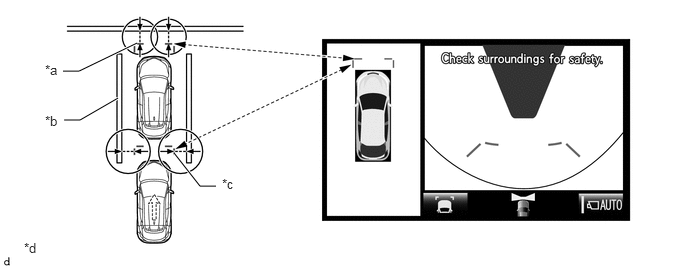
| *a | Front Distance Guide Line | *b | Parking Space Line |
| *c | Front Vehicle Width Extension Line | *d | The illustration shown is an example only. The illustration may differ from the actual vehicle screen. |
Panoramic View and Rear View
Panoramic View and Rear View Display Contents
The panoramic view created by combining images from the front, rear, left and right side television camera assemblies and the image from the rear television camera assembly are displayed simultaneously. The images assist the driver to confirm the safety of the surroundings when operating the vehicle in reverse.
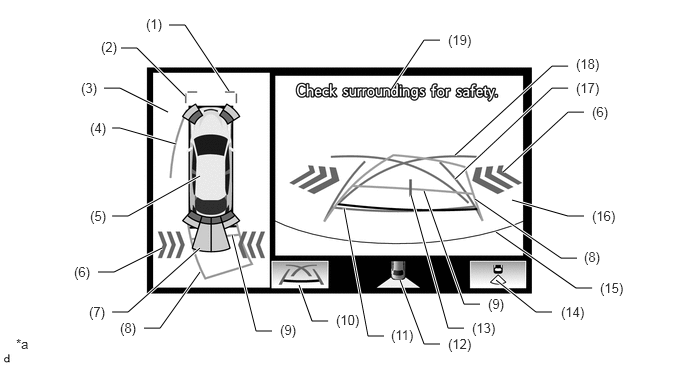
| *a | The illustration shown is an example only. The illustration may differ from the actual vehicle screen. | - | - |
| Item | Description | |
|---|---|---|
|
*1: Displayed when the guide line display is set to "Estimated Course Line Display Mode" and the steering angle is not positioned straight ahead. *2: Displayed when the guide line display is set to "Estimated Course Line Display Mode". *3: Turns red in "Parking Assist Guide Line Display Mode" and "Distance Guide Line Display Mode". *4: Not displayed when the steering angle is approximately straight ahead. *5: The side estimated course line or rear estimated course line and the parking assist guide line cannot be displayed simultaneously. |
||
| (1) | Front Distance Guide Line (Blue) | These lines are distance guide lines showing the distance forward from the edge of the front bumper. (Approximately 1.0 m (3.3 ft.)) |
| (2) | Front Vehicle Width Extension Line (Blue) | These lines are vehicle width extension lines. The lines displayed are wider than the actual vehicle width. |
| (3) | Panoramic View | An overhead image of the vehicle created by combining images from the front, rear, left and right side television camera assemblies. |
| (4) | Side Estimated Course Line*1 (Yellow) | ·
Displays the estimated course calculated from the steering angle. ·
Displays the estimated course on the outside of the steering direction. |
| (5) | Panoramic View Vehicle Icon | Displays the vehicle position in the panoramic view. |
| (6) | RCTA Icon | If a vehicle is detected when the RCTA function is activated, the direction of the approaching vehicle is displayed. |
| (7) | TOYOTA Parking Assist-sensor Information | If a stationary object is detected when the TOYOTA parking assist-sensor is activated, the approximate distance between the vehicle and the stationary object is displayed. |
| (8) | Rear Estimated Course Line*2 (Yellow) | Moves in sync with the steering wheel to indicate the estimated reverse course of the vehicle. |
| (9) | Rear Distance Guide Line (Yellow/Red)*1 | These lines are distance guide lines showing the distance from the edge of the rear bumper. (Approximately 1.0 m (3.3 ft.): yellow, approximately 0.5 m (1.6 ft.): red) |
| (10) | Display Mode Switch Button | Changes the display mode. |
| (11) | Rear Distance Guide Line (Blue*3) | These lines are distance guide lines showing the distance from the edge of the rear bumper. (Approximately 0.5 m (1.6 ft.)) |
| (12) | Camera Direction Display Vehicle Icon | Indicates that the rear view is displayed on the right side of the screen. |
| (13) | Vehicle Center Guide Line (Blue) | Indicates the estimated position on the ground of the center of the vehicle. |
| (14) | Camera Angle Mode Switch Button | Switches to the rear view. |
| (15) | Edge of Rear Bumper | The edge of the rear bumper is displayed on the screen. |
| (16) | Rear View | An image captured by the rear television camera assembly of the area to the rear of the vehicle. |
| (17) | Rear Vehicle Width Extension Line*4 (Blue) | Indicates the estimated vehicle width. |
| (18) | Parking Assist Guide Line*5 (Blue) | Indicates the path the vehicle will follow when the driver turns the steering wheel fully. |
| (19) | Warning Message | Warns the driver according to the message on the display. |
Estimated Course Line Display Mode (Perpendicular Parking (Entering Parking Space))
The estimated course lines inform the driver of the estimated course of the vehicle based on the current steering angle. When reversing, by turning the steering wheel so that the estimated course lines are correctly positioned with respect to the parking space lines, the driver can easily position the vehicle within the parking space. Also, the estimated course lines assist the driver to avoid obstacles.
The rear vehicle width extension lines can be used to determine whether the vehicle is parked straight in the parking space by confirming whether the parking space lines and rear vehicle width extension lines are crossed or parallel.
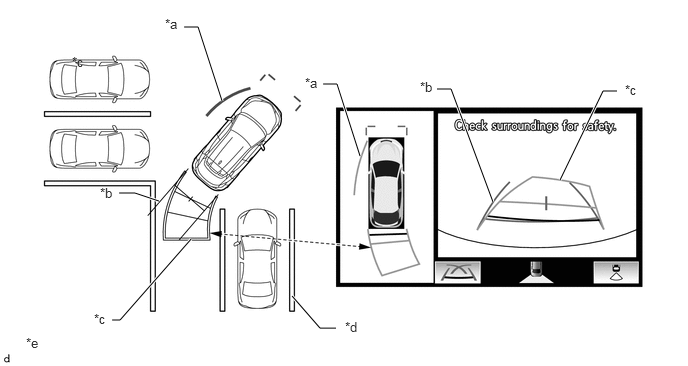
| *a | Side Estimated Course Line | *b | Rear Vehicle Width Extension Line |
| *c | Rear Estimated Course Line | *d | Parking Space Line |
| *e | The illustration shown is an example only. The illustration may differ from the actual vehicle screen. | - | - |
Estimated Course Line Display Mode (Parallel Parking)
The estimated course lines inform the driver of the estimated course of the vehicle based on the current steering angle. By turning the steering wheel so that the estimated course lines are correctly positioned with respect to the side of the road or parking space line, the driver can easily position the vehicle within the parking space. Also, the estimated course lines assist the driver to avoid obstacles.
The rear vehicle width extension lines can be used to determine whether the vehicle is parked straight in the desired parking position by confirming the status of the shoulder and parking space lines, etc., and rear vehicle width extension lines.
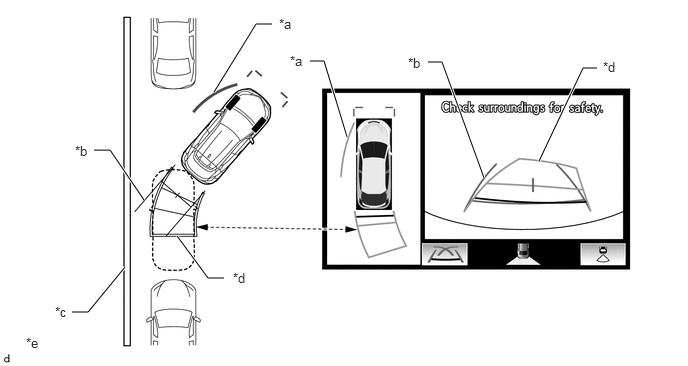
| *a | Side Estimated Course Line | *b | Rear Vehicle Width Extension Line |
| *c | Shoulder and Parking Space Lines, etc. | *d | Rear Estimated Course Line |
| *e | The illustration shown is an example only. The illustration may differ from the actual vehicle screen. | - | - |
Parking Assist Guide Line Display Mode (Perpendicular Parking (Entering Parking Space))
The parking assist guide lines inform the driver of the course of the vehicle when the steering wheel is turned to full lock while driving in reverse. By driving the vehicle in reverse until the parking assist guide lines align with the parking space line, the vehicle can be guided to the position at which the driver should start turning the steering wheel.
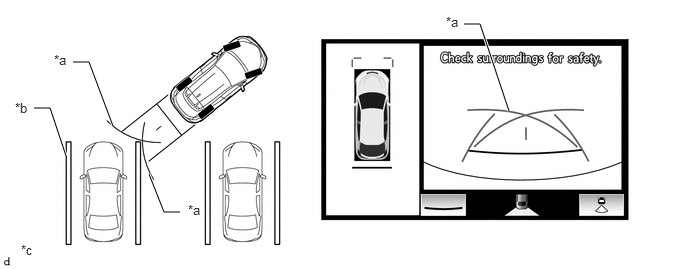
| *a | Parking Assist Guide Line | *b | Parking Space Line |
| *c | The illustration shown is an example only. The illustration may differ from the actual vehicle screen. | - | - |
Parking Assist Guide Line Display Mode (Parallel Parking)
The parking assist guide lines inform the driver of the course of the vehicle when the steering wheel is turned to full lock while driving in reverse. By driving the vehicle in reverse until the parking assist guide lines align with the side of the road or parking space line, the vehicle can be guided to the position at which the driver should start turning the steering wheel.
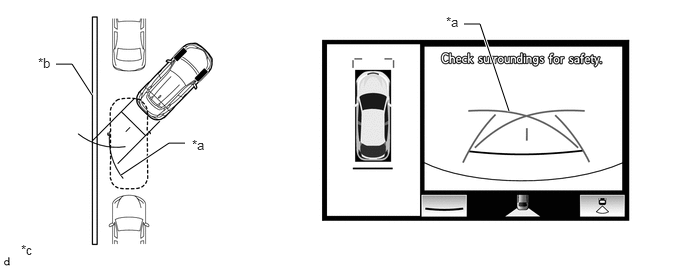
| *a | Parking Assist Guide Line | *b | Shoulder and Parking Space Lines, etc. |
| *c | The illustration shown is an example only. The illustration may differ from the actual vehicle screen. | - | - |
Rear View
Rear View Display Contents
An image from the rear television camera assembly is displayed to assist the driver to confirm the safety of the left and right sides of the vehicle while driving in reverse.
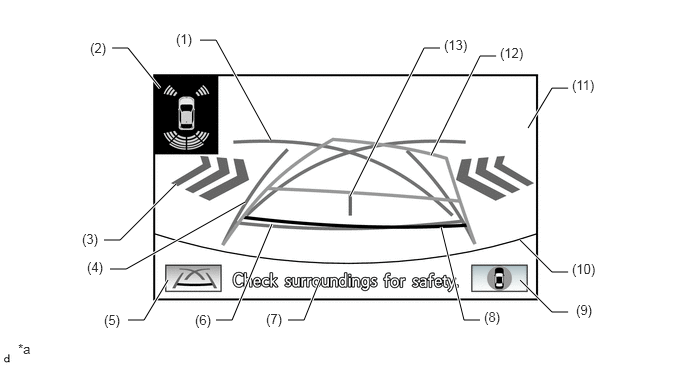
| *a | The illustration shown is an example only. The illustration may differ from the actual vehicle screen. | - | - |
| Item | Description | |
|---|---|---|
|
*1: The rear estimated course line and the parking assist guide line cannot be displayed simultaneously. *2: Not displayed when the steering angle is approximately straight ahead. *3: Turns red in "Parking Assist Guide Line Display Mode" and "Distance Guide Line Display Mode". *4: Displayed when the guide line display is set to "Estimated Course Line Display Mode" and the steering angle is not positioned straight ahead. *5: Displayed when the guide line display is set to "Estimated Course Line Display Mode". |
||
| (1) | Parking Assist Guide Line*1 (Blue) | Indicates the path the vehicle will follow when the driver turns the steering wheel fully. |
| (2) | TOYOTA Parking Assist-sensor Information | If a stationary object is detected when the TOYOTA parking assist-sensor is activated, the approximate distance between the vehicle and the stationary object is displayed. |
| (3) | RCTA Icon | If a vehicle is detected when the RCTA function is activated, the direction of the approaching vehicle is displayed. |
| (4) | Rear Vehicle Width Extension Line*2 (Blue) | Indicates the estimated vehicle width. |
| (5) | Display Mode Switch Button | Changes the display mode. |
| (6) | Rear Distance Guide Line (Blue*3) | These lines are distance guide lines showing the distance from the edge of the rear bumper. (Approximately 0.5 m (1.6 ft.)) |
| (7) | Warning Message | Warns the driver according to the message on the display. |
| (8) | Rear Distance Guide Line (Yellow/Red)*4 | These lines are distance guide lines showing the distance from the edge of the rear bumper. (Approximately 1.0 m (3.3 ft.): yellow, approximately 0.5 m (1.6 ft.): red) |
| (9) | Camera Angle Mode Button | Switches to the panoramic view and rear view. |
| (10) | Edge of Rear Bumper | The edge of the rear bumper is displayed on the screen. |
| (11) | Rear View | An image captured by the rear television camera assembly of the area to the rear of the vehicle. |
| (12) | Rear Estimated Course Line*5 (Yellow) | Moves in sync with the steering wheel to indicate the estimated reverse course of the vehicle. |
| (13) | Vehicle Center Guide Line (Blue) | Indicates the estimated position on the ground of the center of the vehicle. |
Estimated Course Line Display Mode (Perpendicular Parking (Entering Parking Space))
The estimated course lines inform the driver of the estimated course of the vehicle based on the current steering angle. When reversing, by turning the steering wheel so that the estimated course lines are correctly positioned with respect to the parking space lines, the driver can easily position the vehicle within the parking space. Also, the estimated course lines assist the driver to avoid obstacles.
The rear vehicle width extension lines can be used to determine whether the vehicle is parked straight in the parking space by confirming whether the parking space lines and rear vehicle width extension lines are crossed or parallel.
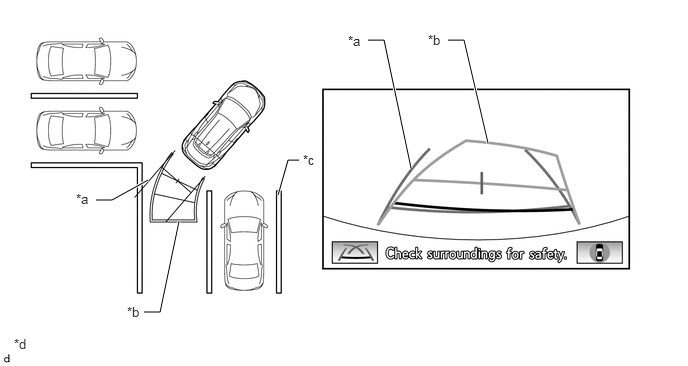
| *a | Rear Vehicle Width Extension Line | *b | Rear Estimated Course Line |
| *c | Parking Space Line | *d | The illustration shown is an example only. The illustration may differ from the actual vehicle screen. |
Estimated Course Line Display Mode (Parallel Parking)
The estimated course lines inform the driver of the estimated course of the vehicle based on the current steering angle. When reversing, by turning the steering wheel so that the estimated course lines are correctly positioned with respect to the side of the road or parking space line, the driver can easily position the vehicle within the parking space. Also, the estimated course lines assist the driver to avoid obstacles.
The rear vehicle width extension lines can be used to determine whether the vehicle is parked straight in the desired parking position by confirming the status of the shoulder and parking space lines, etc., and rear vehicle width extension lines.
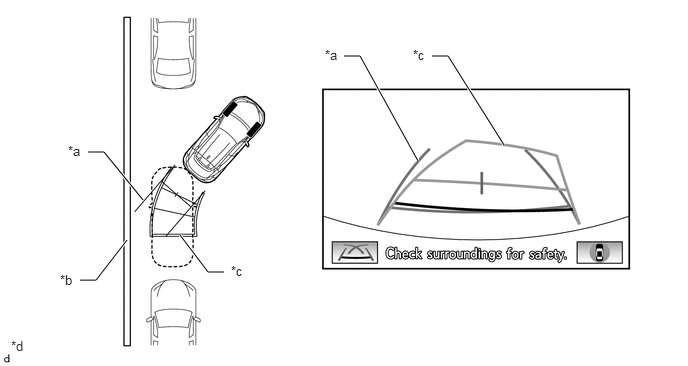
| *a | Rear Vehicle Width Extension Line | *b | Shoulder and Parking Space Line, etc. |
| *c | Rear Estimated Course Line | *d | The illustration shown is an example only. The illustration may differ from the actual vehicle screen. |
Parking Assist Guide Line Display Mode (Perpendicular Parking (Entering Parking Space))
The parking assist guide lines inform the driver of the course of the vehicle when the steering wheel is turned to full lock while driving in reverse. By driving the vehicle in reverse until the parking assist guide lines align with the parking space line, the vehicle can be guided to the position at which the driver should start turning the steering wheel.
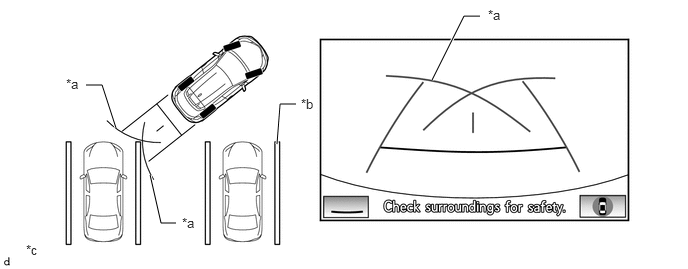
| *a | Parking Assist Guide Line | *b | Parking Space Line |
| *c | The illustration shown is an example only. The illustration may differ from the actual vehicle screen. | - | - |
Parking Assist Guide Line Display Mode (Parallel Parking)
The parking assist guide lines are used as a guide to know where to stop the vehicle when driving the vehicle straight back in reverse, such as when parallel parking. By driving the vehicle in reverse until the parking assist guide lines align with the side of the road or parking space line, the vehicle can be guided to the position at which the driver should start turning the steering wheel.
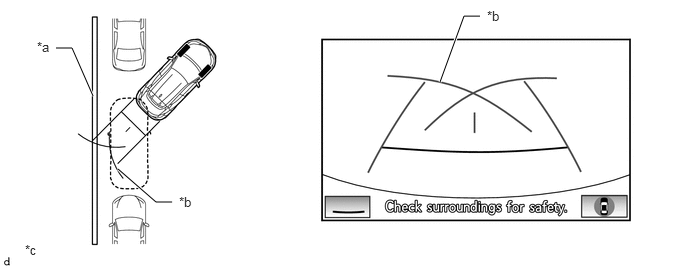
| *a | Shoulder and Parking Space Line, etc. | *b | Parking Assist Guide Line |
| *c | The illustration shown is an example only. The illustration may differ from the actual vehicle screen. | - | - |
Distance Guide Line Display Mode
The rear distance guide lines inform the driver of the vehicles relative location when driving into a parking space. By aligning the rear distance guide lines with the end of the parking space and the parking space lines, the driver can easily position the vehicle within the parking space.
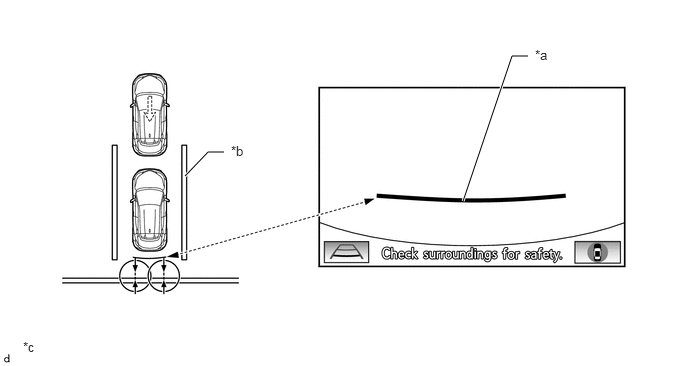
| *a | Rear Distance Guide Line | *b | Parking Space Line |
| *c | The illustration shown is an example only. The illustration may differ from the actual vehicle screen. | - | - |
Dual Side View
Dual Side View Display Contents
This view displays images from the side television camera assembly installed on either side of the vehicle and assists the driver to confirm the safety of the area to the side of the vehicle and avoiding contact with obstacles on narrow roads, etc.
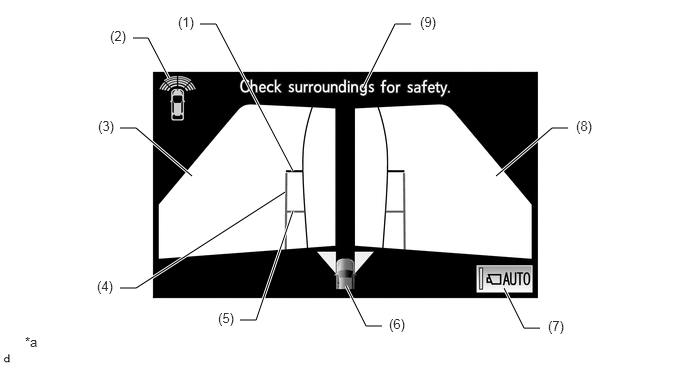
| *a | The illustration shown is an example only. The illustration may differ from the actual vehicle screen. | - | - |
| Item | Description | |
|---|---|---|
| (1) | Front Distance Guide Line (Red) | These lines are distance guide lines showing the distance forward from the edge of the front bumper. (Approximately 0.5 m (1.6 ft.)) |
| (2) | TOYOTA Parking Assist-sensor Information | If a stationary object is detected when the TOYOTA parking assist-sensor is activated, the approximate distance between the vehicle and the stationary object is displayed. |
| (3) | Side View (Front Left Side) | An image captured by the side television camera assembly LH of the area to the front left side of the vehicle. |
| (4) | Vehicle Width Parallel Line (Blue) | A vehicle width guide line including the outer rear view mirror assembly. |
| (5) | Front Tire Contact Line (Blue) | A guide line showing the front tire contact position. |
| (6) | Camera Direction Display Vehicle Icon | Indicates that the "dual side views" is displayed. |
| (7) | Auto Mode Button | Can be used to turn the automatic display mode on and off. When the automatic display mode is on, an indicator inside the button illuminates. |
| (8) | Side View (Front Right Side) | An image captured by the side television camera assembly RH of the area to the front right side of the vehicle. |
| (9) | Warning Message | Warns the driver according to the message on the display. |
Vehicle Width Parallel Line (Obstacle Evasion and Driving Close to Objects on Narrow Roads)
The vehicle width parallel lines inform the driver of the approximate width of the vehicle including the outer rear view mirror assemblies. By driving the vehicle so that the vehicle width parallel lines do not overlap actual obstacles, white lines, curbs, etc., the driver can avoid obstacles and drive the vehicle close to objects on narrow roads.
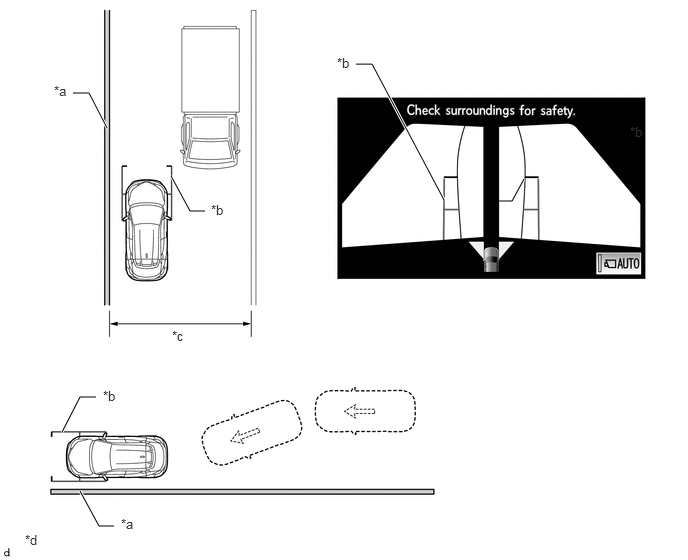
| *a | Wall, Fence, etc. | *b | Vehicle Width Parallel Line |
| *c | Narrow Road, etc. | *d | The illustration shown is an example only. The illustration may differ from the actual vehicle screen. |
Panoramic View Monitor System Display Operation
The panoramic view monitor system has 2 display modes. "Manual Display Mode" displays the screen according to the needs of the driver, and "Automatic Display Mode" automatically displays the screen when the display conditions are met.
The panoramic view monitor system display can be displayed and switched by operating the panoramic view monitor switch.
The panoramic view monitor system is displayed when the panoramic view monitor switch is pressed in manual display mode or the automatic display mode display conditions are met.
When the engine switch is on (IG) and the shift lever is in R, the "panoramic view and rear view" is displayed regardless of the operation status of the panoramic view monitor switch.
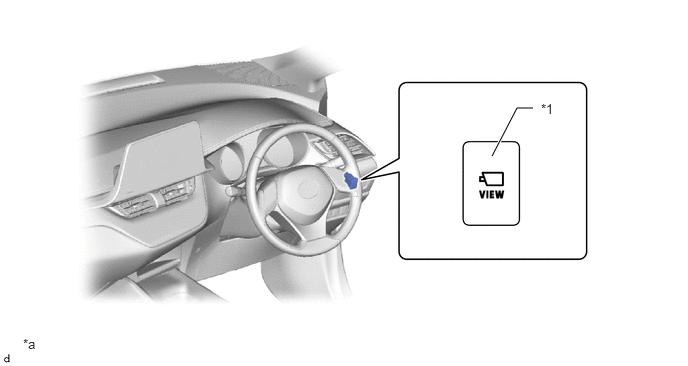
| *1 | Panoramic View Monitor Switch | - | - |
| *a | The illustration shown in an example only. | - | - |
Panoramic View Monitor System Screen Transition
The panoramic view monitor system assists the driver to confirm the conditions around the vehicle while driving at low speeds and when parking.
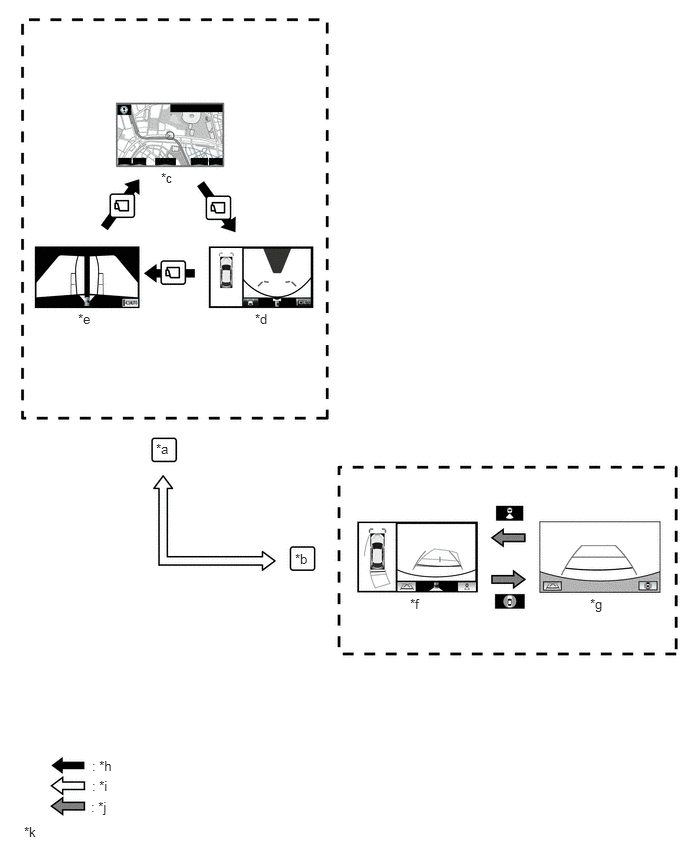
| *a | Shift Lever is not in R | *b | Shift Lever is in R |
| *c | Navigation Display etc. | *d | Panoramic View and Wide Front View |
| *e | Dual Side View | *f | Panoramic View and Rear View |
| *g | Rear View | *h | Screen Transition According to Panoramic View Monitor Switch Operation |
| *i | Shift Operation | *j | Screen Transition According to Camera Angle Mode Switch Button Switching |
| *k | The illustration shown is an example only. The illustration may differ from the actual vehicle screen. | - | - |
DIAGNOSIS
The parking assist ECU is equipped with a diagnosis function which can display a diagnosis menu for the panoramic view monitor system. For details, refer to the Repair Manual.