MAINTENANCE TIRE AND WHEEL INSTALLATION
PROCEDURE

 1.INSTALL WHEEL ASSEMBLY
- NOTICE:
- ·
Only use axle hub nuts that are compatible with the wheel. If incompatible axle hub nuts are used, the contact surface of the wheel and axle hub nut may become deformed or damaged. This may result in looseness or loss of one or more axle hub nuts, even if they are tightened to the correct torque.
·Check that there is no foreign matter or rust on the axle hub bolts and the contact surfaces of the wheel, brake disc, axle hub, etc. Clean the contact surfaces and axle hub bolts if necessary. If a wheel assembly is installed with foreign matter or rust between the contact surfaces, the foreign matter or rust may work loose. This may result in looseness or loss of one or more axle hub nuts, even if they are tightened to the correct torque.
·When installing the axle hub nuts, clean the axle hub bolts with non-residue solvent and check that the axle hub nuts rotate smoothly by hand. If the axle hub nuts do not rotate smoothly, check that there is no foreign matter or rust and clean if necessary. If the axle hub nuts still do not rotate smoothly, replace the axle hub nuts and axle hub bolts with new ones.
While aligning the wheel assembly with the center of the axle hub, install the axle hub nuts by hand.
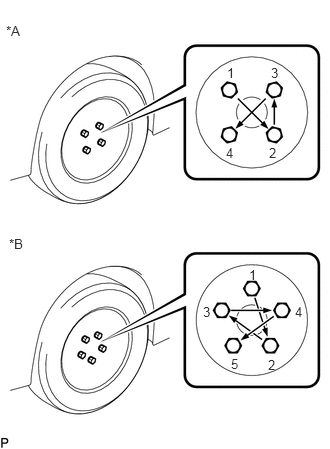
| *A | for 4 Bolt Axle Hub |
| *B | for 5 Bolt Axle Hub |
Temporarily tighten the axle hub nuts in the order shown in the illustration.
Lower the vehicle then fully tighten the axle hub nuts in the order shown in the illustration.
- Torque:
- 103 N*m (1050 kgf*cm, 76 ft.*lbf)
for 17 inch Steel Wheel:
Install the wheel cap.
for 16 inch Aluminum Wheel:
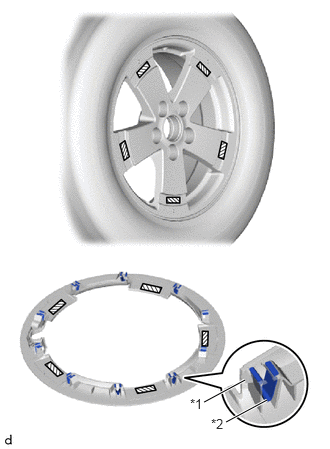
| *1 | Claw |
| *2 | Clip |

|
Fastening Tape |
Check that the claws of the wheel cap are not damaged and that the 10 clips that hold the claws are installed at the locations shown in the illustration.
- NOTICE:
-
If any claws are damaged or clips are missing, replace the wheel cap with a new one.
Check that the fastening tapes of the wheel cap and disc wheel are not peeling off or excessively dirty, etc.
- NOTICE:
-
If the fastening tapes are peeling off or are excessively dirty, replace the wheel cap with a new one.
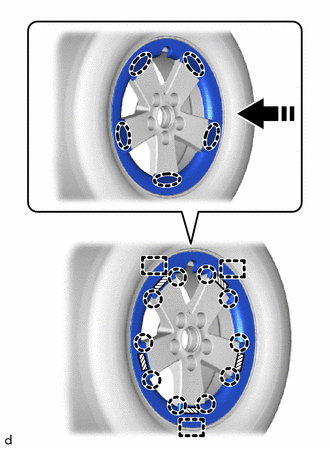
|
|
Fastening Tape |

|
Place Hands Here |

|
Install in this Direction |
Align the cutout of the valve and the locating pins, and install the wheel cap as shown in the illustration.
Press firmly until the claws and fastening tapes engage.
Check that the wheel cap is not excessively loose.
- NOTICE:
-
If the wheel cap is excessively loose, replace it with a new one.