CLUTCH CLUTCH UNIT(for EC6A) REMOVAL
CAUTION / NOTICE / HINT
The necessary procedures (adjustment, calibration, initialization, or registration) that must be performed after parts are removed, installed, or replaced during the clutch unit removal/installation are shown below.
| Replacement Part or Procedure | Necessary Procedure | Effect/Inoperative when not Performed | Link |
|---|---|---|---|
| Disconnect cable from negative battery terminal | Memorize steering angle neutral point | ·
Lane departure alert system (w/ Steering Control) ·
Simple intelligent parking assist system*1 ·
Toyota parking assist-sensor system (w/ Simple Intelligent Parking Assist System)*1 ·
Pre-collision system |
( ) |
| Initialize back door lock | Power door lock control system | ()
|
|
| Front wheel alignment adjustment | Perform the following procedures in the order shown:
1.
Clear zero point calibration data and store system information 2.
Perform yaw rate and acceleration sensor zero point calibration and store system information |
·
VSC disabled or malfunctions ·
DTCs are stored ·
Slip indicator light illuminates ·
ABS warning light illuminates |
()
|
*1: When performing learning using the GTS.
- NOTICE:
-
When the manual transaxle assembly is removed, be sure to use a new clutch release cylinder with bearing assembly and new installation bolts. Removal of the manual transaxle assembly allows the compressed clutch release cylinder with bearing assembly to return to its original position. Dust from the moving section may damage the seal of the clutch release cylinder with bearing assembly, possibly causing clutch fluid leaks.
PROCEDURE

 30300
1.REMOVE MANUAL TRANSAXLE ASSEMBLY
When Not Using the Engine Support Bridge:
When Using the Engine Support Bridge:
31483E
2.REMOVE BLEEDER CLUTCH RELEASE TUBE
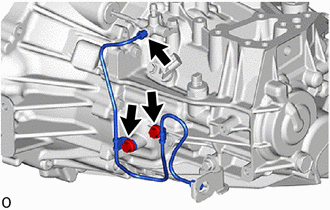
Remove the 2 bolts and bleeder clutch release tube from the manual transaxle assembly.
Using a 10 mm union nut wrench, separate the bleeder clutch release tube from the clutch release bleeder sub-assembly.
31407B
3.REMOVE CLUTCH RELEASE BLEEDER SUB-ASSEMBLY
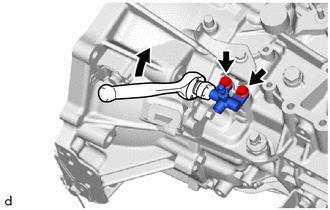
Using a 10 mm union nut wrench, separate the clutch release bleeder sub-assembly from the clutch release cylinder to flexible hose tube.
Remove the 2 bolts and clutch release bleeder sub-assembly from the manual transaxle assembly.
31400
4.REMOVE CLUTCH RELEASE CYLINDER WITH BEARING ASSEMBLY
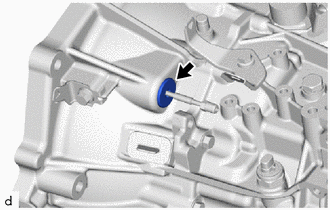
Remove the clutch tube boot from the manual transaxle assembly.
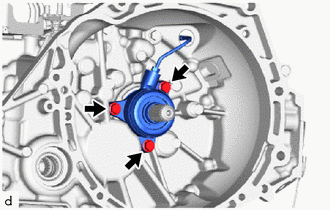
Remove the 3 bolts and clutch release cylinder with bearing assembly together with clutch release cylinder to bleeder tube from the manual transaxle assembly.
31483
5.REMOVE CLUTCH RELEASE CYLINDER TO FLEXIBLE HOSE TUBE
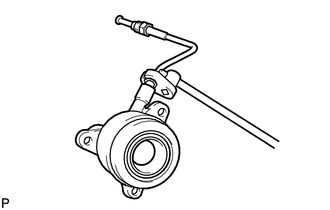
Using a 10 mm union nut wrench, remove the clutch release cylinder to flexible hose tube from the clutch release cylinder with bearing assembly.
31210
6.REMOVE CLUTCH COVER ASSEMBLY
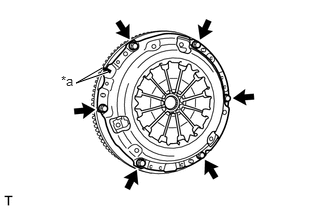
| *a | Matchmarks |
Put matchmarks on the clutch cover assembly and the flywheel sub-assembly.
Loosen each bolt 180° at a time until the spring tension is released.
Remove the 6 bolts and pull off the clutch cover assembly.
- NOTICE:
-
Do not drop the clutch disc assembly.
31250
7.REMOVE CLUTCH DISC ASSEMBLY
- NOTICE:
-
Keep the lined part of the clutch disc assembly, the pressure plate, and the surface of the flywheel sub-assembly away from oil and foreign matter.