GF1A TRANSFER / 4WD / AWD TRANSFER ASSEMBLY INSTALLATION
PROCEDURE

 36100A
1.INSTALL TRANSFER AND TRANSAXLE SETTING STUD BOLT
Clean the bolt holes.
Apply adhesive 1324 to 2 or 3 threads on one half of a new transfer and transaxle setting stud bolt A as shown in the illustration.
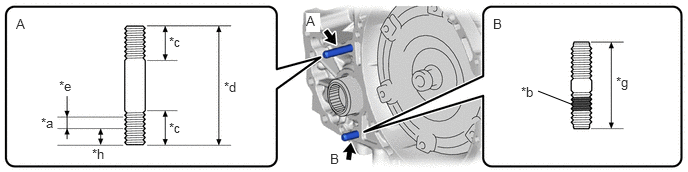
| *a | Adhesive 1324 | *b | Sealant |
| *c | 22 mm (0.866 in.) | *d | 69 mm (2.72 in.) |
| *e | 5.0 to 7.5 mm (0.200 to 0.300 in.) | *f | 13 mm (0.512 in.) |
| *g | 47 mm (1.85 in.) | *h | 13 mm (0.512 in.) |
- Torque:
- 39.2 N*m (400 kgf*cm, 29 ft.*lbf)
- NOTICE:
- ·
Install the stud bolt immediately after applying adhesive to prevent the adherence of foreign matter.
·Do not apply adhesive 1324 to the ends of the stud bolt.
36100
2.INSTALL TRANSFER ASSEMBLY
- SST
- 09961-00950
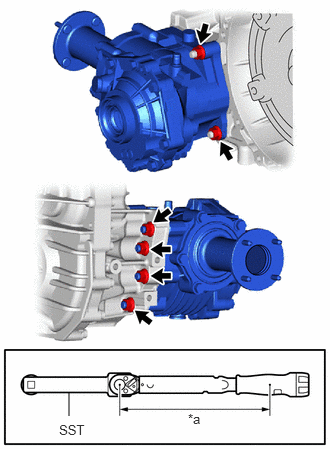
| *a | Torque Wrench Fulcrum Length |
Clean the bolt holes.
Install the transfer assembly to the transaxle with the 6 nuts.
- Torque:
- Specified tightening torque : 68.6 N*m (700 kgf*cm, 51 ft.*lbf)
- HINT:
- ·
This torque value is effective when SST is straight to a torque wrench.
·Calculate the torque wrench reading when changing the fulcrum length of the torque wrench.
Click hereGeneral>INTRODUCTION>REPAIR INSTRUCTION>PRECAUTION
·When using SST (fulcrum length of 150 mm (5.91 in.)) + torque wrench (fulcrum length of 255 mm (10.04 in.)):
43.2 N*m (441 kgf*cm, 32 ft.*lbf)
30400
3.INSTALL CONTINUOUSLY VARIABLE TRANSAXLE ASSEMBLY