3ZR-FAE ENGINE CONTROL CAMSHAFT OIL CONTROL VALVE INSTALLATION
PROCEDURE

 11101J
1.INSTALL CAMSHAFT TIMING OIL CONTROL VALVE ASSEMBLY (for Exhaust Side)
Apply a light coat of engine oil to a new O-ring and install it to the camshaft timing oil control valve assembly.
Install the camshaft timing oil control valve assembly and wire harness bracket to the cylinder head cover sub-assembly with the bolt.
- Torque:
- 10 N*m (102 kgf*cm, 7 ft.*lbf)
- NOTICE:
- ·
If the camshaft timing oil control valve assembly has been struck or dropped, replace it.
·Do not allow foreign matter to contact the oil seal face of the camshaft timing oil control valve assembly (connecting surface with the cylinder head cover sub-assembly).
·Make sure that the O-ring is not cracked or moved out of place when installing the camshaft timing oil control valve assembly.
Connect the camshaft timing oil control valve assembly connector.
11101J
2.INSTALL CAMSHAFT TIMING OIL CONTROL VALVE ASSEMBLY (for Intake Side)
Apply a light coat of engine oil to a new O-ring and install it to the camshaft timing oil control valve assembly.
Install the camshaft timing oil control valve assembly to the cylinder head cover sub-assembly with the bolt.
- Torque:
- 10 N*m (102 kgf*cm, 7 ft.*lbf)
- NOTICE:
- ·
If the camshaft timing oil control valve assembly has been struck or dropped, replace it.
·Do not allow foreign matter to contact the oil seal face of the camshaft timing oil control valve assembly (connecting surface with the cylinder head cover sub-assembly).
·Make sure that the O-ring is not cracked or moved out of place when installing the camshaft timing oil control valve assembly.
Connect the camshaft timing oil control valve assembly connector.
3.INSPECT FOR OIL LEAK
11212
4.INSTALL NO. 2 CYLINDER HEAD COVER
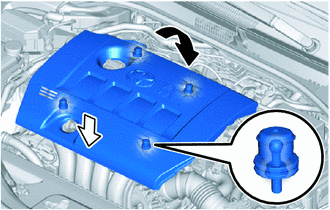

|
Engage the 2 rear clips first |

|
Engage the 2 front clips next |
Engage the 2 rear clips, then the 2 front clips to install the No. 2 cylinder head cover.
- NOTICE:
- ·
Be sure to engage the clips securely.
·Do not apply excessive force or tap the No. 2 cylinder head cover to engage the clips. This may cause the No. 2 cylinder head cover to break.