WIPER / WASHER WIPER AND WASHER SYSTEM TERMINALS OF ECU
CHECK WINDSHIELD WIPER RELAY ASSEMBLY (w/ Auto Wiper System)

Disconnect the F56 windshield wiper relay assembly connector.
Measure the voltage and resistance on the wire harness side connector according to the value(s) in the table below.
| Terminal No.
(Symbol) |
Wiring Color | Terminal Description | Condition | Specified Condition |
|---|---|---|---|---|
| F56-2 (IG) - Body ground | B - Body ground | Ignition switch ON signal (Power source circuit) | Ignition switch ON | 11 to 14 V |
| Ignition switch off | Below 1 V | |||
| F56-25 (W) - Body ground | B - Body ground | Front washer switch signal | Front washer switch on | Below 1 Ω |
| Front washer switch off | 10 kΩ or higher | |||
| F56-8 (VR2) - F56-21 (VR1) | W - G | Adjusting volume signal | Controlling sensitivity setting switch* changed | 0 to 231 Ω |
| F56-12 (E) - Body ground | W-B - Body ground | Body ground | Always | Below 1 Ω |
| F56-16 (WIG) - Body ground | B - Body ground | Power source signal | Ignition switch ON | 11 to 14 V |
| Ignition switch off | Below 1 V |
- HINT:
-
*: The rain sensor sensitivity can be adjusted by the controlling sensitivity setting switch.
-
If the result is not as specified, there may be a malfunction in the wire harness.
Reconnect the F56 windshield wiper relay assembly connector.
Measure the resistance according to the value(s) in the table below.
| Terminal No.
(Symbol) |
Wiring Color | Terminal Description | Condition | Specified Condition |
|---|---|---|---|---|
| F56-10 (+1) - Body ground | G - Body ground | Front wiper motor low speed signal | Front wiper motor off | Below 1 Ω |
- HINT:
-
If the result is not as specified, the windshield wiper relay assembly may be malfunctioning.
Measure the voltage and check for pulses according to the value(s) in the table below.
| Terminal No.
(Symbol) |
Wiring Color | Terminal Description | Condition | Specified Condition |
|---|---|---|---|---|
| F56-1 (+SM) - Body ground | G - Body ground | Front wiper motor position detection signal | Front wiper motor in low or high operation | Below 1 V ←→ 11 to 14 V |
| Front wiper motor off | Below 1 V | |||
| F56-3 (C1) - F56-5 (CO) | V - Y | Front wiper switch AUTO signal | Ignition switch ON, front wiper switch in AUTO | Below 1 V |
| Ignition switch ON, front wiper switch off | 11 to 14 V | |||
| F56-25 (W) - Body ground | B - Body ground | Front washer switch signal | Ignition switch ON, front washer switch on | Below 1 V |
| Ignition switch ON, front washer switch off | 11 to 14 V | |||
| F56-10 (+1) - Body ground | G - Body ground | Front wiper motor low speed signal | Front wiper motor in low operation | 11 to 14 V |
| F56-11 (+2) - Body ground | W - Body ground | Front wiper motor high speed signal | Front wiper motor in high operation | 11 to 14 V |
| Front wiper motor off | Below 1 V | |||
| F56-14 (MPX1) - Body ground | V - Body ground | Rain sensor signal | Ignition switch ON | Pulse generation |
| F56-24 (SPD) - Body ground | V - Body ground | Vehicle speed signal | Driving at approximately 20 km/h (12 mph) | Pulse generation (See waveform 1) |
- HINT:
-
If the result is not as specified, the windshield wiper relay assembly may be malfunctioning.
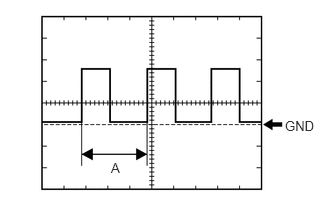
Waveform 1 (Reference):
| Item | Condition |
|---|---|
| Tester Connection | F56-24 (SPD) - Body ground |
| Tool Setting | 5 V/DIV., 20 ms./DIV. |
| Vehicle Condition | Driving at approximately 20 km/h (12 mph) |
- HINT:
-
When the system is functioning normally, one wheel revolution generates 4 pulses. As the vehicle speed increases, the width indicated by A in the illustration narrows.
CHECK COMBINATION METER ASSEMBLY
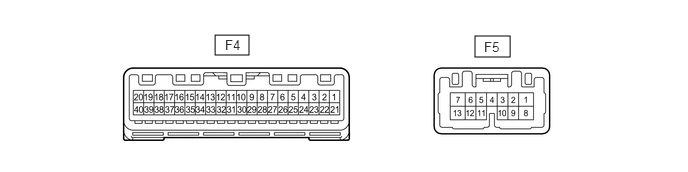
Measure the voltage according to the value(s) in the table below.
| Terminal No. (Symbol) | Wiring Color | Terminal Description | Condition | Specified Condition |
|---|---|---|---|---|
| F4-17 (WLVL)* - Body ground | LG - Body ground | Washer fluid level signal | Ignition switch ON, washer fluid level not low | 11 to 14 V |
| Ignition switch ON, washer fluid level low | Below 1 V |
*: w/ Washer Fluid Warning System
Measure the waveform according to the value(s) in the table below.
| Terminal No. (Symbol) | Wiring Color | Terminal Description | Condition | Specified Condition |
|---|---|---|---|---|
| F4-6 (+S) - Body ground | V - Body ground | Speed signal for other system (Output) | Driving at approximately 20 km/h (12 mph) | Pulse generation (See waveform 1) |
Waveform 1 (Reference):
| Item | Condition |
|---|---|
| Tester Connection | F4-6 (+S) - Body ground |
| Tool Setting | 5 V/DIV., 20 ms./DIV. |
| Vehicle Condition | Driving at approximately 20 km/h (12 mph) |
- HINT:
-
When the system is functioning normally, one wheel revolution generates 4 pulses. As the vehicle speed increases, the width indicated by A in the illustration narrows.
HEADLIGHT ECU SUB-ASSEMBLY RH (for LED Headlight with Headlight Cleaner System)
Disconnect the A17 headlight ECU sub-assembly RH connector.
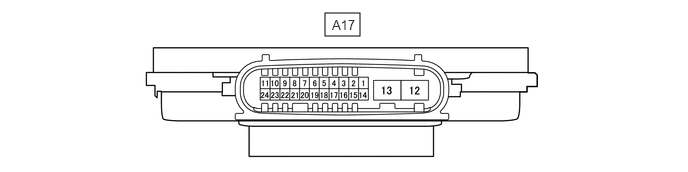
Measure the resistance and voltage according to the value(s) in the table below.
- HINT:
-
Measure the values on the wire harness side with the connector disconnected.
| Terminal No. (Symbol) | Wiring Color | Terminal Description | Condition | Specified Condition |
|---|---|---|---|---|
| A17-4 (IG) - Body ground | V - Body ground | IG power supply | Ignition switch off | Below 1 V |
| Ignition switch ON | 11 to 14 V | |||
| A17-12 (GND) - Body ground | W-B - Body ground | Body ground | Always | Below 1 Ω |
Reconnect the A17 headlight ECU sub-assembly RH connector.
Measure the voltage according to the value(s) in the table below.
| Terminal No. (Symbol) | Wiring Color | Terminal Description | Condition | Specified Condition |
|---|---|---|---|---|
| A17-7 (HLC) - Body ground | W - Body ground | Headlight cleaner motor operation signal | Headlight cleaner motor not operating | 11 to 14 V |
| Headlight cleaner motor operating | Below 1 V | |||
| A17-18 (FRWA) - Body ground | R - Body ground | Front washer switch signal | Ignition switch ON, front washer switch on | 11 to 14 V |
| Ignition switch ON, front washer switch off | Below 1 V |
CHECK INSTRUMENT PANEL JUNCTION BLOCK ASSEMBLY AND MAIN BODY ECU (MULTIPLEX NETWORK BODY ECU) (for Halogen Headlight with Headlight Cleaner System)
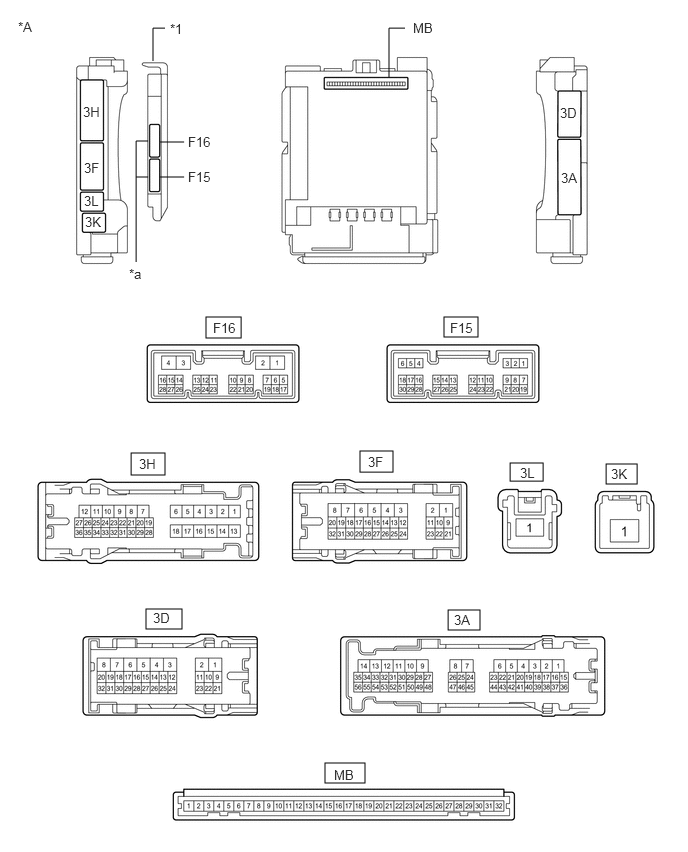
| *A | Main Body ECU (Multiplex Network Body ECU) with 2 Connectors | - | - |
| *1 | Main Body ECU (Multiplex Network Body ECU) | - | - |
| *a | 2 Connectors | - | - |
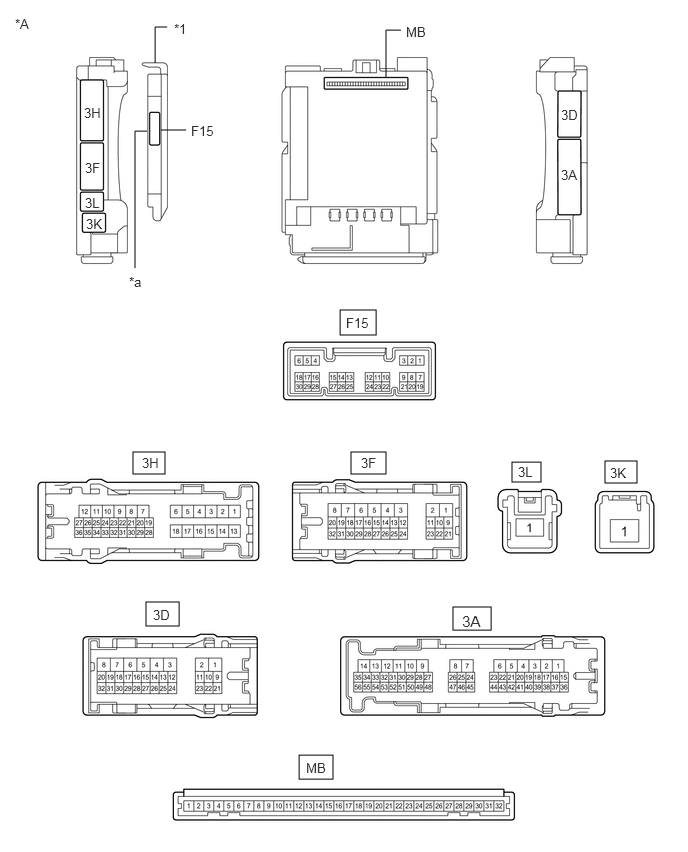
| *A | Main Body ECU (Multiplex Network Body ECU) with 1 Connector | - | - |
| *1 | Main Body ECU (Multiplex Network Body ECU) | - | - |
| *a | 1 Connector | - | - |
Measure the voltage according to the value(s) in the table below.
| Terminal No. (Symbol) | Wiring Color | Terminal Description | Condition | Specified Condition |
|---|---|---|---|---|
| 3F-31 - Body ground | G- Body ground | Low beam headlight signal | Light control switch in head position | Below 1 V |
| Light control switch off | 4.2 V or higher |
If the result is not as specified, the main body ECU (multiplex network body ECU) or instrument panel junction block assembly may be malfunctioning.