EXTERIOR PANELS / TRIM REAR BUMPER REASSEMBLY
PROCEDURE

 52023
1.INSTALL REAR BUMPER REINFORCEMENT SUB-ASSEMBLY (for Type A)
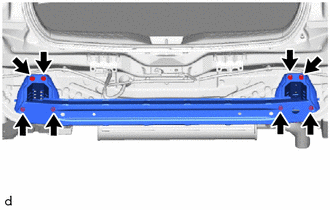
Install the rear bumper reinforcement sub-assembly with the 8 bolts.
- Torque:
- 18 N*m (184 kgf*cm, 13 ft.*lbf)
52015A
2.INSTALL REAR BUMPER ARM SUB-ASSEMBLY RH (for Type B)
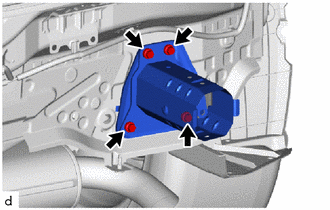
Install the rear bumper arm sub-assembly RH with the 4 bolts.
- Torque:
- 18 N*m (184 kgf*cm, 13 ft.*lbf)
52563A
3.INSTALL REAR BUMPER UPPER RETAINER LH
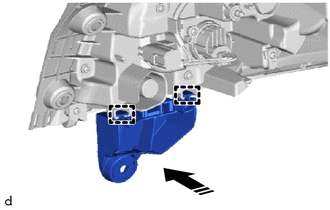

|
Install in this Direction |
Engage the guides to install the rear bumper upper retainer LH as shown in the illustration.
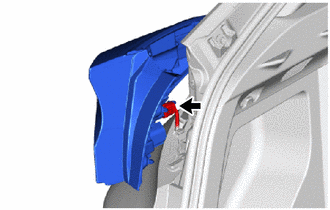
Connect the connector.
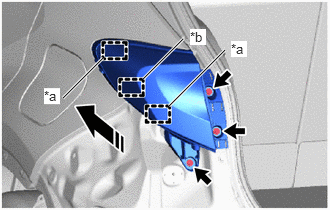
| *a | Guide |
| *b | Pin |
|
|
Install in this Direction |
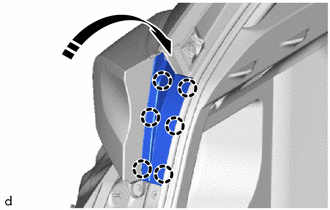
Engage the pin and guide to install the rear combination light assembly LH as shown in the illustration.
Install the 3 screws.
|
|
Install in this Direction |
Install the claws and rear combination light cover LH as shown in the illustration.
52562B
4.INSTALL REAR BUMPER UPPER RETAINER RH
- HINT:
-
Use the same procedure as for the LH side.
52576B
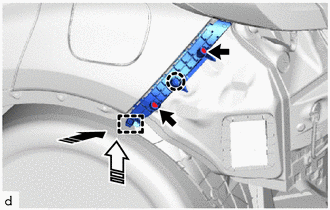
5.INSTALL REAR BUMPER SIDE RETAINER LH
|
|
Install in this Direction (1) |

|
Install in this Direction (2) |
Engage the claw and guide to install rear bumper side retainer LH as shown in the illustration.
Install the 2 screws.
52575
6.INSTALL REAR BUMPER SIDE RETAINER RH
- HINT:
-
Use the same procedure as for the LH side.
52453
7.INSTALL REAR BUMPER CENTER GUARD
Engage the claws and guides to install the rear bumper center guard.
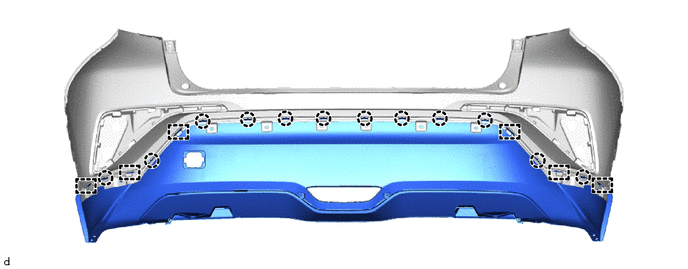
Install the 2 clips and 6 outside moulding retainers.
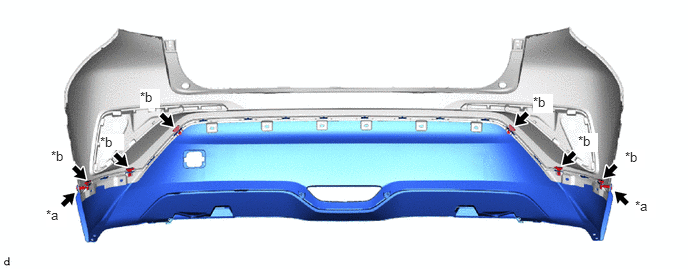
| *a | Clip | *b | Outside Moulding Retainer |
52154B
8.INSTALL REAR BUMPER SIDE STAY LH
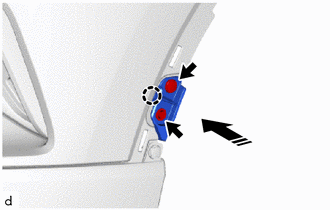
|
|
Install in this Direction |
Engage the claw to install the rear bumper side stay LH as shown in the illustration.
Install the clip and screw.
52153A
9.INSTALL REAR BUMPER SIDE STAY RH
- HINT:
-
Use the same procedure as for the LH side.
52463
10.INSTALL REAR BUMPER PAD LH
- HINT:
-
When installing the rear bumper pad LH, heat the rear bumper assembly using a heat light.
| Item | Temperature |
|---|---|
| Rear Bumper Assembly | 40 to 60°C (104 to 140°F) |
- CAUTION:
-
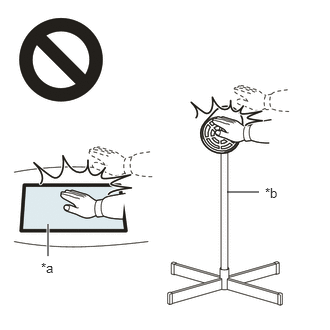 2.365,2 2.698,2 false 0.5,2.333 0.5,2.667 true 0.427,2.708 0.74,2.865 0.313,0.156 10 false *a 2.76,1.927 3.073,2.083 0.313,0.156 10 false *b
*a Heated Part *b Heat Light
- ·
Do not touch the heat light and heated parts, touching the heat light may result in burns.
·Touching heated parts for a long time may result in burns.
- NOTICE:
-
Do not heat the rear bumper assembly excessively.
Clean the rear bumper assembly surface.
Using a heat light, heat the rear bumper assembly surface.
Remove the double-sided tape from the rear bumper assembly.
Wipe off any tape adhesive residue with cleaner.
Remove the release paper from a new rear bumper pad LH.
- HINT:
-
After removing the release paper, keep the exposed adhesive free from foreign matter.
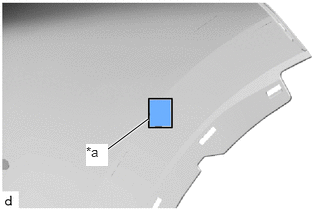
| *a | Line |
Install the rear bumper pad LH as shown in the illustration.
- HINT:
-
Install the rear bumper pad LH along the line on the rear bumper cover.
52462
11.INSTALL REAR BUMPER PAD RH
- HINT:
-
Use the same procedure as for the LH side.
52461F
12.INSTALL REAR BUMPER PAD
- HINT:
-
When installing the rear bumper pad, heat the rear bumper assembly using a heat light.
| Item | Temperature |
|---|---|
| Rear Bumper Assembly | 40 to 60°C (104 to 140°F) |
- CAUTION:
-
2.365,2 2.698,2 false 0.5,2.333 0.5,2.667 true 0.427,2.708 0.74,2.865 0.313,0.156 10 false *a 2.76,1.927 3.073,2.083 0.313,0.156 10 false *b
*a Heated Part *b Heat Light
- ·
Do not touch the heat light and heated parts, touching the heat light may result in burns.
·Touching heated parts for a long time may result in burns.
- NOTICE:
-
Do not heat the rear bumper assembly excessively.
Clean the rear bumper assembly surface.
Using a heat light, heat the rear bumper assembly surface.
Remove the double-sided tape from the rear bumper assembly.
Wipe off any tape adhesive residue with cleaner.
Remove the release paper from a new rear bumper pad.
- HINT:
-
After removing the release paper, keep the exposed adhesive free from foreign matter.
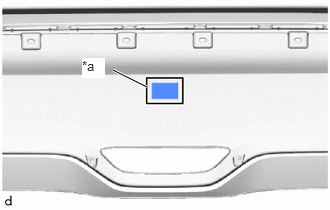
| *a | Line |
Install the rear bumper pad as shown in the illustration.
- HINT:
-
Install the rear bumper pad along the line on the rear bumper cover.
52162B
13.INSTALL NO. 1 REAR BUMPER PLATE
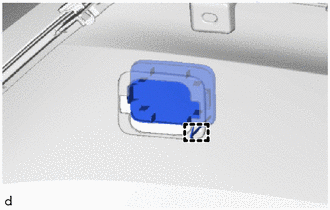
Engage the hook to install the No. 1 rear bumper plate.
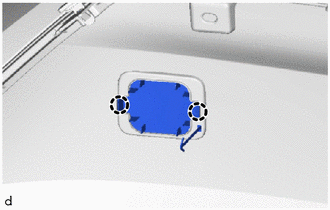
Disengage the claws.
52756
14.INSTALL REAR BUMPER MOULDING RETAINER LH (w/ Rear Bumper Moulding Retainer)
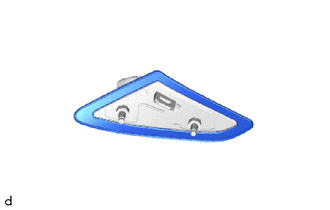
Install the No. 1 rear spoiler protector to the rear bumper moulding retainer LH.
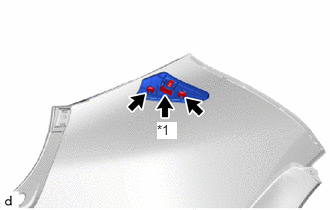
| *1 | Outside Moulding Retainer |
Install the No. 2 rear bumper side retainer LH and rear bumper moulding retainer LH with No. 1 rear spoiler protector.
Install the outside moulding retainer.
Install the 2 nuts.
52755
15.INSTALL REAR BUMPER MOULDING RETAINER RH (w/ Rear Bumper Moulding Retainer)
- HINT:
-
Use the same procedure as for the LH side.
52164A
16.INSTALL REAR BUMPER PLATE LH
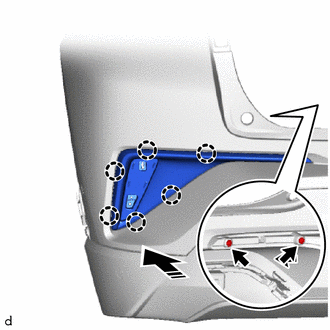
|
|
Install in this Direction |
Engage the claws to install the rear bumper plate LH as shown in the illustration.
Install the 2 screws.
52163A
17.INSTALL REAR BUMPER PLATE RH
- HINT:
-
Use the same procedure as for the LH side.
81920
18.INSTALL REFLEX REFLECTOR ASSEMBLY LH
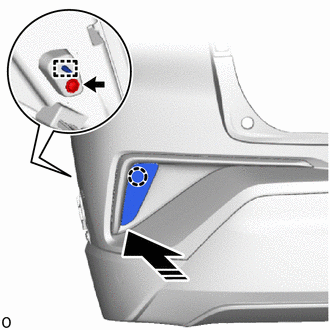
|
|
Install in this Direction |
Engage the guide and claw to install the reflex reflector assembly as shown in the illustration.
Install the screw.
81910
19.INSTALL REFLEX REFLECTOR ASSEMBLY RH
- HINT:
-
Use the same procedure as for the LH side.
52166A
20.INSTALL REAR BUMPER UPPER COVER LH
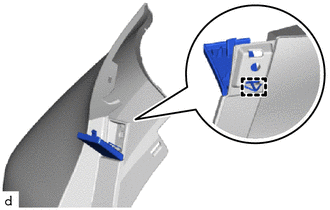
Engage the hook to install the rear bumper upper cover LH.
52165A
21.INSTALL REAR BUMPER UPPER COVER RH
- HINT:
-
Use the same procedure as for the LH side.
81480B
22.INSTALL REAR FOG LIGHT ASSEMBLY (w/ Rear Fog Light)
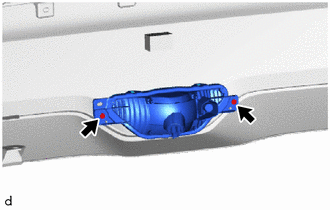
Install the rear fog light with the 2 screws.
81481Q
23.INSTALL FOG LIGHT BRACKET (w/o Rear Fog Light)
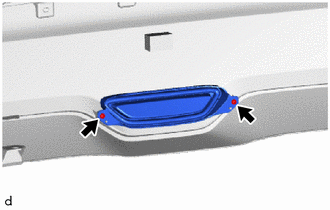
Install the fog light bracket with the 2 screws.
82169A
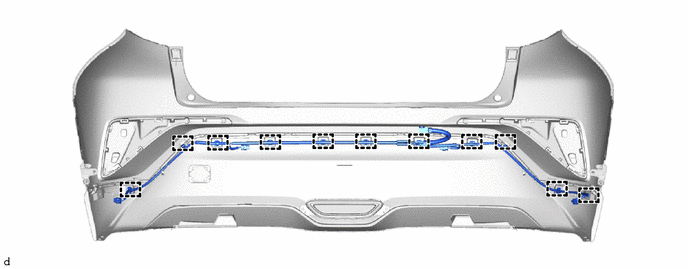
24.INSTALL NO. 6 FLOOR WIRE (w/ Wire Harness)
w/ Simple Intelligent Parking Assist System and Rear Fog Light:
Engage the clamps to install the No. 6 floor wire.
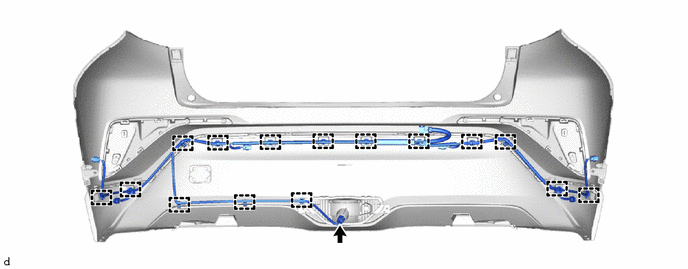
Connect the connector.
w/ Rear Fog Light:
Engage the clamps to install the No. 6 floor wire.
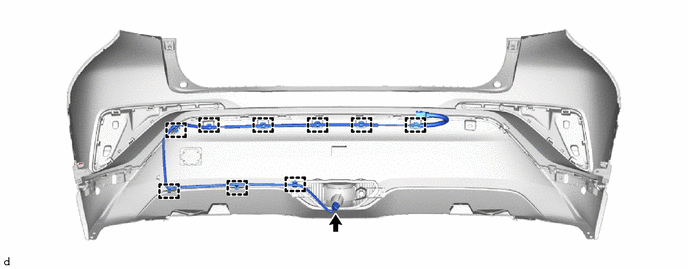
Connect the connector.
w/ TOYOTA Parking Assist-sensor System:
Engage the clamps to install the No. 6 floor wire.
89348S
25.INSTALL REAR CENTER ULTRASONIC SENSOR RETAINER (w/ TOYOTA Parking Assist-sensor System)
89348R
26.INSTALL REAR CORNER ULTRASONIC SENSOR RETAINER (w/ TOYOTA Parking Assist-sensor System)
89348T
27.INSTALL REAR SIDE ULTRASONIC SENSOR RETAINER (w/ Simple Intelligent Parking Assist System)
89342A
28.INSTALL REAR CENTER ULTRASONIC SENSOR (w/ TOYOTA Parking Assist-sensor System)
89342
29.INSTALL REAR CORNER ULTRASONIC SENSOR (w/ TOYOTA Parking Assist-sensor System)
89342B
30.INSTALL REAR SIDE ULTRASONIC SENSOR (w/ Simple Intelligent Parking Assist System)