8NR-FTS STARTING STARTER(for Valeo Made Cold Area Specification Vehicles) INSPECTION
PROCEDURE

 28100
1.INSPECT STARTER ASSEMBLY
- CAUTION:
-
As a large electric current passes through the cable during this inspection, a thick cable must be used. If not, the cable may become hot and cause injury.
- NOTICE:
-
Perform each of the following tests within 3 to 5 seconds to prevent the coil from burning out.
Perform a pull-in test.
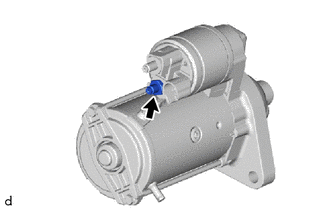
Remove the nut, and disconnect the field coil lead wire from terminal C.
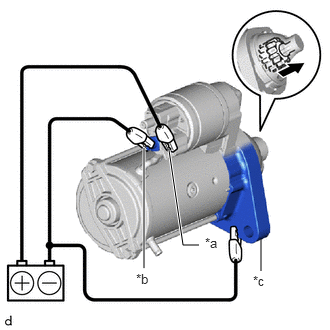
| *a | Terminal 50 |
| *b | Terminal C |
| *c | Starter Body |

|
Moves outward |
Connect a battery to the magnet starter switch assembly as shown in the illustration. Check that the clutch pinion gear moves outward.
If the clutch pinion gear does not move outward, replace the magnet starter switch assembly.
Perform a hold-in test.
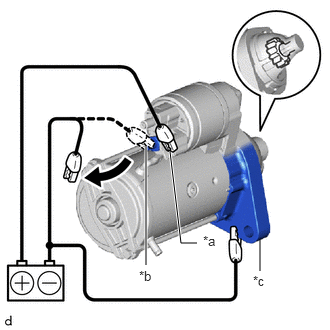
| *a | Terminal 50 |
| *b | Terminal C |
| *c | Starter Body |
|
|
Disconnect |
While maintaining the battery connections of the pull-in test, disconnect the negative (-) lead from terminal C. Check that the clutch pinion gear does not return inward.
If the clutch pinion gear returns inward, replace the magnet starter switch assembly.
Perform a return test.
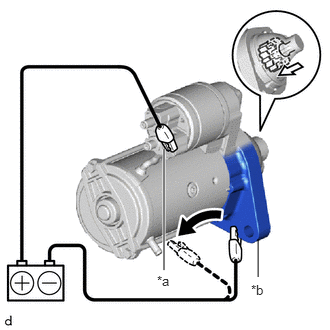
| *a | Terminal 50 |
| *b | Starter Body |
|
|
Disconnect |

|
Returns inward |
Disconnect the negative (-) lead from the starter body. Check that the clutch pinion gear returns inward.
If the clutch pinion gear does not return inward, replace the magnet starter switch assembly.
Perform a no-load performance test.
Connect the field coil lead wire to terminal C with the nut. Make sure that the field coil lead wire is not grounded.
- Torque:
- 9.5 N*m (97 kgf*cm, 84 in.*lbf)
Secure the starter assembly in a vise between aluminum plates.
- NOTICE:
-
Ensure that the starter assembly is secured in the vise to prevent it from falling out.
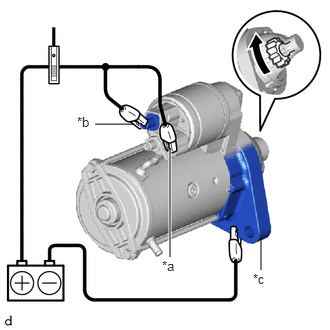
| *a | Terminal 50 |
| *b | Terminal 30 |
| *c | Starter Body |
|
|
Rotates |
Connect the battery and an ammeter to the starter assembly as shown in the illustration.
- NOTICE:
-
Do not allow any lead to get caught as the clutch pinion gear operates.
Check that the starter assembly operates smoothly and steadily while the clutch pinion gear is moving outward.
Measure the current according to the value(s) in the table below.
- Standard Current:
Tester Connection Condition Specified Condition Battery positive (+) terminal - Terminal 30 - Terminal 50 11.5 V Below 145 A
If the result is not as specified, replace the starter assembly.
2.INSPECT MAGNET STARTER SWITCH ASSEMBLY
Check the plunger.
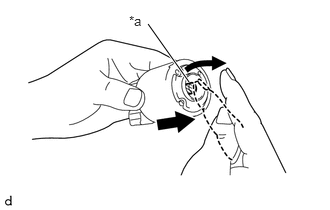
| *a | Plunger |
Push in the plunger and check that it returns quickly to its original position.
If necessary, replace the magnet starter switch assembly.
- NOTICE:
-
To avoid damaging the inside of the magnet starter switch assembly, do not release the plunger quickly.
Check the pull-in coil for an open circuit.
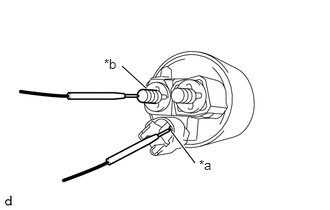
| *a | Terminal 50 |
| *b | Terminal C |
Measure the resistance according to the value(s) in the table below.
- Standard Resistance:
Tester Connection Condition Specified Condition Terminal 50 - Terminal C Always Below 1 Ω
If the result is not as specified, replace the repair service starter kit.
Check the holding coil for an open circuit.
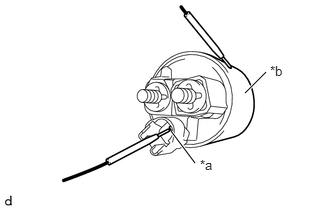
| *a | Terminal 50 |
| *b | Magnet Starter Switch Assembly Body |
Measure the resistance according to the value(s) in the table below.
- Standard Resistance:
Tester Connection Condition Specified Condition Terminal 50 - Magnet switch body Always Below 2 Ω
If the result is not as specified, replace the repair service starter kit.