PARK ASSIST / MONITORING ULTRASONIC SENSOR(for Rear) INSTALLATION
PROCEDURE

 89348S
1.INSTALL REAR CENTER ULTRASONIC SENSOR RETAINER
- HINT:
- ·
Perform this procedure only when replacement of the rear center ultrasonic sensor retainer is necessary.
·If a rear center ultrasonic sensor retainer has been removed, replace it with a new one.
·The illustration is for the LH side. The orientation for the RH side is the opposite of the LH side.
Clean the surface of the rear bumper cover.
Remove any remaining double-sided tape from the rear bumper cover.
Wipe off any adhesive residue with cleaner.
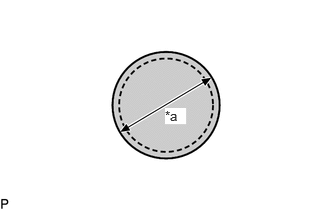
| *a | 30 mm (1.18 in.) |
Cover the 2 sensor installation holes with a 30 mm (1.18 in.) circular piece of tape.
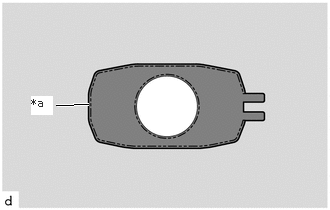
| *a | Scribed Line |

|
Primer Application |
Apply primer to rear bumper assembly on the installation area of the rear center ultrasonic sensor retainer using a brush or felt.
- NOTICE:
- ·
Replace the brush or felt if it is dirty or has become hardened.
·Keep any painted surface free from primer.
·If the primer contacts a painted surface, it may leave light primer marks. Therefore, use protective tape when using liquid primer.
·Do not touch surfaces to which primer has been applied until the rear center ultrasonic sensor retainer has been attached.
Let the primer dry sufficiently.
- NOTICE:
-
Do not touch applied surfaces until the primer is dry.
- Recommended drying time:
10 minutes or more (at 23°C (73°F))
Confirm that the primer has completely dried by touching the rear bumper assembly. Then remove the tape.
Remove the peeling paper of the new rear center ultrasonic sensor retainer trying not to touch the adhesional surface.
- NOTICE:
-
After removing the peeling paper, do not touch the surface of the tape with your fingers or cotton work gloves.
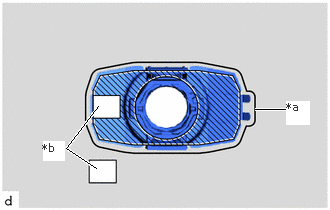
| *a | Scribed Line |
| *b | Identification Code |

|
Press area |
Check that the identification codes on the rear bumper assembly and the rear center ultrasonic sensor retainer are identical.
Align the rear center ultrasonic sensor retainer with the scribed line on the rear bumper assembly and install it as shown in the illustration.
- NOTICE:
-
The application strength of the rear center ultrasonic sensor retainer will weaken if reapplied. If reapplication is necessary, be sure to replace it with a new one.
- HINT:
- ·
Apply pressure so that it does not lift up from the rear bumper assembly.
·Pushing force: 50 N (5.1 kgf) for 3 seconds
89348R
2.INSTALL REAR CORNER ULTRASONIC SENSOR RETAINER
- HINT:
- ·
Perform this procedure only when replacement of the rear corner ultrasonic sensor retainer is necessary.
·If a rear corner ultrasonic sensor retainer has been removed, replace it with a new one.
·The illustration is for the LH side. The orientation for the RH side is the opposite of the LH side.
Clean the surface of the rear bumper cover.
Remove any remaining double-sided tape from the rear bumper cover.
Wipe off any adhesive residue with cleaner.
| *a | 30 mm (1.18 in.) |
Cover the 2 sensor installation holes with a 30 mm (1.18 in.) circular piece of tape.
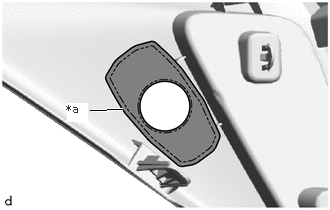
| *a | Scribed Line |
|
|
Primer Application |
Apply primer to rear bumper assembly on the installation area of the rear corner ultrasonic sensor retainer using a brush or felt.
- NOTICE:
- ·
Replace the brush or felt if it is dirty or has become hardened.
·Keep any painted surface free from primer.
·If the primer contacts a painted surface, it may leave light primer marks. Therefore, use protective tape when using liquid primer.
·Do not touch surfaces to which primer has been applied until the rear corner ultrasonic sensor retainer has been attached.
Let the primer dry sufficiently.
- NOTICE:
-
Do not touch applied surfaces until the primer is dry.
- Recommended drying time:
10 minutes or more (at 23°C (73°F))
Confirm that the primer has completely dried by touching the rear bumper assembly. Then remove the tape.
Remove the peeling paper of the new rear corner ultrasonic sensor retainer trying not to touch the adhesional surface.
- NOTICE:
-
After removing the peeling paper, do not touch the surface of the tape with your fingers or cotton work gloves.
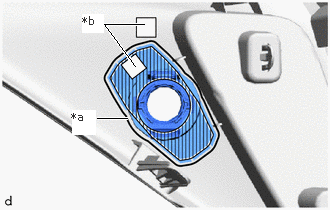
| *a | Scribed Line |
| *b | Identification Code |
|
|
Press area |
Check that the identification codes on the rear bumper assembly and the rear corner ultrasonic sensor retainer are identical.
Align the rear corner ultrasonic sensor retainer with the scribed line on the rear bumper assembly and install it as shown in the illustration.
- NOTICE:
-
The application strength of the rear corner ultrasonic sensor retainer will weaken if reapplied. If reapplication is necessary, be sure to replace it with a new one.
- HINT:
- ·
Apply pressure so that it does not lift up from the rear bumper assembly.
·Pushing force: 50 N (5.1 kgf) for 3 seconds
52164A
3.INSTALL REAR BUMPER PLATE LH
- HINT:
-
Perform this procedure only when replacement of the rear corner ultrasonic sensor retainer is necessary.
-
Click hereVehicle Exterior>EXTERIOR PANELS / TRIM>REAR BUMPER>DISASSEMBLY
52163A
4.INSTALL REAR BUMPER PLATE RH
- HINT:
- ·
Perform this procedure only when replacement of the rear corner ultrasonic sensor retainer is necessary.
·The following procedure is for the LH side.
89348T
5.INSTALL REAR SIDE ULTRASONIC SENSOR RETAINER (w/ Simple Intelligent Parking Assist System)
- HINT:
- ·
Perform this procedure only when replacement of the rear side ultrasonic sensor retainer is necessary.
·If a rear side ultrasonic sensor retainer has been removed, replace it with a new one.
Clean the surface of the rear bumper cover.
Remove any remaining double-sided tape from the rear bumper cover.
Wipe off any adhesive residue with cleaner.
| *a | 30 mm (1.18 in.) |
Cover the 2 sensor installation holes with a 30 mm (1.18 in.) circular piece of tape.
Apply primer to rear bumper assembly on the installation area of the rear side ultrasonic sensor retainer using a brush or felt.
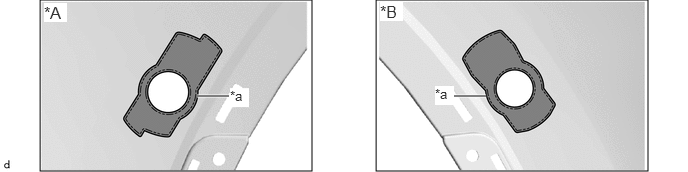
| *A | for LH Side | *B | for RH Side |
| *a | Scribed Line | - | - |
|
|
Primer Application | - | - |
- NOTICE:
- ·
Replace the brush or felt if it is dirty or has become hardened.
·Keep any painted surface free from primer.
·If the primer contacts a painted surface, it may leave light primer marks. Therefore, use protective tape when using liquid primer.
·Do not touch surfaces to which primer has been applied until the rear side ultrasonic sensor retainer has been attached.
Let the primer dry sufficiently.
- NOTICE:
-
Do not touch applied surfaces until the primer is dry.
- Recommended drying time:
10 minutes or more (at 23°C (73°F))
Confirm that the primer has completely dried by touching the rear bumper assembly. Then remove the tape.
Remove the peeling paper of the new rear side ultrasonic sensor retainer trying not to touch the adhesional surface.
- NOTICE:
-
After removing the peeling paper, do not touch the surface of the tape with your fingers or cotton work gloves.
Check that the identification codes on the rear bumper assembly and the rear side ultrasonic sensor retainer are identical.
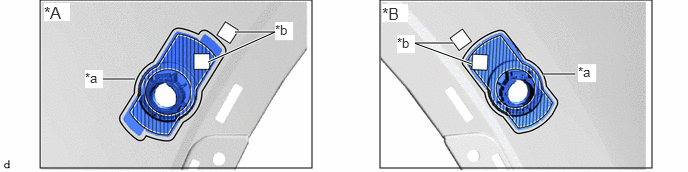
| *A | for LH Side | *B | for RH Side |
| *a | Scribed Line | *b | Identification Code |
|
|
Press area | - | - |
Align the rear side ultrasonic sensor retainer with the scribed line on the rear bumper assembly and install it as shown in the illustration.
- NOTICE:
-
The application strength of the rear side ultrasonic sensor retainer will weaken if reapplied. If reapplication is necessary, be sure to replace it with a new one.
- HINT:
- ·
Apply pressure so that it does not lift up from the rear bumper assembly.
·Pushing force: 50 N (5.1 kgf) for 3 seconds
89342A
6.INSTALL REAR CENTER ULTRASONIC SENSOR
- HINT:
-
The illustration is for the LH side. The orientation for the RH side is the opposite of the LH side.
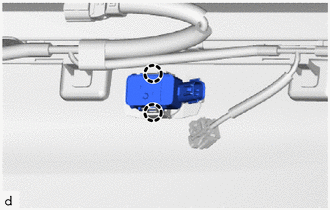
Engage the claws to install the rear center ultrasonic sensor.
Connect the connector.
89342
7.INSTALL REAR CORNER ULTRASONIC SENSOR
- HINT:
-
The illustration is for the LH side. The orientation for the RH side is the opposite of the LH side.
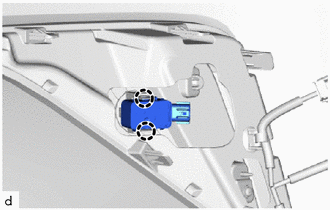
Engage the claws to install the rear corner ultrasonic sensor.
Connect the connector.
89342B
8.INSTALL REAR SIDE ULTRASONIC SENSOR (w/ Simple Intelligent Parking Assist System)
- HINT:
-
The illustration is for the LH side. The orientation for the RH side is the opposite of the LH side.
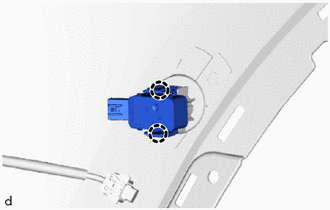
Engage the claws to install the rear side ultrasonic sensor.
Connect the connector.
9.INSTALL REAR BUMPER ASSEMBLY
10.PERFORM CALIBRATION