8NR-FTS ENGINE CONTROL ECM REMOVAL
CAUTION / NOTICE / HINT
The necessary procedures (adjustment, calibration, initialization, or registration) that must be performed after parts are removed, installed, or replaced during the ECM removal/installation are shown below.
| Replacement Part or Procedure | Necessary Procedure | Effect/Inoperative when not Performed | Link |
|---|---|---|---|
| Disconnect cable from negative battery terminal | Memorize steering angle neutral point | Panoramic view monitor system | ( ) |
| Replacement of ECM | Perform Vehicle Identification Number (VIN) or frame number registration | ·
MIL illuminates ·
DTC P0630 is stored |
()
|
| HEAVY KNOCK HISTORY | ·
SAVE HISTORY ·
WRITE HISTORY |
()
|
|
| ECU Communication ID Registration (Immobiliser system) | Engine start function | See Service Bulletin for the registration method. | |
| Perform code registration (Immobiliser system) | ·
Wireless door lock control system ·
Smart entry and start system ·
Engine start function ·
Steering lock system |
See Service Bulletin for the registration method. (w/ Entry and Start System) | |
| Engine starting | See Service Bulletin for the registration method. (w/o Entry and Start System) | ||
1.
Reset Memory 2.
Deceleration Sensor 0 Point Calibration 3.
CVT Oil Pressure Calibration |
Deterioration of fuel efficiency | for K313()
for K313F( )
|
- HINT:
-
When the cable is disconnected / reconnected to the battery terminal, systems temporarily stop operating. However, each system has a function that completes learning the first time the system is used.
- ·
Learning completes when vehicle is driven
Effect/Inoperative Function When Necessary Procedures are not Performed Necessary Procedures Link *1: When performing learning using the GTS
Click here(
)
Lane tracing assist system Drive the vehicle straight ahead at 35 km/h (22 mph) or more for 5 second or more. ( )
Pre-collision system Simple intelligent parking assist system*1 Parking support brake system*1
·Learning completes when vehicle is operated normally
Effect/Inoperative Function When Necessary Procedures are not Performed Necessary Procedures Link Power door lock control system
·Back door opener
Perform door unlock operation with door control switch or electrical key transmitter sub-assembly switch. ( )
Air conditioning system After the ignition switch is turned to ON, the servo motor standard position is recognized. -
PROCEDURE

 1. PRECAUTION
- NOTICE:
- ·
After turning the ignition switch off, waiting time may be required before disconnecting the cable from the negative (-) battery terminal.
Click hereGeneral>INTRODUCTION>REPAIR INSTRUCTION>PRECAUTION
·If the ECM has been struck or dropped, replace it.
·Perform the Vehicle Identification Number (VIN) registration when replacing the ECM.
Click hereEngine / Hybrid System>8NR-FTS (ENGINE CONTROL)>SFI SYSTEM>REGISTRATION
·When replacing the ECM, use the GTS to save "Heavy Knock History" and then upload it to the new ECM.
Click hereEngine / Hybrid System>8NR-FTS (ENGINE CONTROL)>SFI SYSTEM>REGISTRATION
2.DISCONNECT CABLE FROM NEGATIVE BATTERY TERMINAL
53141F
3.REMOVE RADIATOR COVER
17751
4.REMOVE NO. 1 AIR CLEANER INLET
17705
5.REMOVE AIR CLEANER CAP SUB-ASSEMBLY
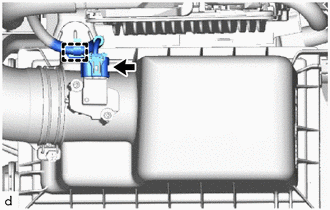
Disconnect the mass air flow meter connector.
Disengage the clamp from the air cleaner cap sub-assembly.
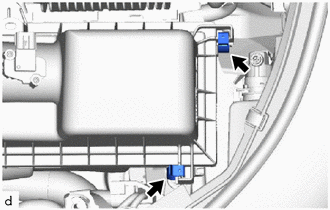
Disengage the 2 air cleaner cap sub-assembly clamps.
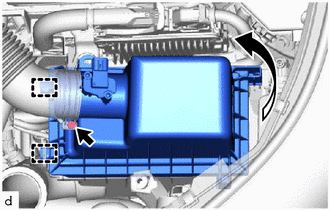
Disengage the 2 guides to separate the air cleaner cap sub-assembly from the air cleaner case sub-assembly.
Loosen the hose clamp and remove the air cleaner cap sub-assembly from the air cleaner hose.
17701
6.REMOVE AIR CLEANER CASE SUB-ASSEMBLY
89661
7.REMOVE ECM
- HINT:
-
When replacing the ECM, use the GTS to save "Heavy Knock History" and then upload it to the new ECM.
-
Click hereEngine / Hybrid System>8NR-FTS (ENGINE CONTROL)>SFI SYSTEM>REGISTRATION
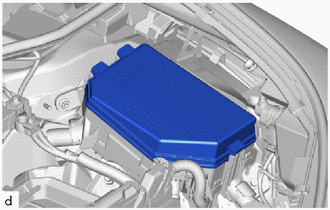
Remove the No. 1 relay block cover from the No. 1 engine room relay block.
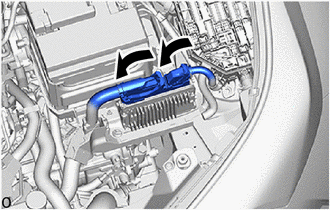
Raise the 2 levers while pushing the locks on the levers, and disconnect the 2 ECM connectors.
- NOTICE:
-
After disconnecting the ECM connectors, make sure that dirt, water or other foreign matter does not contact the connecting parts of the ECM connectors.
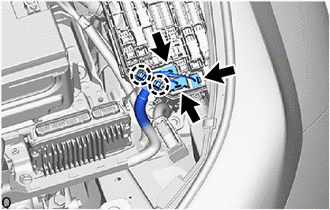
Disconnect the 3 connectors from the No. 1 engine room relay block.
Disengage the 2 claws to separate the engine wire from the No. 1 engine room relay block.
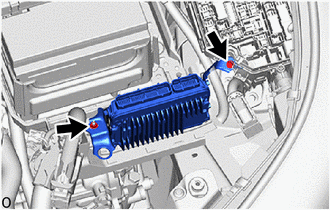
Remove the bolt, nut and ECM.
- NOTICE:
-
If the ECM has been struck or dropped, replace it.
89667E
8.REMOVE NO. 1 ECM BRACKET
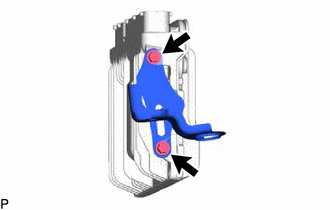
Remove the 2 screws and No. 1 ECM bracket from the ECM.
89668
9.REMOVE NO. 2 ECM BRACKET
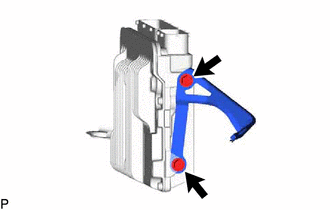
Remove the 2 screws and No. 2 ECM bracket from the ECM.