BRAKE CONTROL / DYNAMIC CONTROL SYSTEMS BRAKE ACTUATOR(for RHD) REMOVAL
CAUTION / NOTICE / HINT
The necessary procedures (adjustment, calibration, initialization, or registration) that must be performed after parts are removed, installed, or replaced during the brake actuator assembly removal/installation are shown below.
| Replacement Part or Procedure | Necessary Procedure | Effect/Inoperative when not Performed | Link |
|---|---|---|---|
| Disconnect cable from negative battery terminal | Memorize steering angle neutral point | Panoramic view monitor system | ( ) |
| Replacement of brake actuator assembly | Operate the electric parking brake switch assembly | Parking brake indicator light (red) blinks when the ignition switch is first turned on (IG) | ()
|
1.
Clear zero point calibration data. 2.
Perform yaw rate and acceleration sensor zero point calibration. |
·
DTCs are stored ·
ABS warning light illuminates ·
Slip indicator light illuminates ·
VSC disabled or malfunctions |
()
|
CAUTION / NOTICE / HINT
- HINT:
-
When the cable is disconnected / reconnected to the battery terminal, systems temporarily stop operating. However, each system has a function that completes learning the first time the system is used.
- ·
Learning completes when vehicle is driven
Effect/Inoperative Function When Necessary Procedures are not Performed Necessary Procedures Link *1: When performing learning using the GTS
(
)
Lane tracing assist system Drive the vehicle straight ahead at 35 km/h (22 mph) or more for 5 second or more. ( )
Pre-collision system Simple intelligent parking assist system*1 Parking support brake system*1
·Learning completes when vehicle is operated normally
Effect/Inoperative Function When Necessary Procedures are not Performed Necessary Procedures Link Power door lock control system
·Back door opener
Perform door unlock operation with door control switch or electrical key transmitter sub-assembly switch. ( )
Air conditioning system After the ignition switch is turned to ON, the servo motor standard position is recognized. -
PROCEDURE

 1. PRECAUTION
- NOTICE:
-
After turning the ignition switch off, waiting time may be required before disconnecting the cable from the negative (-) battery terminal.
-
Click hereGeneral>SETUP>WHEN DISCONNECTING OR RECONNECTING BATTERY TERMINAL>WORK PROCEDURE
2.DISCONNECT CABLE FROM NEGATIVE BATTERY TERMINAL
3.REMOVE WINDSHIELD WIPER MOTOR AND LINK ASSEMBLY
55737B
4.REMOVE NO. 1 HEATER AIR DUCT SPLASH SHIELD SEAL
55735A
5.REMOVE WATER GUARD PLATE LH (for TMC Made)
55736D
6.REMOVE COWL BODY MOUNTING REINFORCEMENT LH
55735C
7.REMOVE COWL BODY MOUNTING REINFORCEMENT RH
55701J
8.REMOVE OUTER COWL TOP PANEL SUB-ASSEMBLY
9.REMOVE BATTERY
86510A
10.REMOVE SECURITY HORN ASSEMBLY (w/ Security Horn)
11.DRAIN BRAKE FLUID
- NOTICE:
-
If brake fluid leaks onto any painted surface, immediately wash it off.
12.REMOVE BRAKE ACTUATOR WITH BRACKET
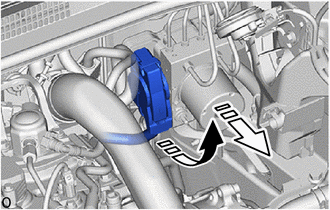

|
Release the lock lever |

|
Disconnect the connector |
Release the lock lever and disconnect the connector from the brake actuator assembly.
- NOTICE:
-
Be careful not to allow any brake fluid to enter the connector.
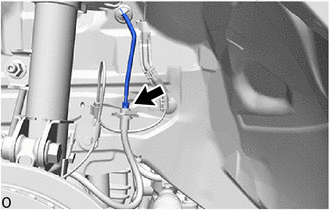
Using a 10 mm union nut wrench, disconnect the brake tube from the front flexible hose.
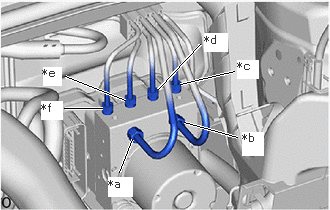
| *a | From 1st Chamber of Brake Booster with Master Cylinder Assembly |
| *b | From 2nd Chamber of Brake Booster with Master Cylinder Assembly |
| *c | To Front Wheel Cylinder Assembly LH |
| *d | To Rear Wheel Cylinder Assembly RH |
| *e | To Rear Wheel Cylinder Assembly LH |
| *f | To Front Wheel Cylinder Assembly RH |
Use tags or make a memo to identify the places to reconnect the brake tubes.
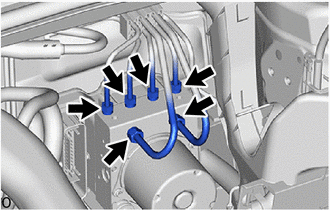
Using a 10 mm and 12 mm union nut wrench, disconnect the 6 brake tubes from the brake actuator assembly.
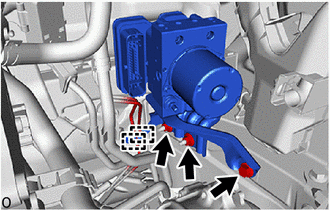
Disengage the 2 clamps to separate the fuel main tube and fuel tank to canister tube from the No. 2 fuel tube clamp.
Remove the bolt, 2 nuts and brake actuator with bracket from the vehicle body.
- NOTICE:
- ·
Do not kink or damage the brake tubes.
·Do not hold the brake actuator assembly by the connector.
- HINT:
-
Remove the brake actuator with bracket while avoiding the brake tubes.
44510
13.REMOVE BRAKE ACTUATOR ASSEMBLY
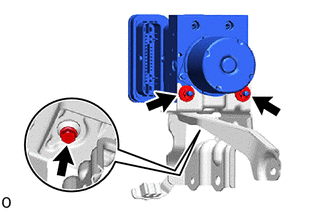
Loosen the 2 nuts.
Remove the bolt and brake actuator assembly from the brake actuator bracket assembly.
- NOTICE:
- ·
Do not hold the brake actuator assembly by the connector.
·Be careful not to allow any brake fluid to enter the connector.
·Do not drop the brake actuator assembly when carrying it.
44521A
14.REMOVE NO. 1 BRAKE ACTUATOR CASE COLLAR
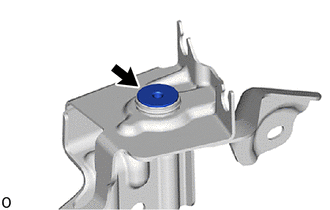
Remove the No. 1 brake actuator case collar from the brake actuator bracket cushion.
44547B
15.REMOVE BRAKE ACTUATOR BRACKET CUSHION
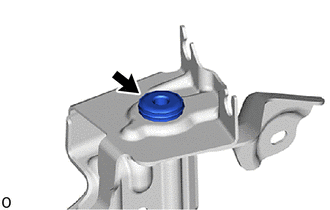
Remove the brake actuator bracket cushion from the brake actuator bracket assembly.
77286D
16.REMOVE NO. 2 FUEL TUBE CLAMP
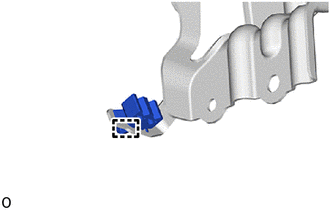
Disengage the claw to remove the No. 2 fuel tube clamp from the brake actuator bracket assembly.