PRECAUTION
Precautions · Vehicles built Oct 2006 – May 2009
Versions by build date: Jun 2006 – Sep 2006 Oct 2006 – May 2009 from Jun 2009
- CAUTION:
- The vehicle is equipped with a Supplemental Restraint System (SRS). It consists of a driver airbag, front passenger airbag, front side airbag (*1), curtain shield airbag (*1), and front seat belt pretensioner. Failure to carry out service operations in the correct sequence could cause the SRS to unexpectedly deploy during servicing, possibly leading to a serious accident. Further, if a mistake is made when servicing the SRS, it is possible that the SRS may fail to operate when required. Before performing servicing (including removal or installation of parts, inspection or replacement), be sure to read the following items carefully, then follow the procedures exactly as indicated in the repair manual.
- Wait at least 90 seconds after the ignition switch is turned to the LOCK position and the negative (-) terminal cable is disconnected from the battery before starting the operation.
(The SRS is equipped with a backup power source, so if work is started within 90 seconds after disconnecting the negative (-) terminal cable from the battery, the SRS may be deployed.)
- Do not expose any of the following components directly to hot air or flames: the steering pad, front passenger airbag assembly, center airbag sensor assembly, front airbag sensor, front seat inner belt assembly, seat position airbag sensor, front seat side airbag assembly (*1), side airbag sensor (*1), curtain shield airbag assembly (*1), rear airbag sensor (*1), or front seat outer belt assembly.
- The vehicle is equipped with a Supplemental Restraint System (SRS). It consists of a driver airbag, front passenger airbag, front side airbag (*1), curtain shield airbag (*1), and front seat belt pretensioner. Failure to carry out service operations in the correct sequence could cause the SRS to unexpectedly deploy during servicing, possibly leading to a serious accident. Further, if a mistake is made when servicing the SRS, it is possible that the SRS may fail to operate when required. Before performing servicing (including removal or installation of parts, inspection or replacement), be sure to read the following items carefully, then follow the procedures exactly as indicated in the repair manual.
- *1: For vehicles equipped with the front side and curtain shield airbags.
- NOTICE:
- Malfunction symptoms of the SRS are difficult to confirm, so DTCs are the most important source of information when troubleshooting. When troubleshooting the SRS, always inspect DTCs before disconnecting the battery.
- Even in the case of a minor collision that does not cause the SRS to deploy, the following components of the SRS should be inspected: the steering pad, front passenger airbag assembly, center airbag sensor assembly, front airbag sensor, front seat inner belt assembly, seat position airbag sensor, front seat side airbag assembly (*1), side airbag sensor (*1), curtain shield airbag assembly (*1), rear airbag sensor (*1) and front seat outer belt assembly.
- Before beginning repairs, remove the airbag sensor if any kind of shock is likely to occur to the airbag sensor during the operation.
- Never use SRS parts from another vehicle. When replacing parts, replace them with new ones.
- Never disassemble or repair any of the following parts in order to reuse them. If any of these parts have been dropped, or any defect is found (e.g. cracks, dents or any other defects) in any of the housings, brackets or connectors, replace the part with a new one.
- Steering Pad
- Front Passenger Airbag Assembly
- Front Seat Side Airbag Assembly (*1)
- Curtain Shield Airbag Assembly (*1)
- Center Airbag Sensor Assembly
- Front Airbag Sensor
- Front Seat Inner Belt Assembly
- Seat Position Airbag Sensor
- Side Airbag Sensor (*1)
- Rear Airbag Sensor (*1)
- Front Seat Outer Belt Assembly
- Use a volt/ohmmeter with high impedance (10 kΩ/V minimum) for troubleshooting the electrical circuits.
- Information labels are attached near the SRS components. Follow the instructions noted in the caution.
- After work on the SRS is completed, perform an SRS warning light check (Click here).
- When the negative (-) terminal cable is disconnected from the battery, the memory will be cleared. Because of this, be sure to make a record of the contents in each system before starting work. When work is finished, adjust each system to its previous state. Never use a backup power supply for the purpose of retaining the memory of vehicle electronic systems.
- If the vehicle is equipped with a mobile communication system, refer to the precaution in the INTRODUCTION section.
- Malfunction symptoms of the SRS are difficult to confirm, so DTCs are the most important source of information when troubleshooting. When troubleshooting the SRS, always inspect DTCs before disconnecting the battery.
- *1: For vehicles equipped with the front side and curtain shield airbags.
- HINT:
- In the airbag system, the center airbag sensor assembly, front airbag sensor LH and RH, side airbag sensor LH (*1) and RH (*1), and rear airbag sensor LH (*1) and RH (*1) are collectively referred to as the airbag sensors.
- *1: For vehicles equipped with the front side and curtain shield airbags.
| 1.HANDLING PRECAUTIONS FOR AIRBAG SENSORS |
Before starting the following operations, wait for at least 90 seconds after disconnecting the negative (-) terminal cable from the battery:
Replacement of the airbag sensors.
Adjustment of the front/rear doors of the vehicle equipped with front side airbag and curtain shield airbag (fitting adjustment).
When connecting or disconnecting the airbag sensor connectors, ensure that each sensor is installed in the vehicle.
Do not use airbag sensors which have been dropped during the operation or transportation.
Do not disassemble the airbag sensors.
| 2.INSPECTION PROCEDURE FOR VEHICLE INVOLVED IN ACCIDENT |
When the airbag has not deployed, confirm the DTCs by checking the SRS warning light. If there is any malfunction in the SRS airbag system, perform troubleshooting.
When any of the airbags have deployed, replace the airbag sensors and check the installation condition.
| 3.EXPRESSIONS OF IGNITION SWITCH |
The expressions listed in the table below are used in this section.
| Expression |
Switch Type |
|
| Ignition Switch (position) |
Engine Switch (condition) |
|
| Ignition Switch off |
LOCK |
Off |
| Ignition Switch on (IG) |
ON |
On (IG) |
| Ignition Switch on (ACC) |
ACC |
On (ACC) |
| Engine Start |
START |
Start |
| 4.SRS CONNECTORS |
SRS connectors are located as shown in the following illustration.
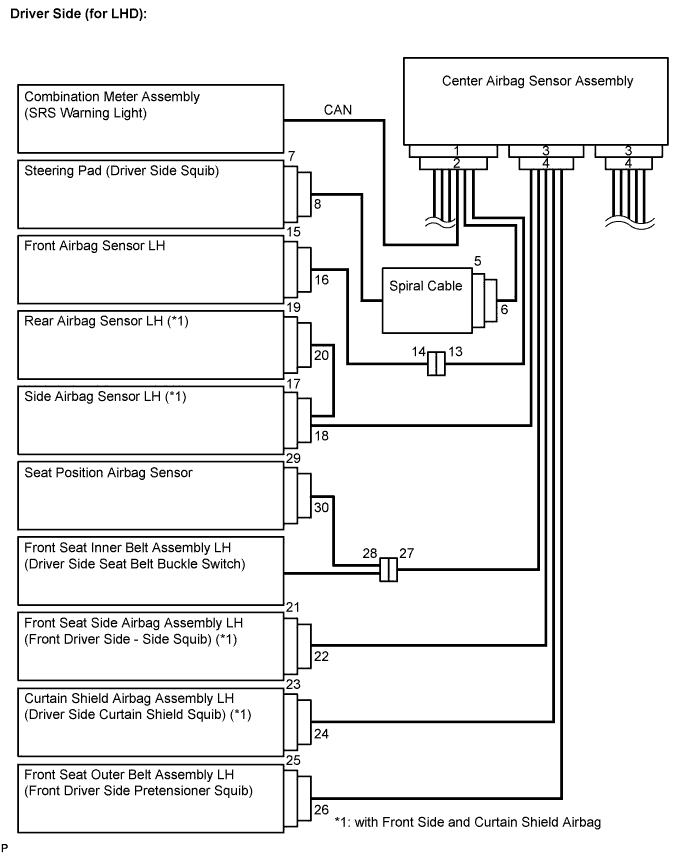

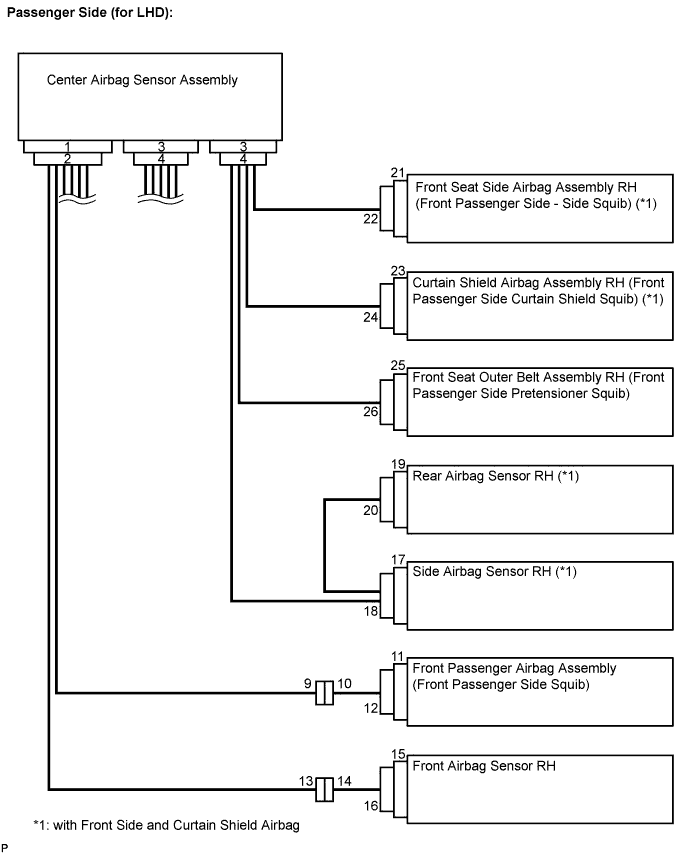
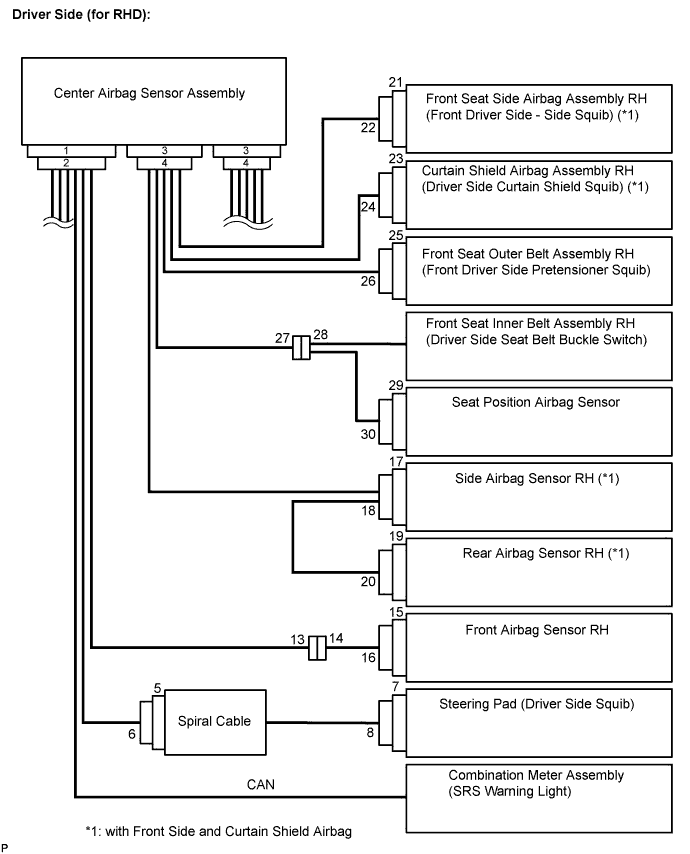
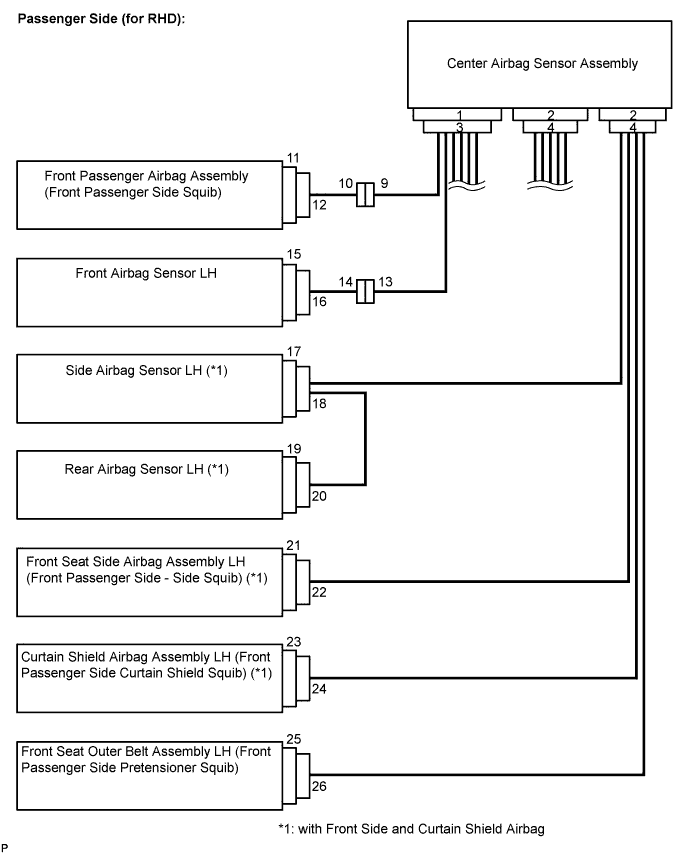
No.
Item
Application
(1)
Terminal Twin-Lock Mechanism
Connectors 5, 6, 9, 10, 13, 14, 18, 20, 21, 22
(2)
Activation Prevention Mechanism
Connectors 2, 4, 5, 7, 10, 11, 21, 23, 25
(3)
Half Connection Prevention Mechanism
Connectors 6, 9, 14, 18, 20, 22
(4)
Connector Position Assurance Mechanism
Connector 16
(5)
Connector Lock Mechanism (1)
Connectors 8, 12, 24, 26
(6)
Connector Lock Mechanism (2)
Connectors 2, 4
(7)
Improper Connection Prevention Lock Mechanism
Connectors 1, 3
All connectors in the SRS, except the seat position airbag sensor connector, are colored yellow to distinguish them from other connectors. These connectors have special functions, and are specially designed for the SRS. All SRS connectors use durable gold-plated terminals, and are placed in the locations shown on the previous page to ensure high reliability.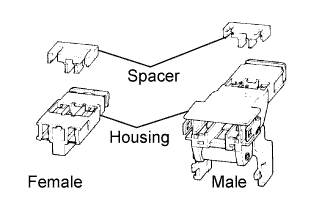
Terminal twin-lock mechanism:
All connectors with a terminal twin-lock mechanism have a two-piece component consisting of a housing and a spacer. This design enables the terminal to be locked securely by two locking devices (the retainer and the lance) to prevent terminals from coming out.Activation prevention mechanism:
All connectors with an activation prevention mechanism contain a short spring plate. When these connectors are disconnected, the short spring plate creates a short circuit by automatically connecting the positive (+) and negative (-) terminals of the squib.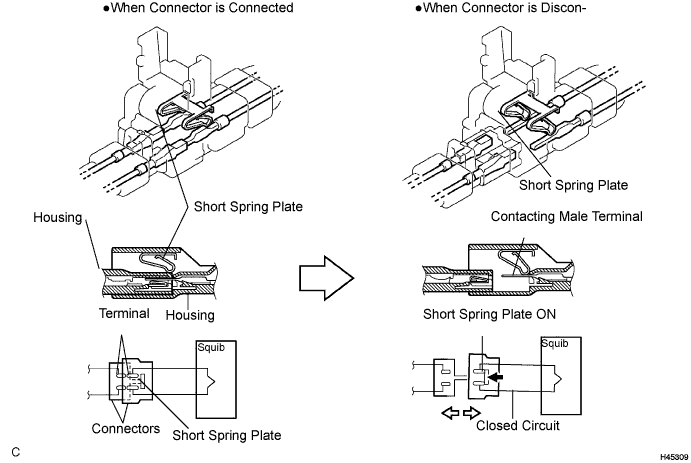
Half connection prevention mechanism:
If the connector is not completely connected, the connector is disconnected due to the spring force so that no continuity exists.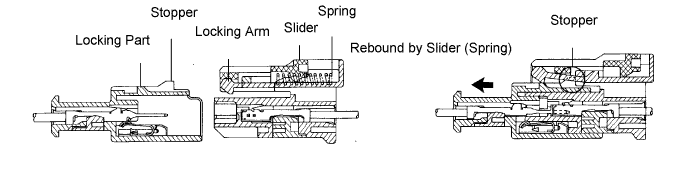
Connector position assurance mechanism:
Only when the housing lock (white part) is completely engaged, the CPA (yellow part) slides, which completes the connector engagement.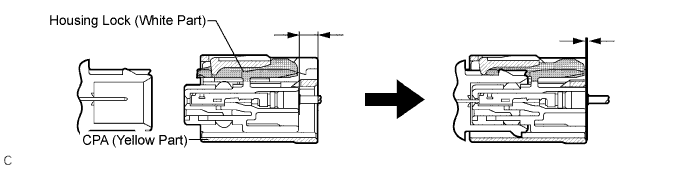
Connector lock mechanism (1):
Locking the connector lock button connects the connector securely.
Connector lock mechanism (2):
Both the primary lock with holder lances and the secondary lock with retainer prevent the connectors from becoming disconnected.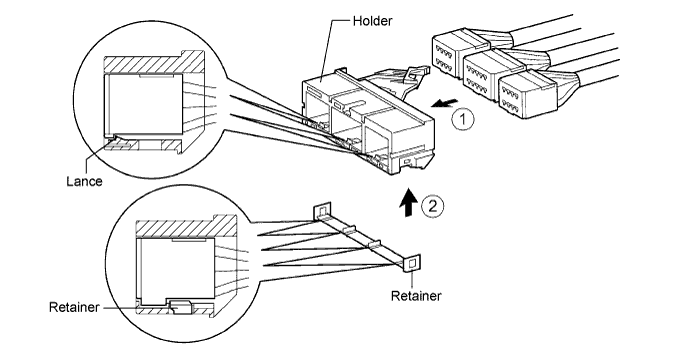
Improper connection prevention lock mechanism:
When the holder is connected, the lever is pushed into the end by rotating around the A axis to lock the holder securely.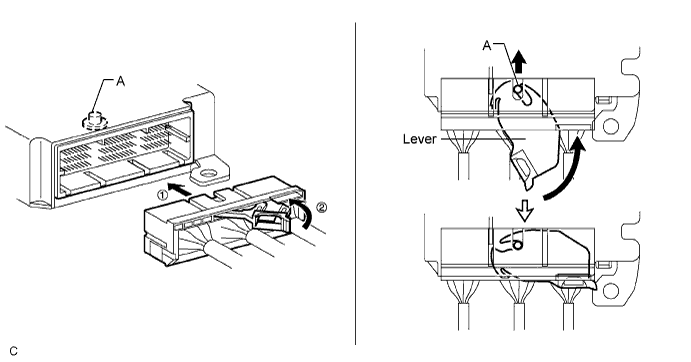
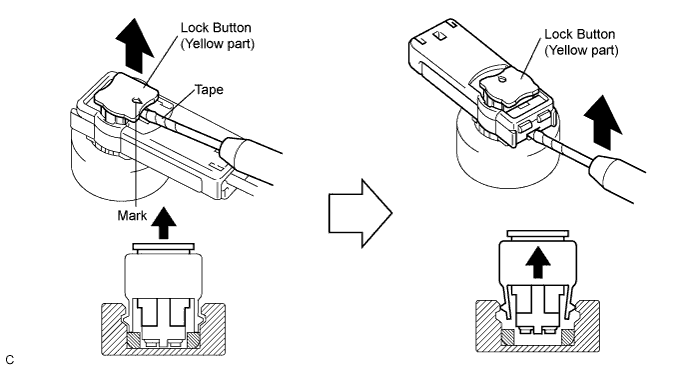
| 5.DISCONNECTION OF CONNECTORS FOR STEERING PAD, FRONT PASSENGER AIRBAG ASSEMBLY (SQUIB SIDE), AND CURTAIN SHIELD AIRBAG ASSEMBLY |
- HINT:
- Tape up the screwdriver tip before use.
Release the lock button (yellow part) of the connector using a screwdriver.
Insert the screwdriver tip between the connector and the base, and then raise the connector.
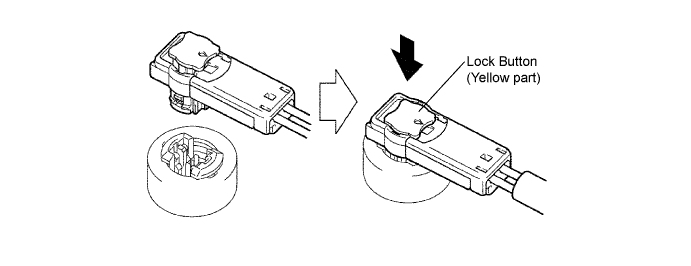
| 6.CONNECTION OF CONNECTORS FOR STEERING PAD, FRONT PASSENGER AIRBAG ASSEMBLY (SQUIB SIDE), AND CURTAIN SHIELD AIRBAG ASSEMBLY |
Connect the connector.
Push down securely on the lock button (yellow part) of the connector. (When locked, a click sound can be heard.)
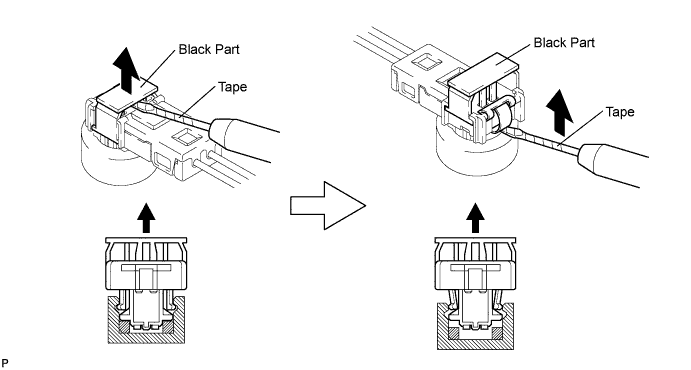
| 7.DISCONNECTION OF CONNECTOR FOR FRONT SEAT OUTER BELT ASSEMBLY |
- HINT:
- Tape up the screwdriver tip before use.
Release the look button (black part) of the connector using a screwdriver.
Insert the screwdriver tip between the connector and the base, and then raise the connector.
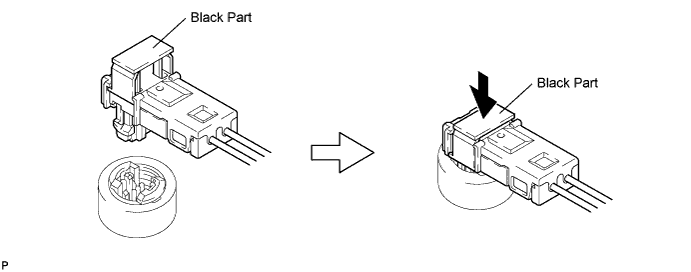
| 8.DISCONNECTION OF CONNECTOR FOR FRONT SEAT OUTER BELT ASSEMBLY |
Connect the connector.
Push down securely on the lock button (yellow part) of the connector. (When locked, a click sound can be heard.)
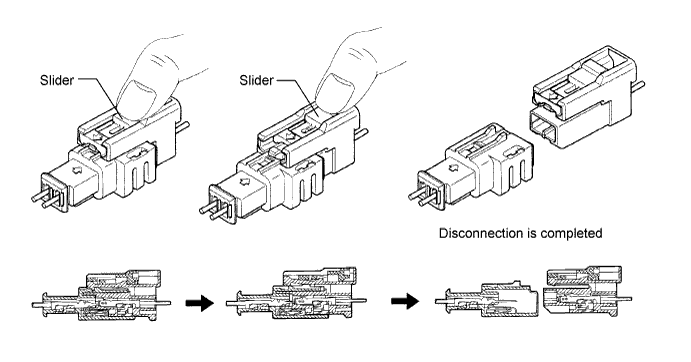
| 9.DISCONNECTION OF CONNECTOR FOR SPIRAL CABLE (INSTRUMENT PANEL WIRE SIDE) AND FRONT PASSENGER AIRBAG ASSEMBLY (INSTRUMENT PANEL WIRE SIDE) |
Place a finger on the slider, slide the slider to release the lock, and then disconnect the connector.
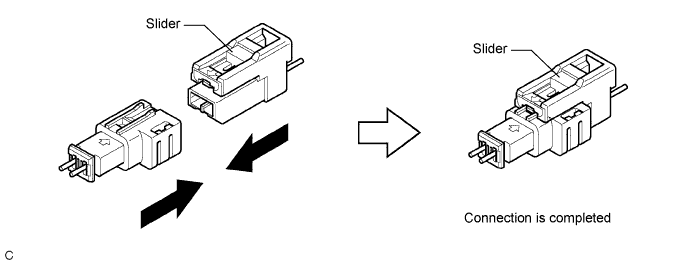
| 10.CONNECTION OF CONNECTOR FOR SPIRAL CABLE (INSTRUMENT PANEL WIRE SIDE) AND FRONT PASSENGER AIRBAG ASSEMBLY (INSTRUMENT PANEL WIRE SIDE) |
Connect the connector as shown in the illustration. (When locking, make sure that the slider returns to its original position and a click sound can be heard.)
- HINT:
- When connected, the slider will slide. Be sure not to touch the slider while connecting, as it may result in an insecure fit.
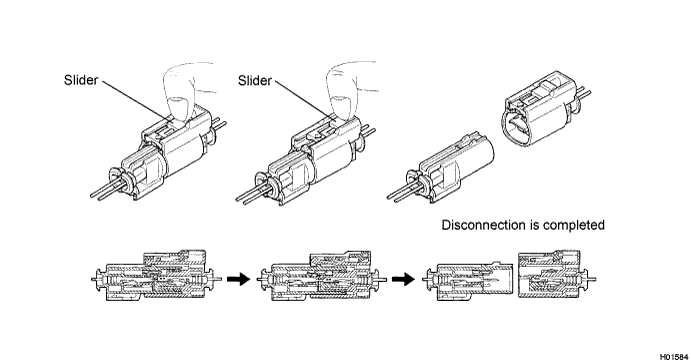
| 11.DISCONNECTION OF CONNECTORS FOR FRONT SEAT SIDE AIRBAG ASSEMBLY |
Place a finger on the slider, slide the slider to release the lock, and then disconnect the connector.
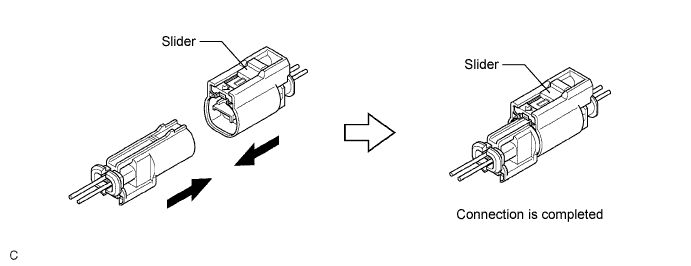
| 12.CONNECTION OF CONNECTORS FOR FRONT SEAT SIDE AIRBAG ASSEMBLY |
Connect the connector as shown in the illustration. (When locking, make sure that the slider returns to its original position and a click sound can be heard.)
- HINT:
- When connected, the slider will slide. Be sure not to touch the slider while connecting, as it may result in an insecure fit.
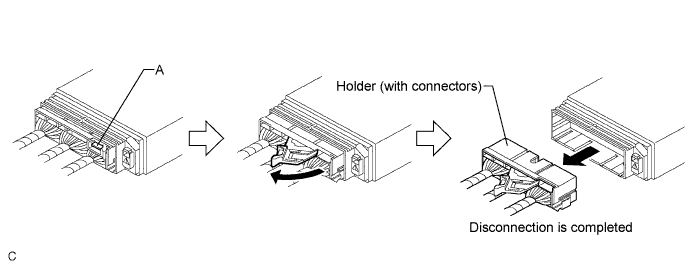
| 13.DISCONNECTION OF CONNECTOR FOR CENTER AIRBAG SENSOR ASSEMBLY |
Pull the lever by pushing part A as shown in the illustration and disconnect the holder (with connectors).
- HINT:
- Perform the following procedures when replacing the holder.
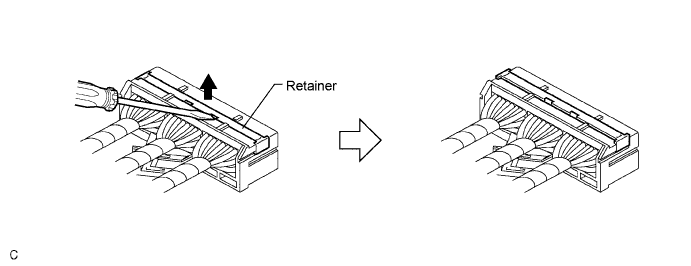
Remove the holder.
Using a screwdriver, unlock the retainer.
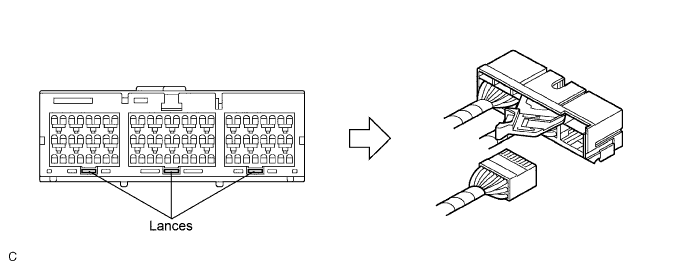
Release the fitting lance and remove the holder.
Install the holder.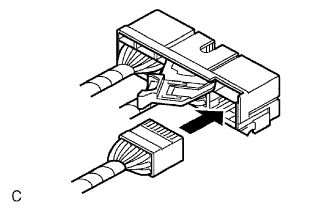
Install the connectors to the holder. (When locked, a click sound can be heard.)
- HINT:
- The retainer is locked when the holder is connected.
| 14.CONNECTION OF CONNECTOR FOR CENTER AIRBAG SENSOR ASSEMBLY |
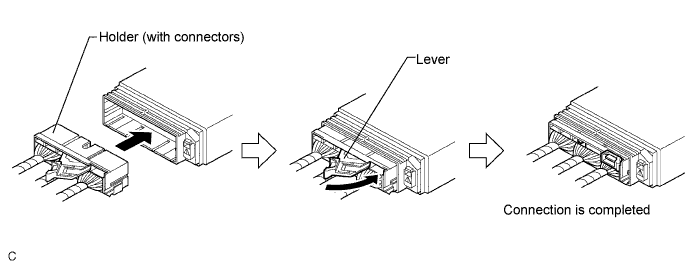
Firmly insert the holder (with connectors) into the center airbag sensor assembly until it cannot be pushed any further.
Push the lever to connect the holder (with connectors). (When locked, a click sound can be heard.)
- HINT:
- The holder slides into the center airbag sensor assembly when it is being connected. Be sure not to hold the holder while connecting, as it may result in an insecure fit.
| 15.DISCONNECTION OF CONNECTOR FOR FRONT AIRBAG SENSOR |
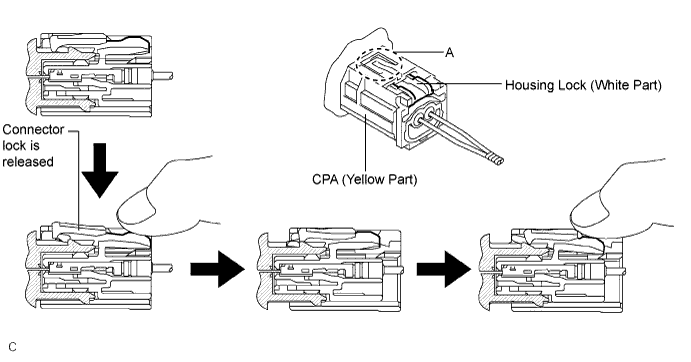
Push down the housing lock (white part) and slide the CPA (yellow part). (At this time, the connector cannot be disconnected yet.)
Push down the housing lock (white part) again and disconnect the connector.
- HINT:
- Do not push down the part A shown in the illustration when disconnecting.
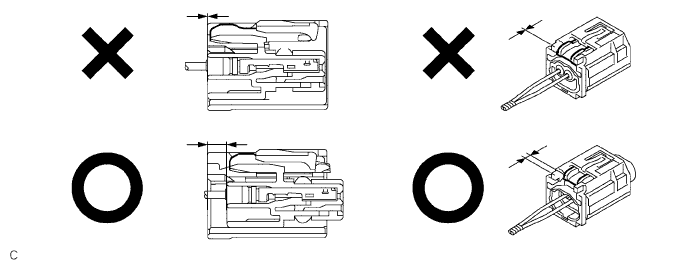
After disconnecting the connector, check that the position of the housing lock (white part) is as shown in the illustration.
| 16.CONNECTION OF CONNECTOR FOR FRONT AIRBAG SENSOR |
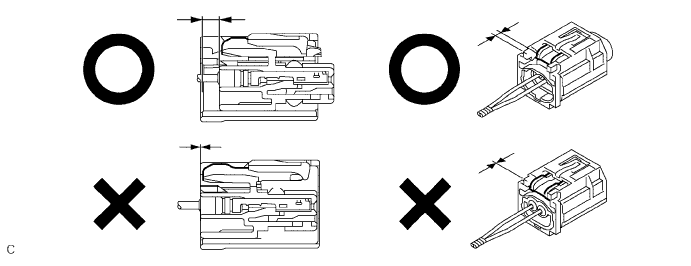
Before connecting the connectors, check that the position of the housing lock (white part) is as shown in the illustration.
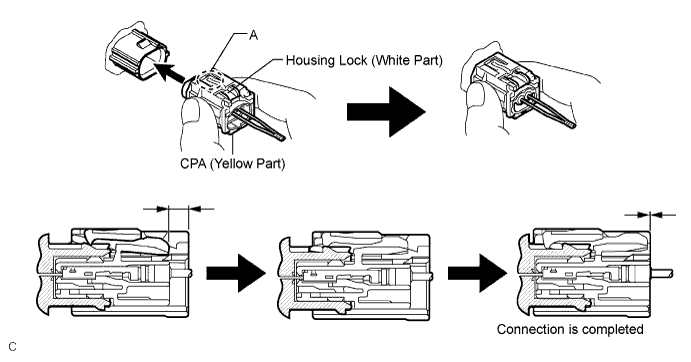
Be sure to engage the connectors until they are locked. (When locking, make sure that a click sound can be heard.)
- HINT:
- When engaged, the housing lock (white part) slides. Be sure not to hold the housing lock (white part) and part A, as it may result in an insecure fit.
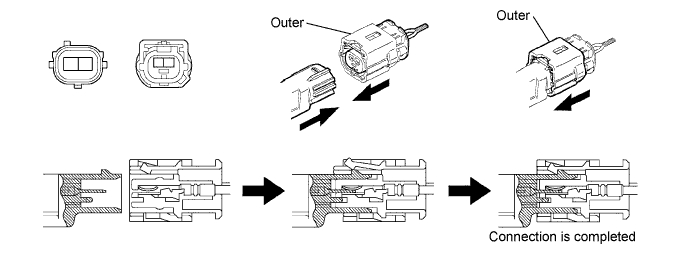
| 17.DISCONNECTION OF CONNECTORS FOR SIDE AIRBAG SENSOR AND REAR AIRBAG SENSOR |
While holding the sides of the outer connector locking sleeve, slide the outer in the direction shown by the arrow.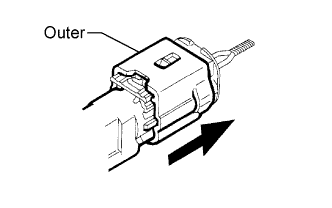
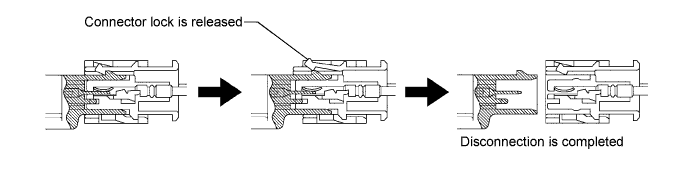
When the connector lock is released, the connectors are disconnected.
- HINT:
- Be sure to hold both outer flank sides. Holding the top and bottom will make disconnection difficult.
| 18.CONNECTION OF CONNECTORS FOR SIDE AIRBAG SENSOR AND REAR AIRBAG SENSOR |
Connect the connector as shown in the illustration (When locking, make sure that the outer returns to its original position and a click sound can be heard).
- HINT:
- When connected, the outer will slide. Be sure not to hold the outer while connecting, as it may result in an insecure fit.