P0100 Mass or Volume Air Flow Circuit
Diagnostic trouble codes · Vehicles built Oct 2006 – May 2009
Also covers:
- P0102 Mass or Volume Air Flow Circuit Low Input
- P0103 Mass or Volume Air Flow Circuit High Input
Versions by build date: Oct 2006 – May 2009 from Jun 2009
DESCRIPTION
The Mass Air Flow (MAF) meter is a sensor that measures the amount of air flowing through the valve.The ECM uses this information to determine the fuel injection time and to prove appropriate air-fuel ratio.
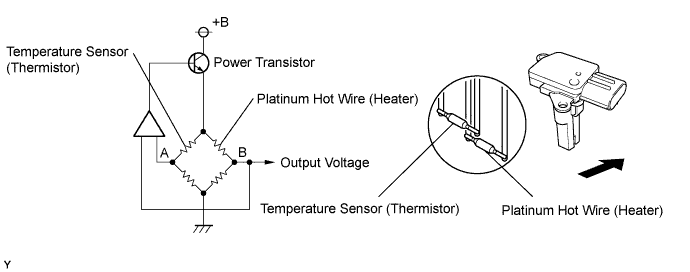
Inside the MAF meter, there is a heated platinum wire which is exposed to the flow of intake air.
By applying a specific electrical current to the wire, the ECM heats it to a given temperature. The flow of incoming air cools both the wire and an internal thermistor, affecting their resistance. To maintain a constant current value, the ECM varies the voltage applied to these components in the MAF meter. The voltage level is proportional to the airflow through the sensor, and the ECM uses it to calculate the intake air volume.
The circuit is constructed so that the platinum hot wire and the temperature sensor provide a bridge circuit, and the power transistor is controlled so that the potentials of A and B remain equal to maintain the predetermined temperature.
- HINT:
- When any of these DTCs are set, the ECM enters fail-safe mode. During fail-safe mode, the ignition timing is calculated by the ECM, according to the engine RPM and throttle valve position. Fail-safe mode continues until a pass condition is detected.

| DTC No. |
DTC Detection Condition |
Trouble Area |
| P0100 |
Open or short in Mass Air Flow (MAF) meter circuit for 3 seconds |
|
| P0102 |
Open in Mass Air Flow (MAF) meter circuit for 3 seconds |
|
| P0103 |
Short in Mass Air Flow (MAF) meter circuit for 3 seconds |
|
- HINT:
- When any of these DTCs are set, check the air-flow rate by entering the following menus on the intelligent tester: Powertrain / Engine / Data List / MAF.
Mass Air Flow Rate (gm/s)
Malfunctions
Approximately 0.0
- Open in Mass Air Flow (MAF) meter power source circuit
- Open or short in VG circuit
271.0 or more
Open in EVG circuit
- Open in Mass Air Flow (MAF) meter power source circuit
WIRING DIAGRAM
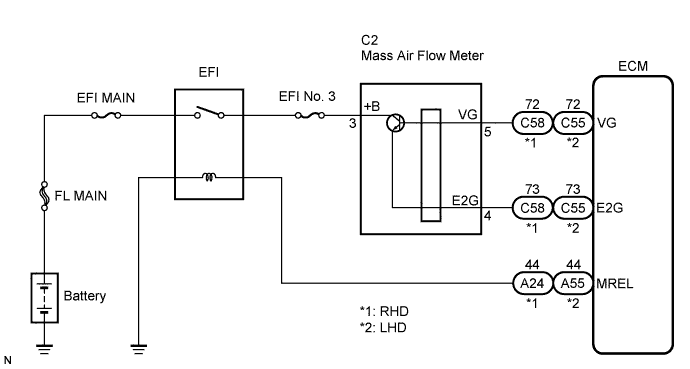
INSPECTION PROCEDURE
- HINT:
- Read freeze frame data using the intelligent tester. The ECM records vehicle and driving condition information as freeze frame data the moment a DTC is stored. When troubleshooting, freeze frame data can be helpful in determining whether the vehicle was running or stopped, whether the engine was warmed up or not, whether the air-fuel ratio was lean or rich, as well as other data recorded at the time of a malfunction (Click here).
| 1. READ VALUE USING MASS AIR FLOW METER (MAF) |

Connect the intelligent tester to the DLC3.
Start the engine.
Turn the tester on.
Enter the following menus: Powertrain / Engine / Data List / MAF.
Read the values displayed on the tester.
- Result:
Mass Air Flow Rate (gm/s)
Proceed to
0.0
A
271.0 or more
B
Between 1.0 and 270.0 (*1)
C
|
|
||||
|
|
||||


| A | |
 |
| 2. INSPECT MASS AIR FLOW METER (POWER SOURCE VOLTAGE) |
Disconnect the C2 mass air flow (MAF) meter connector.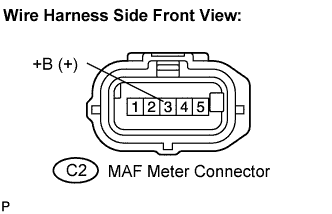
Turn the ignition switch on (IG).
Measure the voltage according to the value(s) in the table below.
- Standard voltage:
Tester Connection
Specified Condition
+B (C2-3) - Body ground
9 to 14 V
Reconnect the MAF meter connector.
|
|
||||
| OK | |
|
| 3. INSPECT MASS AIR FLOW METER (VG VOLTAGE) |
Inspect the output voltage.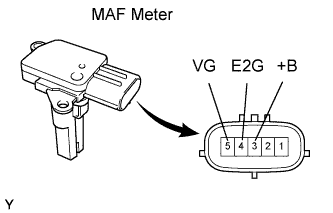
Apply battery voltage across terminals +B and E2G.
Connect the positive (+) tester probe to terminal VG, and the negative (-) tester probe to terminal E2G.
Measure the voltage between the terminals.
- Standard voltage:
Tester Connection
Specified Condition
5 (VG) - 4 (E2G)
0.2 to 4.9 V
|
|
||||
| OK | |
|
| 4. CHECK HARNESS AND CONNECTOR (MASS AIR FLOW METER - ECM) |
Disconnect the C2 MAF meter connector.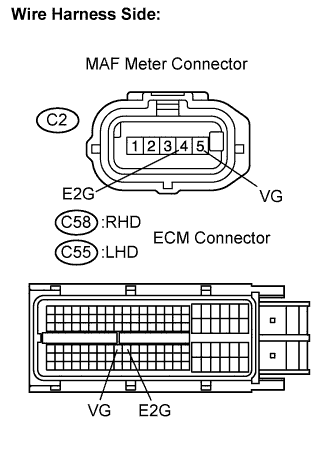
Disconnect the C58 (RHD) or C55 (LHD) ECM connector.
Measure the resistance between the terminals.
- Standard resistance (Check for open):
- RHD:
Tester Connection
Specified Condition
VG (C58-72) - VG (C2-5)
Below 1 Ω
E2G (C58-73) - E2G (C2-4)
Below 1 Ω
- LHD:
Tester Connection
Specified Condition
VG (C55-72) - VG (C2-5)
Below 1 Ω
E2G (C55-73) - E2G (C2-4)
Below 1 Ω
- Standard resistance (Check for short):
- RHD:
Tester Connection
Specified Condition
VG (C58-72) or VG (C2-5) - Body ground
10 kΩ or higher
E2G (C58-73) or E2G (C2-4) - Body ground
10 kΩ or higher
- LHD:
Tester Connection
Specified Condition
VG (C55-72) or VG (C2-5) - Body ground
10 kΩ or higher
E2G (C55-73) or E2G (C2-4) - Body ground
10 kΩ or higher
Reconnect the MAF meter connector.
Reconnect the ECM connector.
|
|
||||
| OK | ||
 |
||
| ||
| 5. INSPECT FUSE (EFI NO. 3) |
Remove the EFI No. 3 fuse from the engine room R/B.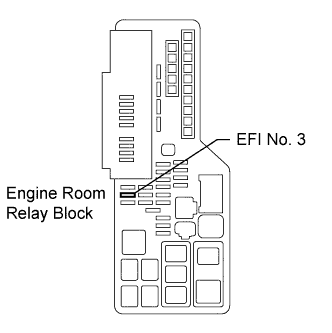
Measure the EFI No. 3 fuse resistance.
- Standard resistance:
- Below 1 Ω
Reinstall the EFI No. 3 fuse.
|
|
||||
| OK | |
|
| 6. CHECK HARNESS AND CONNECTOR (MASS AIR FLOW METER - ENGINE ROOM JUNCTION BLOCK) |
Disconnect the C2 MAF meter connector.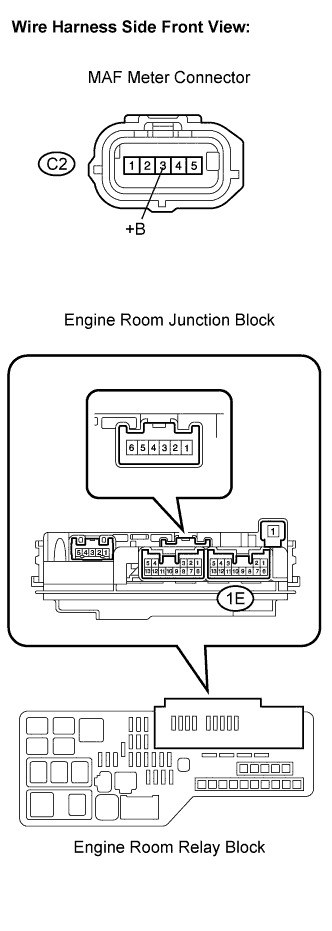
Remove the engine room junction block from the engine room R/B.
Measure the resistance between the terminals.
- Standard resistance:
- Check for open:
Tester Connection
Specified Condition
+B (C2-3) - 1E-6 (Engine room R/B)
Below 1 Ω
- Check for short:
Tester Connection
Specified Condition
+B (C2-3) or 1E-6 (Engine room R/B) - Body ground
10 kΩ or higher
Reinstall the engine room junction block.
Reconnect the C2 MAF meter connector.
|
|
||||
| OK | |
|
| 7. INSPECT ENGINE ROOM JUNCTION BLOCK (EFI RELAY) |
Remove the engine room junction block from the engine room R/B.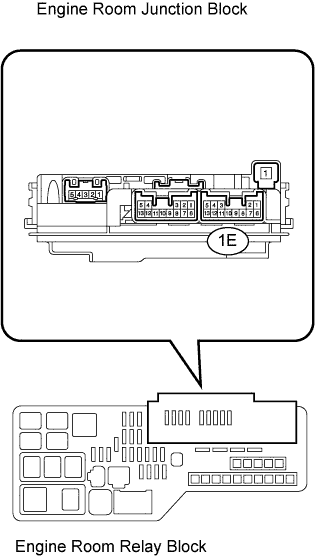
Inspect the EFI relay.
Measure the EFI relay resistance.
- Standard resistance:
Tester Connection
Specified Condition
1E-12 - 1E-6
10 kΩ or higher
1E-12 - 1E-6
Bellow 1 Ω
(Apply battery voltage between terminals 1E-9 and 1E-10)
Reinstall the engine room junction block.
|
|
||||
| OK | ||
|
||
| ||
| 8. CHECK HARNESS AND CONNECTOR (SENSOR GROUND) |
Disconnect the C2 MAF meter connector.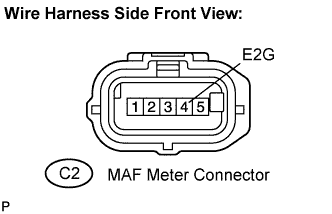
Measure the resistance between the terminals.
- Standard resistance:
Tester Connection
Specified Condition
E2G (C2-4) - Body ground
Below 1 Ω
Reconnect the MAF meter connector.
|
|
||||
| NG | |
|
| 9. CHECK HARNESS AND CONNECTOR (MASS AIR FLOW METER - ECM) |
Disconnect the C2 MAF meter connector.
Disconnect the C58 (RHD) or C55 (LHD) ECM connector.
Measure the resistance between the terminals.
- Standard resistance (Check for open):
- RHD:
Tester Connection
Specified Condition
VG (C58-72) - VG (C2-5)
Below 1 Ω
E2G (C58-73) - E2G (C2-4)
Below 1 Ω
- LHD:
Tester Connection
Specified Condition
VG (C55-72) - VG (C2-5)
Below 1 Ω
E2G (C55-73) - E2G (C2-4)
Below 1 Ω
- Standard resistance (Check for short):
- RHD:
Tester Connection
Specified Condition
VG (C58-72) or VG (C2-5) - Body ground
10 kΩ or higher
E2G (C58-73) or E2G (C2-4) - Body ground
10 kΩ or higher
- LHD:
Tester Connection
Specified Condition
VG (C55-72) or VG (C2-5) - Body ground
10 kΩ or higher
E2G (C55-73) or E2G (C2-4) - Body ground
10 kΩ or higher
Reconnect the MAF meter connector.
Reconnect the ECM connector.
|
|
||||
| OK | ||
|
||
| ||