ADJUSTMENT
Removal / installation · Vehicles built from Jun 2009
Versions by build date: Jun 2006 – May 2009 from Jun 2009
| 1. REMOVE REAR WHEEL |
| 2. ADJUST PARKING BRAKE SHOE CLEARANCE |

Remove the rear brake caliper.
- HINT:
- Do not disconnect the flexible hose.
- Do not remove the brake pads.
- Do not allow the caliper to hang on the flexible hose. Always support the caliper.
- Do not disconnect the flexible hose.
Remove the disc rotor.
- HINT:
- If the disc rotor is difficult to remove, rotate the disc whilst pulling on the rotor.
- If the disc jams, return the disc to its original position, turn the shoe adjuster in a clockwise direction to contact the brake and attempt to remove the disc again.
- If the disc rotor is difficult to remove, rotate the disc whilst pulling on the rotor.
Measure the brake shoe diameter as shown in the illustration.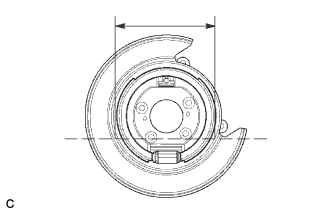

- Standard diameter:
- 189.55 to 189.75 mm (7.463 to 7.470 in.)
If the shoe diameter is out of specification, adjust it by turning the nut as shown in the illustration.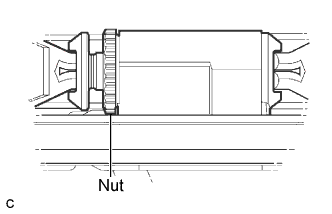
The gap between the adjusting nut and screw must not exceed 5 mm (0.197 in.) as shown in the illustration. If the gap is set to this specification and the shoe diameter is less than specified, replace the parking brake shoe. If the lining thickness is less than 1.5 mm (0.059 in.) or exhibits uneven wear, replace the parking brake shoe.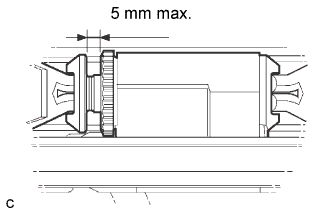
Check for drag. Spin the rotor and ensure there is no drag from the parking brake shoe.
- HINT:
- If there is drag, apply and release the parking brake lever or parking brake pedal and retest. If drag is still present, remove the disc, remeasure and readjust the shoe diameter and centralize the shoe. Reassemble the disc and recheck for drag.
| 3. INSTALL REAR WHEEL |
- Torque:
- 103 N*m{ 1,050 kgf*cm , 76 ft.*lbf }
| 4. INSPECT PARKING BRAKE LEVER TRAVEL (for Lever Type Parking Brake) |
Pull the parking brake lever firmly.
Release the parking brake lock, and return the parking brake lever to its off position.
Slowly pull the parking brake lever all the way up, and count the number of clicks.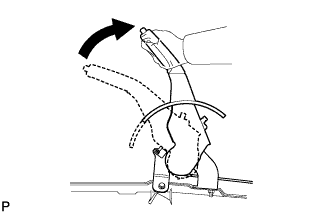
- Parking brake lever travel:
- 7 to 9 notches at 200 N (20 kgf, 45 lbf)
| 5. ADJUST PARKING BRAKE LEVER TRAVEL (for Lever Type Parking Brake) |
Pull up the parking brake lever. Hold the No. 1 wire adjusting nut using a wrench and loosen the lock nut.
Release the parking brake lever.
Turn the No. 1 wire adjusting nut until the parking brake lever travel meets the above specification.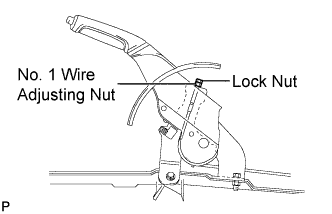
Hold the No. 1 wire adjusting nut using a wrench or an equivalent tool and tighten the lock nut.
- Torque:
- 5.0 N*m{ 51 kgf*cm , 44 in.*lbf }
Count the number of clicks after pulling and releasing the parking brake lever 3 or 4 times.
Check whether the parking brake drags.
When operating the parking brake lever, check that the parking brake indicator light comes on.
| 6. INSPECT PARKING BRAKE PEDAL TRAVEL (for Pedal Type Parking Brake) |
Fully depress the parking brake pedal and release it to engage the parking brake.
Depress the pedal to the floor again, and release it to disengage the parking brake.
Slowly depress the parking brake pedal to the floor, and count the number of clicks.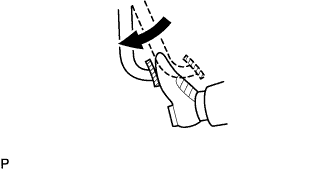
- Parking brake pedal travel:
- 7 to 10 notches at 300 N (31 kgf, 67 lbf)
| 7. ADJUST PARKING BRAKE PEDAL TRAVEL (for Pedal Type Parking Brake) |
Depress the parking brake pedal. Hold the No. 1 wire adjusting nut using a wrench and loosen the lock nut.
Release the parking brake pedal.
Turn the No. 1 wire adjusting nut until the parking brake pedal travel meets the above specification.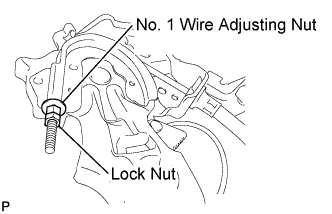
Hold the No. 1 wire adjusting nut using a wrench or an equivalent tool and tighten the lock nut.
- Torque:
- 5.4 N*m{ 55 kgf*cm , 48 in.*lbf }
Count the number of clicks after depressing and releasing the parking brake pedal 3 or 4 times.
Check whether the parking brake drags.
When operating the parking brake pedal, check that the parking brake indicator light comes on.