Open in CAN Main Bus Line
Circuit diagnosis · Vehicles built Oct 2006 – May 2009
Versions by build date: Oct 2006 – May 2009 from Jun 2009
DESCRIPTION
There may be an open circuit in the CAN main bus wire and/or the DLC3 branch wire when the resistance between terminals 6 (CANH) and 14 (CANL) of the DLC3 is 69 Ω or more.| Symptom |
Trouble Area |
| Resistance between terminals 6 (CANH) and 14 (CANL) of the DLC3 is 69 Ω or more. |
|
WIRING DIAGRAM
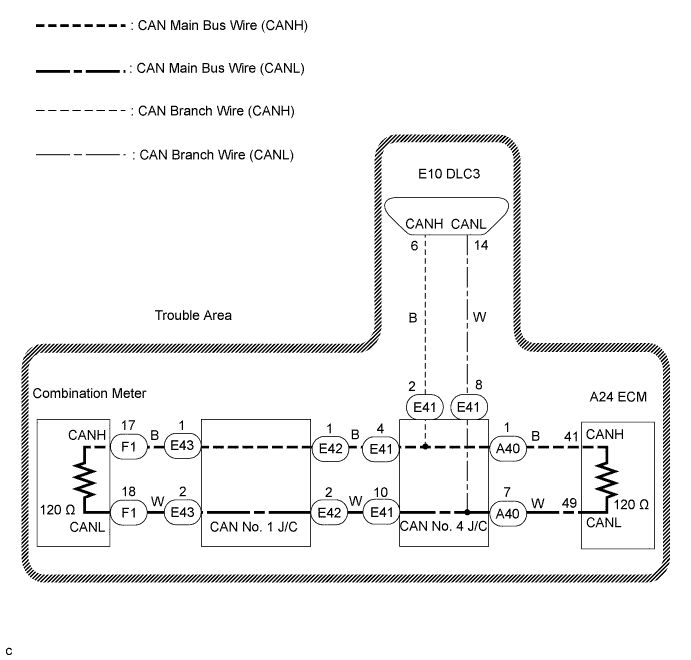

INSPECTION PROCEDURE
- NOTICE:
- Turn the engine switch off before measuring the resistance of the CAN main wire and CAN branch wires.
- After the engine switch is turned off, check that the key reminder warning system and lighting system are not operating.
- Before measuring the resistance, leave the vehicle as is for at least 1 minute and do not operate the engine switch, any other switches or the doors. If doors need to be opened in order to check connectors, open the doors and leave them open.
- Turn the engine switch off before measuring the resistance of the CAN main wire and CAN branch wires.
- HINT:
- Operating the engine switch, any other switches, or any doors triggers related ECU and sensor communication on the CAN. This communication will cause the resistance value to change.
| 1. CHECK DLC3 |

Turn the engine switch off.
Measure the resistance according to the value(s) in the table below.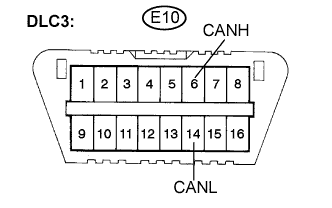
- Standard resistance:
Tester Connection
Condition
Specified Value
Proceed to
E10-6 (CANH) -E10-14 (CANL)
Engine switch off
108 to 132 Ω
A
E10-6 (CANH) - E10-14 (CANL)
Engine switch off
132 Ω or higher
B
- NOTICE:
- When the measured value is 132 Ω or more and a CAN communication system diagnostic trouble code is output, there may be a fault besides disconnection of the DLC3 branch wire. For that reason, troubleshooting should be performed again from "HOW TO PROCEED WITH TROUBLESHOOTING" (Click here ) after repairing the trouble area.
|
|
||||

| A | |
 |
| 2. CHECK FOR OPEN IN CAN BUS MAIN WIRE (COMBINATION METER MAIN BUS WIRE) |
Disconnect the CAN main bus wire connector E43 from the CAN No. 1 J/C "B" side (without earth terminal).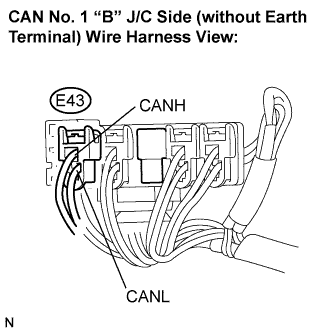
- NOTICE:
- Before disconnecting the connector, make a note of where it is connected.
- Reconnect the connector to its original position.
- Before disconnecting the connector, make a note of where it is connected.
Measure the resistance according to the value(s) in the table below.
- Standard resistance:
Tester Connection
Condition
Specified Value
E43-1 (CANH) - E43-2 (CANL)
Engine switch off
108 to 132 Ω
|
|
||||

| NG | |
|
| 3. CHECK FOR OPEN IN CAN BUS MAIN WIRE (CAN NO. 1 J/C) |
Reconnect the CAN main bus wire connector E43 to the CAN No. 1 J/C "B" side (without earth terminal).
Disconnect the CAN main bus wire connector E42 from the CAN No. 1 J/C "A" side (with earth terminal).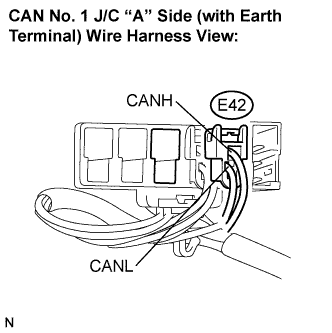
- NOTICE:
- Before disconnecting the connector, make a note of where it is connected.
- Reconnect the connector to its original position.
- Before disconnecting the connector, make a note of where it is connected.
Measure the resistance according to the value(s) in the table below.
- Standard resistance:
Tester Connection
Condition
Specified Value
E42-1 (CANH) - E42-2 (CANL)
Engine switch off
108 to 132 Ω
|
|
||||
| NG | |
|
| 4. CHECK FOR OPEN IN CAN BUS MAIN WIRE (CAN NO. 4 J/C - ECM) |
Reconnect the CAN main bus wire connector E42 to the CAN No. 1 J/C (with earth terminal).
Disconnect the CAN main bus wire connector A40 from the CAN No. 4 J/C (rear of the vehicle).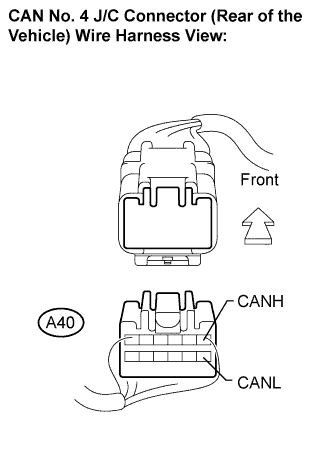
Measure the resistance according to the value(s) in the table below.
- Standard resistance:
Tester Connection
Condition
Specified Value
A40-1 (CANH) - A40-7 (CANL)
Engine switch off
108 to 132 Ω
|
|
||||
| NG | |
|
| 5. CHECK FOR OPEN IN CAN BUS MAIN WIRE (ECM CAN MAIN BUS WIRE) |
Reconnect the CAN main bus wire connector A40 to the CAN No. 4 J/C (rear of the vehicle).
Disconnect the A24 ECM connector.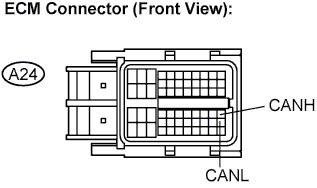
Measure the resistance according to the value(s) in the table below.
- Standard resistance:
Tester Connection
Condition
Specified Value
A24-41 (CANH) - A24-49 (CANL)
Engine switch off
108 to 132 Ω
|
|
||||
| NG | ||
 |
||
| ||
| 6. CHECK FOR OPEN IN CAN BUS MAIN WIRE (COMBINATION METER - CAN NO. 1 J/C) |
Reconnect the CAN main bus wire connector E43 to the CAN No. 1 J/C "B" side (without earth terminal).
Disconnect the combination meter connector F1.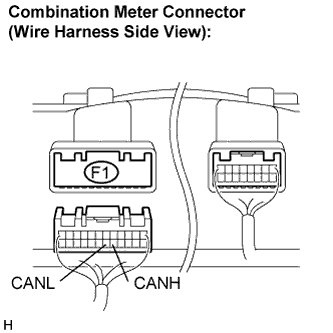
Measure the resistance according to the value(s) in the table below.
- Standard resistance:
Tester Connection
Condition
Specified Value
F1-17 (CANH) - F1-18 (CANL)
Engine switch off
108 to 132 Ω
|
|
||||
| NG | ||
|
||
| ||
| 7. CHECK FOR OPEN IN CAN BUS MAIN WIRE (CAN NO. 1 J/C - CAN NO. 4 J/C) |
Reconnect the CAN main bus wire connector A40 to the CAN No. 4 J/C (rear of the vehicle).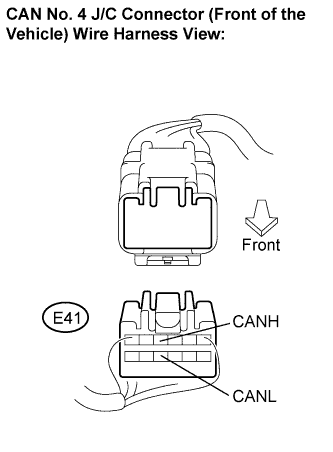
Disconnect the CAN main bus wire connector E41 from the CAN No. 4 J/C (front of the vehicle).
Measure the resistance according to the value(s) in the table below.
- Standard resistance:
Tester Connection
Specified Value
E41-4 (CANH) - E41-10 (CANL)
108 to 132 Ω
|
|
||||
| OK | ||
|
||
| ||