TERMINALS OF ECU
System information · Vehicles built from Jun 2009
Versions by build date: Oct 2006 – May 2009 from Jun 2009
| CHECK MAIN BODY ECU (INSTRUMENT PANEL J/B) |
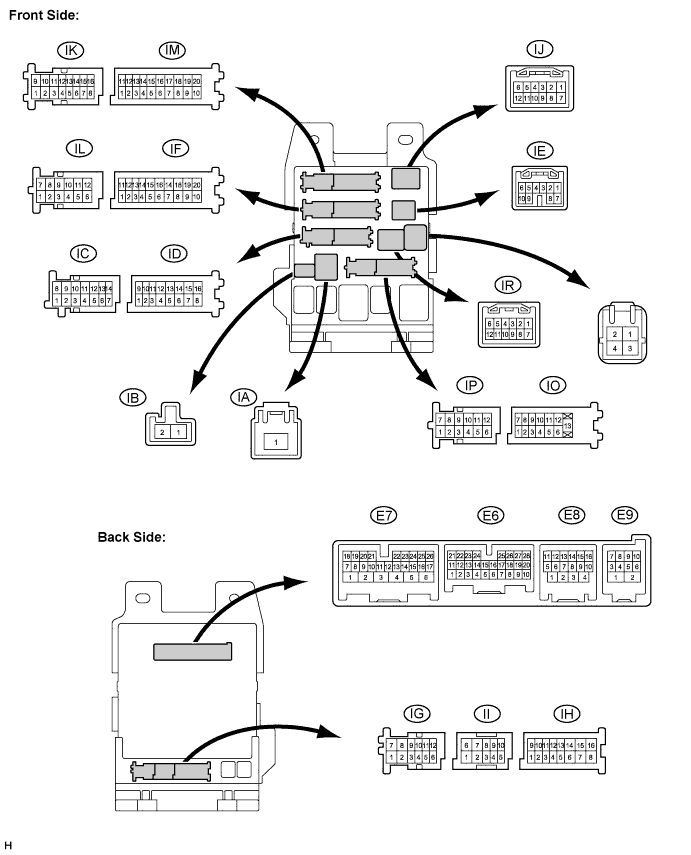

Disconnect the IR, IF, IM, E6, E7 and E8 ECU connectors.
Measure the voltage and resistance of the wire harness side connector.
*: with Corner SensorTester Connection
Wiring Color
Terminal Description
Condition
Specified Condition
E6-1 (AM2) - Body ground
L - Body ground
+B power supply
Always
10 to 14 V
E7-6 (AM1) - Body ground
L - Body ground
+B power supply
Always
10 to 14 V
E7-16 (SSW2) - Body ground
V - Body ground
Engine switch signal
Engine switch pushed
Below 1 Ω
E7-16 (SSW2) - Body ground
V - Body ground
Engine switch signal
Engine switch not pushed
10 kΩ or higher
E7-17 (SSW1) - Body ground
L - Body ground
Engine switch signal
Engine switch pushed
Below 1 Ω
E7-17 (SSW1) - Body ground
L - Body ground
Engine switch signal
Engine switch not pushed
10 kΩ or higher
E8-1 (GND3) - Body ground
W-B - Body ground
Ground
Always
Below 1 Ω
E8-5 (CANH) - Body ground
B - Body ground
CAN Line
Always
10 kΩ or higher
E8-6 (CANL) - Body ground
W - Body ground
CAN Line
Always
10 kΩ or higher
E8-15 (CANN) - Body ground*
W - Body ground
CAN Line
Always
10 kΩ or higher
E8-16 (CANP) - Body ground*
L - Body ground
CAN Line
Always
10 kΩ or higher
IF-10 (GND1) - Body ground
W-B - Body ground
Ground
Always
Below 1 Ω
IM-9 (GND2) - Body ground
W-B - Body ground
Ground
Always
Below 1 Ω
IR-9 (LIN1) - Body ground
O - Body ground
LIN line
Always
10 kΩ or higher
If the result is not as specified, there may be a malfunction on the wire harness side.Reconnect the ECU connectors.
Measure the voltage of the connector.
Tester Connection
Wiring Color
Terminal Description
Condition
Specified Condition
E6-3 (ACCR) - E8-1 (GND3)
P - W-B
Starter assist signal
(ACC cut signal)
Brake pedal depressed, shift lever P position, engine switch is pushed once → on (IG)
0.1 to 0.8 V *1
→ Output voltage at terminal AM1 or AM2 is -2 V or more.
E6-11 (IG2D) - E8-1 (GND3)
LG - W-B
IG2 signal
Engine switch on (IG)
Output voltage at terminal AM1 or AM2 is -2 V or more.
E6-11 (IG2D) - E8-1 (GND3)
LG - W-B
IG2 signal
Engine switch on (ACC)
Below 1 V
E7-3 (IG1D) - E8-1 (GND3)
P - W-B
IG1 signal
Engine switch on (IG)
Output voltage at terminal AM1 or AM2 is -2 V or more.
E7-3 (IG1D) - E8-1 (GND3)
P - W-B
IG1 signal
Engine switch on (ACC)
Below 1 V
E7-8 (STR) - E8-1 (GND3)
G - W-B
Park/neutral position switch
Engine switch on (IG), shift lever except P or N position →P or N position
Below 2 V → Pulse generation *3
E7-14 (INDW) - E8-1 (GND3)
P - W-B
Warning signal
Shift lever P position, engine switch on (ACC, IG)
Output voltage at terminal AM1 or AM2 is -3 V or more.
E7-15 (INDS) - E8-1 (GND3)
LG - W-B
Vehicle condition signal
Brake pedal depressed, shift lever P position
Output voltage at terminal AM1 or AM2 is -3 V or more.
E7-18 (SLP) - E8-1 (GND3)
P - W-B
Steering lock actuator position signal
Steering lock is locked
Pulse generation
(See waveform 3)
E7-18 (SLP) - E8-1 (GND3)
P - W-B
Steering lock actuator position signal
Steering lock is released
Pulse generation
(See waveform 3)
E7-19 (SLR+) - E8-1 (GND3)
BR - W-B
Steering lock motor signal
Steering lock motor operating
Below 1 V
E7-19 (SLR+) - E8-1 (GND3)
BR - W-B
Steering lock motor signal
Steering lock motor does not operate
Output voltage at terminal AM1 or AM2 is -2 V or more.
E7-22 (ACCD) - E8-1 (GND3)
W - W-B
ACC signal
Engine switch on (ACC)
Output voltage at terminal AM1 or AM2 is -2 V or more.
E7-22 (ACCD) - E8-1 (GND3)
W - W-B
ACC signal
Engine switch off
Below 1 V
E7-25 (SWIL) - E8-1 (GND3)
BE - W-B
Illumination signal
Light control switch TAIL or HEAD
Output voltage at terminal AM1 or AM2 is -2 V or more.
E8-8 (TACH) - E8-1 (GND3)
B - W-B
Tachometer signal
Engine running
Pulse generation
(See waveform 2)
E8-9 (SPD) - E8-1 (GND3)
V - W-B
Vehicle speed signal
Engine switch on (IG), rotate rear wheel slowly
Pulse generation
(See waveform 1)
E9-2 (P) - E8-1 (GND3)
G - W-B
Shift lock signal
Shift lever P position
Output voltage at terminal AM1 or AM2 is -2 V or more.
E9-2 (P) - E8-1 (GND3)
G - W-B
Shift lock signal
Shift lever not P position
Below 1.5 V
E9-4 (STSW) - E8-1 (GND3)
GR - W-B
Starter activation request signal
Brake pedal depressed, engine switch held on (ST)
Output voltage at terminal AM1 or AM2 is -2 V or more.
E9-6 (STR2) - E8-1 (GND3)
V - W-B
Starter signal (Sub)
Brake pedal depressed, shift lever P or N position, engine switch on (ST)
Output voltage at terminal AM1 or AM2 is -3.5 V or more. *2
IF-2 (ACC) - Body ground
L - Body ground
ACC power supply
Always
10 to 14 V
IF-11 (IG) - Body ground
B - Body ground
IG power supply
Always
10 to 14 V
IL-7 (STP) - E8-1 (GND3)
L - W-B
Stop light signal
Brake pedal depressed
Output voltage at terminal AM1 or AM2 is -2 V or more.
IL-7 (STP) - E8-1 (GND3)
L - W-B
Stop light signal
Brake pedal released
Below 1 V
- HINT:
- *1: Voltage is output only when the engine is cranking.
- *2: Voltage is output for 0.3 seconds when the engine is cranking to start. Disconnect the C55 connector from the ECM and ST CUT relay before measuring the voltage.
- *3: Remove the ST CUT relay before measuring the voltage.
Using an oscilloscope, check the signal waveform of the ECU.
Waveform 1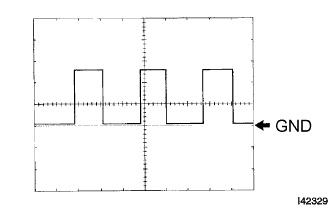
Waveform 1 (Reference): Terminal No.
E8-9 (SPD) - E8-1 (GND3)
Tool Setting
5 V/DIV., 10 ms./DIV.
Vehicle Condition
Driving at approx. 20 km/h (12 mph)
- HINT:
- As the vehicle speed increases, the wavelength shortens.
Waveform 2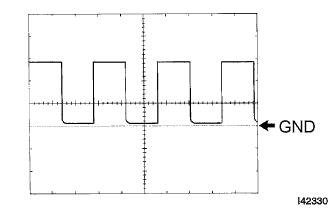
Waveform 2 (Reference): Terminal No.
E8-8 (TACH) - E8-1 (GND3)
Tool Setting
5 V/DIV., 10 ms./DIV.
Vehicle Condition
Engine idling
- HINT:
- As the engine revolution speed increases, the wavelength shortens.
Waveform 3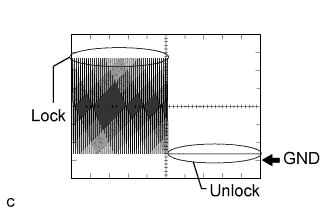
Waveform 3 (Reference): Terminal No.
E7-18 (SLP) - E8-1 (GND3)
Tool Setting
2 V/DIV., 100 ms./DIV.
Vehicle Condition
Steering lock/unlock
| CHECK CERTIFICATION ECU |
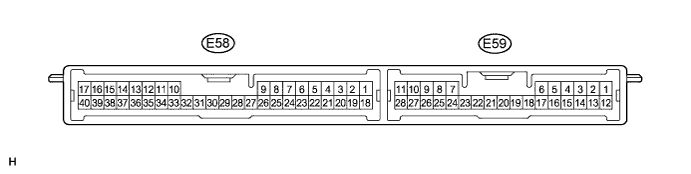
Disconnect the E58 ECU connector.
Measure the voltage and resistance of the wire harness side connector.
If the result is not as specified, there may be a malfunction on the wire harness side.Tester Connection
Wiring Color
Terminal Description
Condition
Specified Condition
E58-1 (+B) - Body ground
W - Body ground
+B power supply
Always
10 to 14 V
E58-10 (LIN) - Body ground
BE - Body ground
LIN line
Always
10 kΩ or higher
E58-17 (E) - Body ground
W-B - Body ground
Ground
Always
Below 1 Ω
Reconnect the ECU connector.
Measure the voltage of the connector.
If the result is not as specified, the ECU may have a malfunction.Tester Connection
Wiring Color
Terminal Description
Condition
Specified Condition
E58-18 (IG) - Body ground
LG - Body ground
Ignition power supply
Engine switch on (IG)
10 to 14 V
E58-18 (IG) - Body ground
LG - Body ground
Ignition power supply
Engine switch off
Below 1 V
| CHECK ECM |
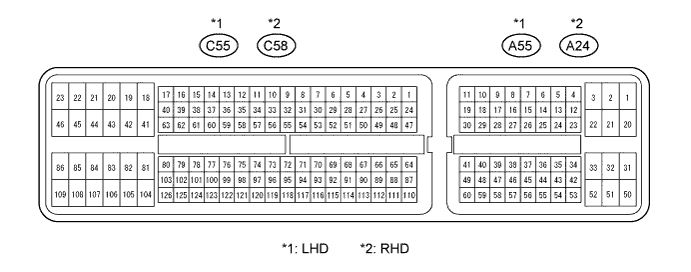
Disconnect the C55 and A55 ECM connectors (LHD).
Disconnect the C58 and A24 ECM connectors (RHD).
Measure the voltage and resistance of the wire harness side connectors.
LHD: Tester Connection
Wiring Color
Terminal Description
Condition
Specified Condition
A55-1 (+B2) - Body ground
R - Body ground
Power source of ECM
Engine switch on (IG)
10 to 14 V
A55-2 (+B) - Body ground
R - Body ground
Power source of ECM
Engine switch on (IG)
10 to 14 V
A55-28 (IGSW) - Body ground
Y - Body ground
Engine switch signal
Engine switch on (IG)
10 to 14 V
C55-20 (ME01) - Body ground
B - Body ground
Ground
Always
Below 1 Ω
C55-21 (E02) - Body ground
B-W - Body ground
Ground
Always
Below 1 Ω
C55-22 (E01) - Body ground
W-B - Body ground
Ground
Always
Below 1 Ω
C55-23 (E04) - Body ground
W - Body ground
Ground
Always
Below 1 Ω
C55-46 (E05) - Body ground
W - Body ground
Ground
Always
Below 1 Ω
C55-81 (E1) - Body ground
W-B - Body ground
Ground
Always
Below 1 Ω
C55-104 (E03) - Body ground
B - Body ground
Ground
Always
Below 1 Ω
If the result is not as specified, there may be a malfunction on the wire harness side.RHD: Tester Connection
Wiring Color
Terminal Description
Condition
Specified Condition
A24-1 (+B2) - Body ground
R - Body ground
Power source of ECM
Engine switch on (IG)
10 to 14 V
A24-2 (+B) - Body ground
R - Body ground
Power source of ECM
Engine switch on (IG)
10 to 14 V
A24-28 (IGSW) - Body ground
Y - Body ground
Engine switch signal
Engine switch on (IG)
10 to 14 V
C58-20 (ME01) - Body ground
B - Body ground
Ground
Always
Below 1 Ω
C58-21 (E02) - Body ground
B-W - Body ground
Ground
Always
Below 1 Ω
C58-22 (E01) - Body ground
W-B - Body ground
Ground
Always
Below 1 Ω
C58-23 (E04) - Body ground
W - Body ground
Ground
Always
Below 1 Ω
C58-46 (E05) - Body ground
W - Body ground
Ground
Always
Below 1 Ω
C58-81 (E1) - Body ground
W-B - Body ground
Ground
Always
Below 1 Ω
C58-104 (E03) - Body ground
B - Body ground
Ground
Always
Below 1 Ω
Reconnect the ECM connectors.
Measure the voltage of the connectors.
LHD: Tester Connection
Wiring Color
Terminal Description
Condition
Specified Condition
A55-13 (ACCR) - C55-81 (E1)
B - W-B
ACC relay cut signal (output)
Brake pedal depressed, shift lever P position, engine switch is pushed once → on (IG)
0.1 to 0.8 V *1 → Output voltage at terminal AM1 or AM2 is -2 V or more.
A55-14 (STSW) - C55-81 (E1)
R - W-B
Starter activation request signal
Brake pedal depressed, engine switch held (on)
Output voltage at terminal AM1 or AM2 is -2 V or more.
A55-15 (TACH) - C55-81 (E1)
B - W-B
Engine revolution signal (output)
Idling
Pulse generation (see waveform 1)
A55-36 (STP) - C55-81 (E1)
W - W-B
Stop light switch signal (input)
Brake pedal depressed
7.5 to 14 V
A55-36 (STP) - C55-81 (E1)
W - W-B
Stop light switch signal (input)
Brake pedal released
Below 1.5 V
A55-48 (STA) - C55-81 (E1)
V - W-B
Starter relay operation signal
Cranking
10 to 14 V
C55-62 (NSW) - C55-81 (E1)
L-B - W-B
Park/neutral position switch
Shift lever P or N position → except P or N position
Below 1 V → Pulse generation
C55-63 (STAR) - C55-81 (E1)
R - W-B
Starter signal (Main)
Brake pedal depressed, shift lever P or N position, engine switch on (ST)
10 to 14 V
RHD: Tester Connection
Wiring Color
Terminal Description
Condition
Specified Condition
A24-13 (ACCR) - C58-81 (E1)
B - W-B
ACC relay cut signal (output)
Brake pedal depressed, shift lever P position, engine switch is pushed once → on (IG)
0.1 to 0.8 V *1 → Output voltage at terminal AM1 or AM2 is -2 V or more.
A24-14 (STSW) - C58-81 (E1)
R - W-B
Starter activation request signal
Brake pedal depressed, engine switch held (on)
Output voltage at terminal AM1 or AM2 is -2 V or more.
A24-15 (TACH) - C58-81 (E1)
B - W-B
Engine revolution signal (output)
Idling
Pulse generation (see waveform 1)
A24-36 (STP) - C58-81 (E1)
W - W-B
Stop light switch signal (input)
Brake pedal depressed
7.5 to 14 V
A24-36 (STP) - C58-81 (E1)
W - W-B
Stop light switch signal (input)
Brake pedal released
Below 1.5 V
A24-48 (STA) - C58-81 (E1)
V - W-B
Starter relay operation signal
Cranking
10 to 14 V
C58-62 (NSW) - C58-81 (E1)
L-B - W-B
Park/neutral position switch
Shift lever P or N position → except P or N position
Below 1 V → Pulse generation
C58-63 (STAR) - C58-81 (E1)
R - W-B
Starter signal (Main)
Brake pedal depressed, shift lever P or N position, engine switch on (ST)
10 to 14 V
- HINT:
- *1: Voltage is output only when the engine is cranking.
Using an oscilloscope, check the signal waveform of the ECM.
Waveform 1 (Reference): Terminal No.
A55-15 (TACH) - C55-81 (E1)
Tool Setting
5 V/DIV., 10 ms./DIV.
Vehicle Condition
Engine idling
- HINT:
- As the vehicle speed increases, the wavelength shortens.
| CHECK STEERING LOCK ECU |

Disconnect the E51 ECU connector.
Measure the voltage and resistance of the wire harness side connector.
Tester Connection
Wiring Color
Terminal Description
Condition
Specified Condition
E51-1 (GND) - Body ground
W-B - Body ground
Ground
Always
Below 1 Ω
E51-2 (SGND) - Body ground
W-B - Body ground
Ground
Always
Below 1 Ω
E51-6 (IG2) - Body ground
B - Body ground
Ignition power supply
Engine switch on (IG)
10 to 14 V
E51-6 (IG2) - Body ground
B - Body ground
Ignition power supply
Engine switch off
Below 1 V
E51-7 (B) - Body ground
P - Body ground
+B power supply
Always
10 to 14 V
- If the result is not as specified, there may be a malfunction on the wire harness side.
- If the result is not as specified, there may be a malfunction on the wire harness side.
Reconnect the E51 ECU connector.
Measure the voltage of the connector.
Tester Connection
Wiring Color
Terminal Description
Condition
Specified Condition
E51-4 (SLP1) - E51-1 (GND)
P - W-B
Steering lock actuator position signal
Steering is locked
10 to 14 V
E51-4 (SLP1) - E51-1 (GND)
P - W-B
Steering lock actuator position signal
Steering is released
Below 1 V
- If the result is not as specified, the ECU may have a malfunction.
- If the result is not as specified, the ECU may have a malfunction.