REASSEMBLY
Removal / installation · Vehicles built from Jun 2006
| 1. INSTALL SYNCHRONIZER PULL RING |

Install the No. 5 synchronizer middle ring, No. 5 synchronizer ring outer, and synchronizer pull ring to the No. 5 synchronizer ring inner. Using a screwdriver, fix them with the snap ring.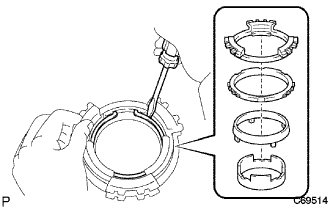

| 2. INSTALL NO. 3 SYNCHROMESH SHIFTING KEY SPRING |
Install the No. 3 synchromesh shifting key spring to the No. 3 transmission clutch hub.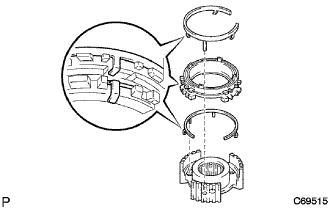
- NOTICE:
- Align the projection of the shifting key spring with the No. 3 hole of the clutch hub.
Install the synchronizer ring set and No. 3 synchromesh shifting key spring to the No. 3 transmission clutch hub.
- NOTICE:
- Engage the shifting key spring claw to the center of the teeth of the synchronizer ring.
- Align the projection of the shifting key spring with the hole of the No. 3 clutch hub.
- Engage the shifting key spring claw to the center of the teeth of the synchronizer ring.
| 3. INSTALL FRONT TRANSAXLE CASE COVER OIL SEAL |
Using SST and a hammer, install a new front transaxle case cover oil seal.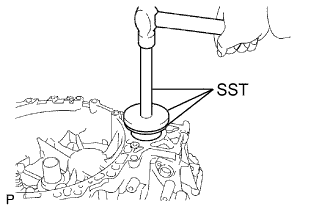
- SST
- 09316-20011
09950-60020 (09951-00910)
09950-70010 (09951-07150)
- Oil seal installation depth:
- - 0.5 to 0.5 mm (- 0.020 to 0.020 in.)
Coat the front transaxle case cover oil seal lip with MP grease.
| 4. INSTALL FRONT DIFFERENTIAL CASE FRONT TAPERED ROLLER BEARING |
Using SST and a hammer, install the front differential case front tapered roller bearing (outer race) to the front transaxle case.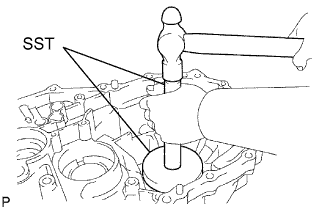
- SST
- 09950-60020
(09951-00910)
09950-70010 (09951-07100)
Using SST and a press, install the front differential case front tapered roller bearing (inner race) to the front differential case.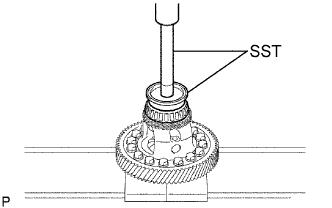
- SST
- 09950-70010
(09951-07100, 09951-07150)
09608-10010
| 5. INSTALL FRONT DIFFERENTIAL CASE REAR TAPERED ROLLER BEARING |
Install the front differential case shim rear.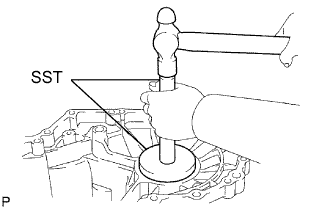
Using SST and a hammer, install the front differential case rear tapered roller bearing (outer race).
- SST
- 09950-60020
(09951-00890)
09950-70010 (09951-07100)
Using SST and a press, install the front differential case rear tapered roller bearing (inner race).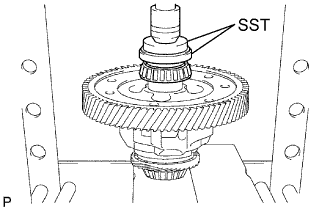
- SST
- 09631-12090
09950-60010 (09951-00600)
09950-70010 (09951-07100)
| 6. INSTALL TRANSMISSION CASE OIL SEAL |
Using SST and a hammer, install a transmission case oil seal to the manual transmission case.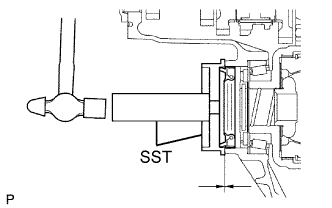
- SST
- 09608-32010
09950-70010 (09951-07150)
- Oil seal installation depth:
- 3.0 to 4.0 mm (0.1181 to 0.1575 in.)
Coat the transmission case oil seal lip with MP grease.
| 7. INSTALL OUTPUT SHAFT REAR BEARING |
Using SST and a hammer, install the output shaft rear bearing (outer race) to the manual transmission case.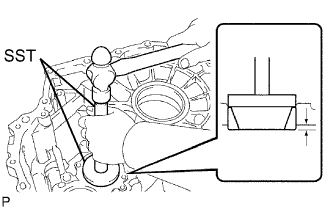
- SST
- 09950-60020
(09951-00680)
09950-70010 (09951-07100)
- Clearance:
- 3.8 to 4.4 mm (0.150 to 0.173 in.)
| 8. INSTALL OUTPUT SHAFT COVER |
Coat the output shaft cover with MP grease, and install it to the manual transaxle case.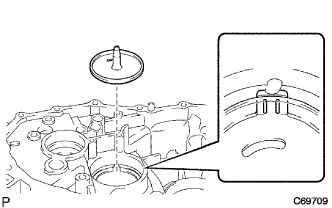
- NOTICE:
- Align the projection of the output shaft with the transmission groove.
| 9. INSTALL OUTPUT SHAFT FRONT BEARING |
Using SST and a hammer, install the output shaft front bearing (outer race).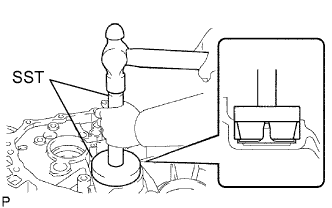
- SST
- 09950-60020
(09951-00730)
09950-70010 (09951-07100)
| 10. ADJUST OUTPUT SHAFT BEARING PRELOAD |
Install the output shaft to the manual transaxle case.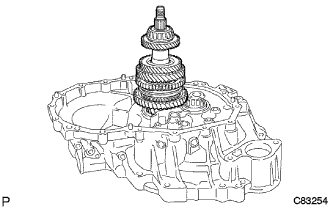
Install the transmission case to the manual transaxle case with the 14 bolts.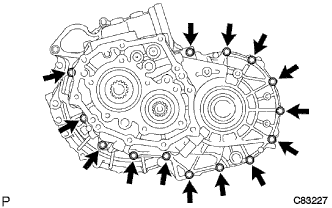
- Torque:
- 29 N*m{ 296 kgf*cm , 21 ft.*lbf }
Install the 3 bolts to the manual transaxle case.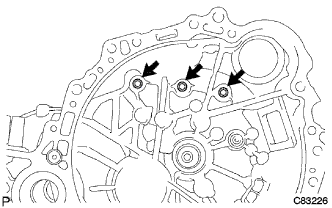
- Torque:
- 29 N*m{ 296 kgf*cm , 21 ft.*lbf }
Install the output shaft rear bearing case shim to the output shaft.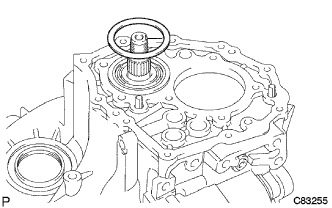
Using a "TORX" socket wrench (T45), install the bearing retainer rear to the manual transmission case with the 7 screws.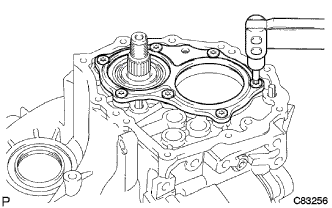
- Torque:
- 43 N*m{ 438 kgf*cm , 32 ft.*lbf }
Turn the output shaft in both directions to make sure that it starts to turn smoothly.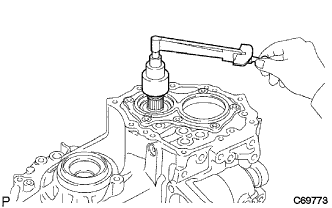
Using a socket wrench and torque wrench, inspect the preload.
Preload: N*m (kgf*cm, in.*lbf) Bearing
Preload
New
0.8 to 1.6 (8.16 to 16.32, 7.1 to 14.2)
Used
0.5 to 1.0 (5.10 to 10.20, 4.4 to 8.9)
If preload is out of specification, select a proper output shaft rear bearing shim and adjust it.
- HINT:
- The thickness difference of each output shaft rear bearing shim varies the preload torque by about 0.04 to 0.06 N*m (0.408 to 0.612 kgf*cm, 0.35 to 0.53 in.*lbf).
- Shim:
Part No.
Thickness: mm (in.)
Mark
90564-59001
1.30 (0.0512)
0
90564-59002
1.35 (0.0531)
1
90564-59003
1.40 (0.0551)
2
90564-59004
1.45 (0.0571)
3
90564-59005
1.50 (0.0591)
4
90564-59006
1.55 (0.0610)
5
90564-59007
1.60 (0.0630)
6
90564-59008
1.65 (0.0650)
7
90564-59009
1.70 (0.0669)
8
90564-59010
1.75 (0.0689)
9
90564-59011
1.80 (0.0709)
A
90564-59012
1.85 (0.0728)
B
90564-59013
1.90 (0.0748)
C
90564-59014
1.95 (0.0768)
D
90564-59015
2.00 (0.0787)
E
90564-59016
2.05 (0.0807)
F
90564-59017
2.10 (0.0827)
G
90564-59018
2.15 (0.0846)
H
90564-59019
2.20 (0.0866)
J
90564-59020
2.25 (0.0886)
K
90564-59021
2.30 (0.0906)
L
90564-59022
2.35 (0.0925)
M
90564-59023
2.40 (0.0945)
N
90564-59024
2.45 (0.0965)
P
90564-59025
2.50 (0.0984)
Q
Remove the output shaft rear set nut from the output shaft.
Using a "TORX" socket wrench (T45), remove the 7 screws and bearing retainer rear from the manual transmission case.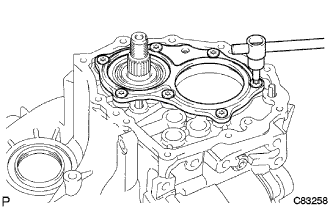
Remove the output shaft rear bearing shim from the output shaft.
Remove the 3 bolts.
Remove the 14 bolts and manual transmission case from the manual transaxle case.
Remove the output shaft assembly from the front manual transaxle case.
| 11. ADJUST TAPERED ROLLER BEARING PRELOAD |
Install the differential case assembly to the manual transaxle case.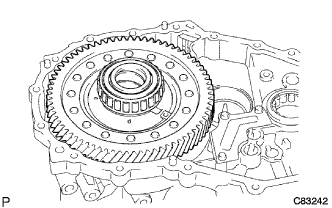
Install the 14 bolts and manual transmission case to the manual transaxle case.
- Torque:
- 29 N*m{ 296 kgf*cm , 21 ft.*lbf }
Install the 3 bolts to the front manual transaxle case.
- Torque:
- 29 N*m{ 296 kgf*cm , 21 ft.*lbf }
Turn the differential case in both directions to make sure that it starts to turn smoothly.
Using SST and a torque wrench, inspect preload.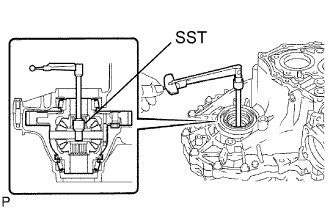
- SST
- 09564-32011
If preload is out of specification, select a proper front differential case rear shim and adjust it.Preload: N*m (kgf*cm, in.*lbf) Bearing
Preload
New
0.8 to 1.6 (8.16 to 16.32, 7.1 to 14.2)
Used
0.5 to 1.0 (5.10 to 10.2, 4.4 to 8.9)
- HINT:
- The thickness difference of each front differential case rear shim varies the preload torque by about 0.04 to 0.06 N*m (0.408 to 0.612 kgf*cm, 0.35 to 0.53 in.*lbf).
- Shim:
Part No.
Thickness: mm (in.)
Mark
90564-56055
2.00 (0.0787)
0
90564-56056
2.05 (0.0807)
1
90564-56057
2.10 (0.0827)
2
90564-56058
2.15 (0.0846)
3
90564-56059
2.20 (0.0866)
4
90564-56060
2.25 (0.0886)
5
90564-56061
2.30 (0.0906)
6
90564-56062
2.35 (0.0925)
7
90564-56063
2.40 (0.0945)
8
90564-56064
2.45 (0.0965)
9
90564-56065
2.50 (0.0984)
A
90564-56066
2.55 (0.1004)
B
90564-56067
2.60 (0.1024)
C
90564-56068
2.65 (0.1043)
D
90564-56069
2.70 (0.1063)
E
90564-56070
2.75 (0.1083)
F
90564-56071
2.80 (0.1102)
G
90564-56072
2.85 (0.1122)
H
Remove the 3 bolts.
Remove the 14 bolts and manual transmission case from the manual transaxle case.
Remove the differential case assembly from the manual transaxle case.
| 12. INSTALL FRONT TRANSAXLE CASE OIL SEAL |
Using SST and a hammer, install a new front transaxle case oil seal to the manual transaxle case.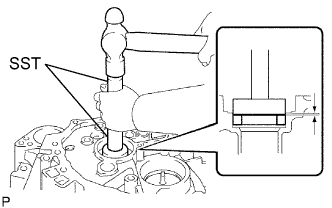
- SST
- 09950-60010
(09951-00420)
09950-70010 (09951-07150)
Coat the lip of the front transaxle case oil seal with MP grease.
- Clearance:
- 1.0 to 2.0 mm (0.0394 to 0.0787 in.)
| 13. INSTALL INPUT SHAFT FRONT BEARING |
Coat the input shaft front bearing with gear oil.
Using SST and a hammer, install the oil seal to the manual transaxle case.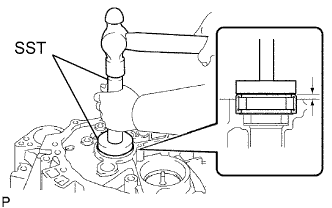
- SST
- 09950-60010
(09951-00570)
09950-70010 (09951-07150)
- Clearance:
- 4.28 to 4.60 mm (0.1685 to 0.1811 in.)
| 14. INSTALL MANUAL TRANSAXLE CASE RECEIVER |
Install the manual transaxle case receiver to the manual transaxle case with the 3 bolts.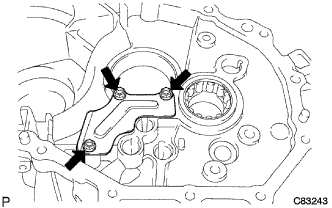
- Torque:
- 7.0 N*m{ 71 kgf*cm , 62 in.*lbf }
| 15. INSTALL DIFFERENTIAL CASE ASSEMBLY |
Coat the differential case tapered roller bearing with gear oil, and install the differential case assembly to the manual transaxle case.
| 16. INSTALL OUTPUT SHAFT ASSEMBLY |
Apply gear oil to each sliding part of the output shaft assembly.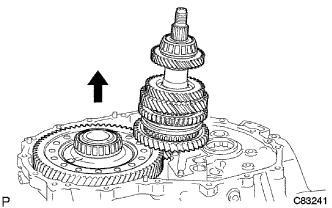
Lift the differential case assembly with the output shaft assembly tilted, and install it to the manual transaxle case.
| 17. INSTALL INPUT SHAFT ASSEMBLY |
Apply gear oil to each sliding part of the input shaft assembly.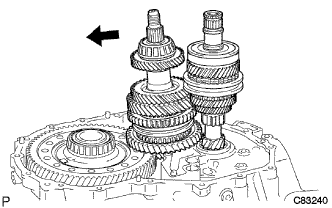
Install the input shaft assembly to the manual transaxle case while tilting the output shaft assembly.
| 18. INSTALL NO. 2 GEAR SHIFT FORK |
Coat the No. 2 gear shift fork with gear oil, and install it to the input shaft assembly.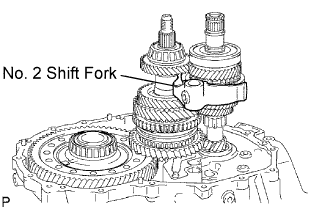
| 19. INSTALL NO. 3 GEAR SHIFT FORK |
Install the No. 3 gear shift fork to the No. 3 gear shift fork shaft.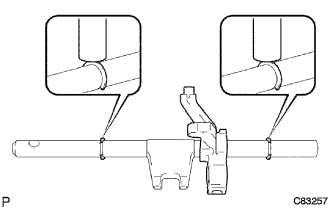
Using a brass bar and hammer, install the 2 shift fork shaft snap rings to the gear shift fork shaft.
Apply gear oil to each sliding part of the No. 3 gear shift fork shaft, and install it to the manual transaxle case.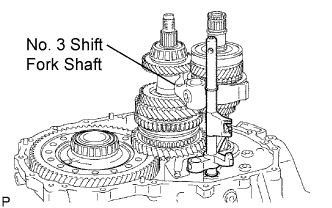
| 20. INSTALL NO. 1 GEAR SHIFT FORK |
Apply gear oil to each sliding part of the No. 1 gear shift fork, and install it to the output shaft assembly.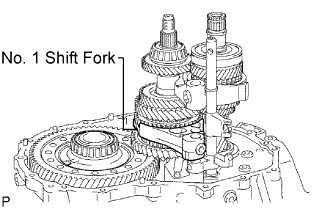
| 21. INSTALL NO. 2 GEAR SHIFT FORK SHAFT |
Install the No. 1 gear shift head to the No. 2 gear shift fork shaft.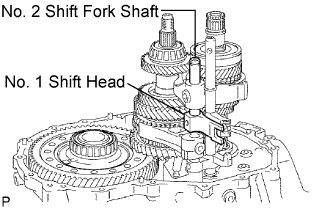
Apply gear oil to each sliding part of the No. 2 gear shift fork shaft, and install it to the manual transaxle case.
Install the shift fork set bolt and shift head set bolt to the No. 1 gear shift head.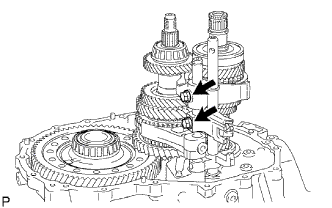
- Torque:
- 24 N*m{ 245 kgf*cm , 18 ft.*lbf }
| 22. INSTALL REVERSE SHIFT FORK ROLLER |
Using a magnetic finger, install the reverse shift fork roller to the reverse shift fork.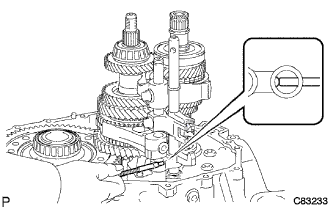
| 23. INSTALL NO. 1 GEAR SHIFT FORK SHAFT |
Using a brass bar and hammer, install the shift fork shaft snap ring to the No. 1 shift fork shaft.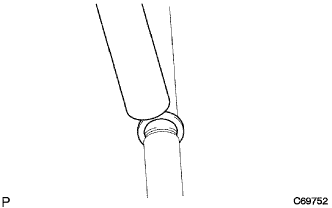
Install the No. 1 gear shift fork shaft to the manual transaxle case.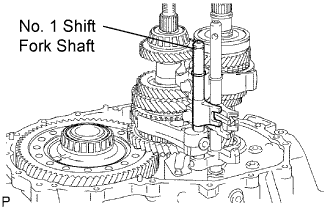
Install the shift fork set bolt to the No. 1 gear shift fork.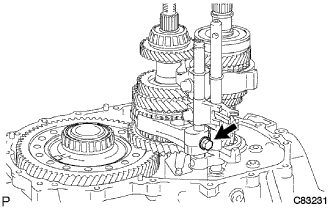
- Torque:
- 24 N*m{ 245 kgf*cm , 18 ft.*lbf }
| 24. INSTALL REVERSE SHIFT ARM BRACKET ASSEMBLY |
Install the reverse shift arm bracket assembly to the manual transaxle case with the 2 bolts.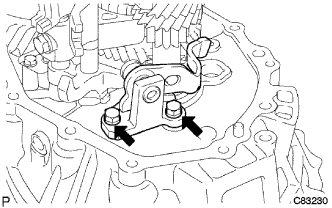
- Torque:
- 17 N*m{ 173 kgf*cm , 13 ft.*lbf }
| 25. INSTALL REVERSE IDLER GEAR SUB-ASSEMBLY |
Coat the reverse idler gear and reverse idler thrust washer with MP grease, and install them to the reverse idler gear shaft.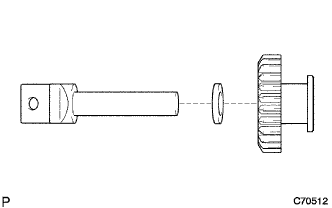
Install the reverse idler gear to the manual transaxle case.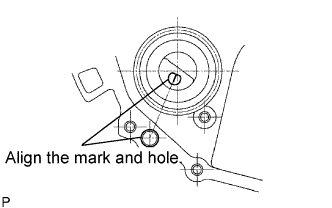
- HINT:
- Align the mark of the reverse idler gear shaft with the hole of the bolt.
| 26. INSTALL TRANSMISSION MAGNET |
Clean the transmission magnet and install it to the manual transaxle case.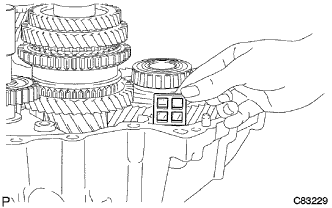
| 27. INSTALL NO. 1 OIL RECEIVER PIPE |
Install the No. 1 oil receiver pipe to the manual transmission case with the bolt.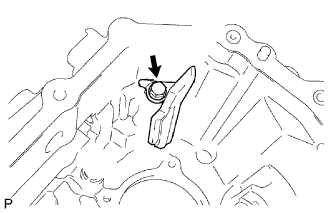
- Torque:
- 17 N*m{ 173 kgf*cm , 13 ft.*lbf }
- NOTICE:
- Do not damage the pipe.
| 28. INSTALL NO. 2 OIL RECEIVER PIPE |
Install the No. 2 oil receiver pipe to the manual transmission case with the bolt.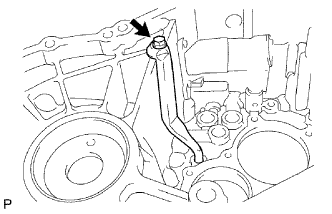
- Torque:
- 17 N*m{ 173 kgf*cm , 13 ft.*lbf }
- NOTICE:
- Do not damage the pipe.
| 29. INSTALL REVERSE RESTRICT PIN ASSEMBLY |
Install the transmission oil baffle and reverse restrict pin with the bolt.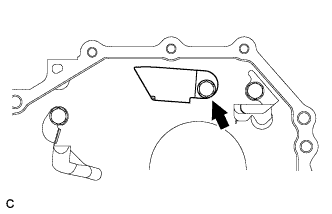
- Torque:
- 17 N*m{ 173 kgf*cm , 13 ft.*lbf }
Using a pin punch (φ 5 mm), install the slotted pin to the reverse restrict pin assembly.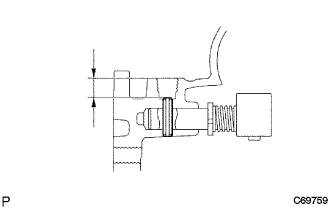
- Clearance:
- 12.5 to 13.5 mm (0.492 to 0.531 in.)
Coat the reverse restrict pin plug with adhesive. Using a hexagon wrench (6 mm), install the manual transmission case.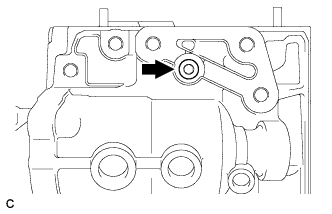
- Torque:
- 13 N*m{ 133 kgf*cm , 9.6 ft.*lbf }
- Adhesive:
- Toyota Genuine Adhesive 1324, Three Bond 1324 or equivalent
| 30. INSTALL MANUAL TRANSMISSION CASE |
Apply a bead of FIPG to the manual transmission case as shown in the illustration.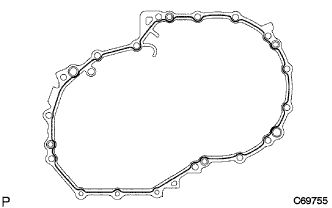
- HINT:
- Install the manual transmission case within 10 minutes after applying FIPG.
Install the manual transmission case to the manual transaxle case with the 14 bolts.
- Torque:
- 29 N*m{ 296 kgf*cm , 21 ft.*lbf }
Coat the 3 bolts with adhesive.
- Adhesive:
- Toyota Genuine Adhesive 1324, Three Bond 1324 or equivalent
Install the 3 bolts to the manual transaxle case.
- Torque:
- 29 N*m{ 296 kgf*cm , 21 ft.*lbf }
| 31. INSTALL NO. 1 CLUTCH TUBE BRACKET |
Install the clutch tube bracket with the bolt.
- Torque:
- 17 N*m{ 173 kgf*cm , 13 ft.*lbf }
| 32. INSTALL REVERSE IDLER GEAR SHAFT BOLT |
Coat the bolt with adhesive. Install a new gasket to the manual transmission case with the bolt.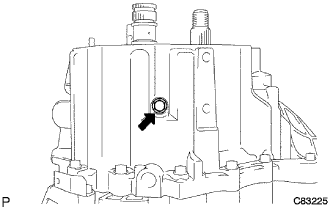
- Torque:
- 30 N*m{ 306 kgf*cm , 22 ft.*lbf }
- Adhesive:
- Toyota Genuine Adhesive 1344, Three Bond 1344 or equivalent
| 33. INSTALL SHIFT FORK SHAFT SNAP RING |
Using a brass bar and hammer, install the shift fork shaft snap ring to the No. 1 gear shift fork shaft.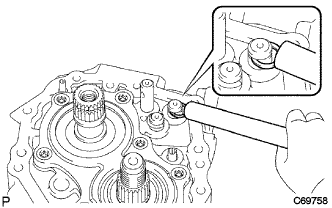
Using a brass bar and hammer, install the shift fork shaft snap ring to the No. 2 gear shift fork shaft.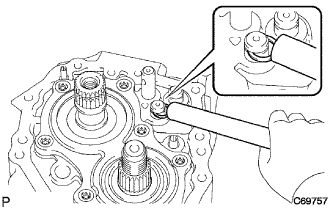
| 34. INSTALL INPUT SHAFT REAR BEARING SHAFT SNAP RING |
Using a snap ring expander, install the input shaft rear bearing shaft snap ring.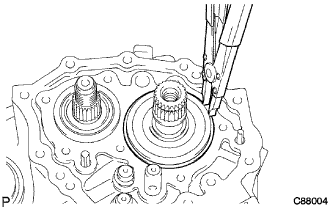
| 35. INSTALL OUTPUT SHAFT REAR BEARING SHIM |
Install the output shaft rear bearing shim to the output shaft.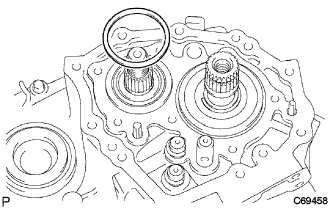
| 36. INSTALL REAR BEARING RETAINER |
Coat the rear bearing retainer with sealant and install it with a "TORX" wrench (T45).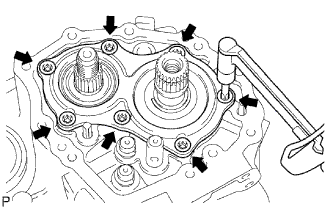
Install a new output rear set nut to the output shaft.
- Torque:
- 43 N*m{ 438 kgf*cm , 32 ft.*lbf }
| 37. INSTALL 5TH DRIVEN GEAR |
Using SST, install the 5th driven gear to the output shaft.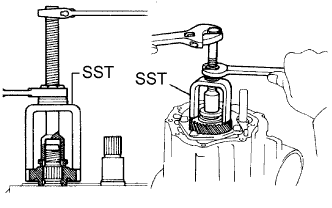
- SST
- 09309-12020
| 38. INSTALL 5TH GEAR NEEDLE ROLLER BEARING |
Coat the 5th gear needle roller bearing with gear oil and install it to the input shaft.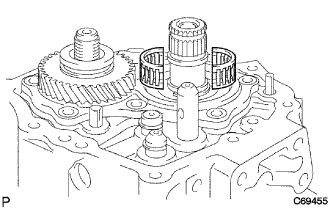
| 39. INSTALL 5TH GEAR |
Coat the 5th gear with gear oil and install it to the input shaft.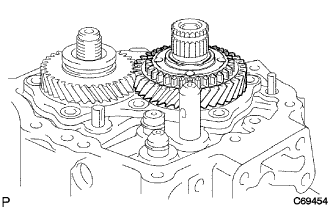
| 40. INSTALL NO. 3 TRANSMISSION CLUTCH HUB |
Using SST, install the No. 3 transmission clutch hub to the input shaft.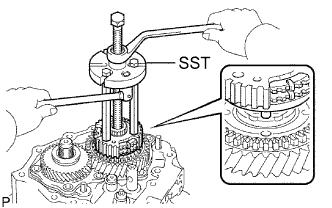
- SST
- 09950-30012
(09951-03010, 09953-03010, 09954-03010)
- NOTICE:
- Align the projection of the synchronizer ring with the hole of the 5th gear.
Install the No. 3 transmission hub sleeve and No. 3 gear shift fork to the No. 3 transmission clutch hub.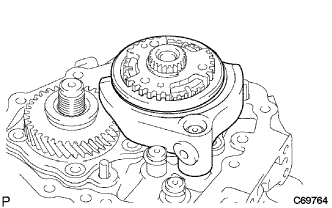
Coat the shift fork set bolt with adhesive and install it to the No. 3 gear shift fork.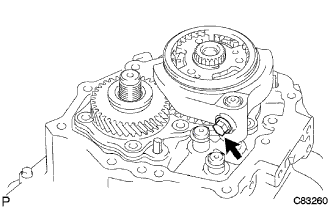
- Torque:
- 24 N*m{ 245 kgf*cm , 18 ft.*lbf }
- Adhesive:
- Toyota Genuine Adhesive 1344, Three Bond 1344 or equivalent
Select a snap ring that will allow minimum axial play. Using a brass bar and a hammer, install the shaft snap ring.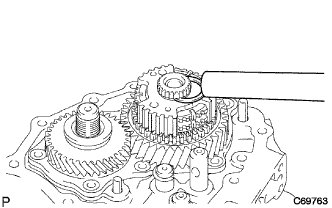
- Clearance:
- 0.1 mm (0.004 in.) or less
- Snap ring:
Part No.
Thickness: mm (in.)
Mark
90520-27061
1.75 to 1.80
(0.0689 to 0.0709)
a
90520-27062
1.80 to 1.85
(0.0709 to 0.0728)
b
90520-27063
1.85 to 1.90
(0.0728 to 0.0748)
c
90520-27064
1.90 to 1.95
(0.0748 to 0.0768)
d
90520-27065
1.95 to 2.00
(0.0768 to 0.0787)
e
90520-27066
2.00 to 2.05
(0.0787 to 0.0807)
f
90520-27067
2.05 to 2.10
(0.0807 to 0.0827)
g
90520-27068
2.10 to 2.15
(0.0827 to 0.0846)
h
90520-27069
2.15 to 2.20
(0.0846 to 0.0866)
j
| 41. INSTALL MANUAL TRANSMISSION OUTPUT SHAFT REAR SET NUT |
Engage the 1st and 2nd gears simultaneously.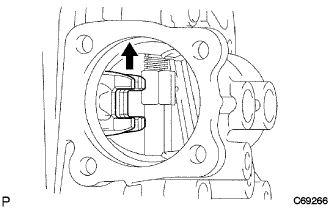
Install a new manual transmission output shaft rear set nut.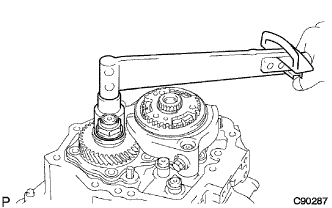
- Torque:
- 123 N*m{ 1,254 kgf*cm , 90 ft.*lbf }
Using a chisel and a hammer, stake the manual transmission output shaft rear set nut.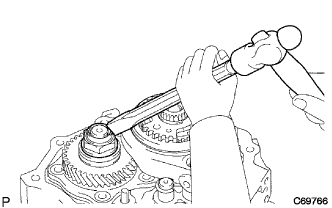
Disengage the gears.
| 42. INSTALL MANUAL TRANSMISSION CASE COVER SUB-ASSEMBLY |
Apply FIPG to the transaxle case cover sub-assembly as shown in the installation.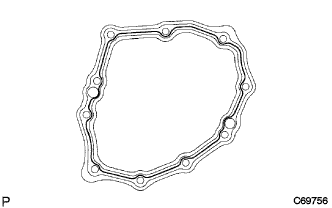
- FIPG:
- Toyota Genuine Seal Packing 1281, Three Bond 1281 or equivalent
- NOTICE:
- Install the part within 10 minutes after applying the packing material (FIPG).
Install the transmission case cover sub-assembly to the manual transaxle case with the 10 bolts.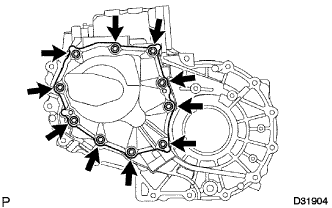
- Torque:
- 29 N*m{ 296 kgf*cm , 21 ft.*lbf }
| 43. INSTALL DRAIN PLUG SUB-ASSEMBLY |
Install the drain plug sub-assembly to the manual transmission case with a new gasket.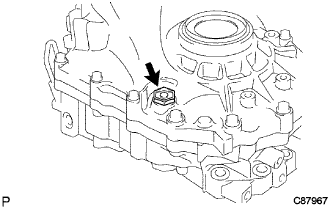
- Torque:
- 49 N*m{ 500 kgf*cm , 36 ft.*lbf }
| 44. INSTALL MANUAL TRANSMISSION FILLER PLUG |
Install the manual transmission filler plug to the transaxle case with a new gasket.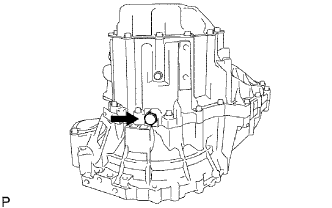
- Torque:
- 49 N*m{ 500 kgf*cm , 36 ft.*lbf }
| 45. INSTALL SHIFT AND SELECT LEVER SHAFT ASSEMBLY |
Coat the shift and select lever shaft assembly with gear oil, and install it to the manual transmission case.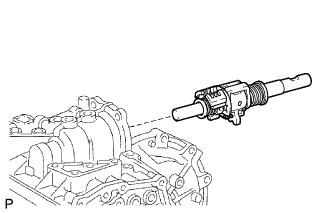
| 46. INSTALL BACK-UP LIGHT SWITCH ASSEMBLY |
Install the back-up light switch assembly to the manual transmission case with a new gasket.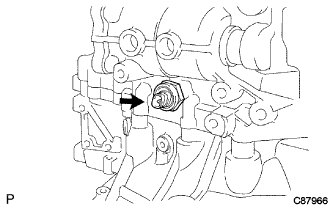
- Torque:
- 40 N*m{ 408 kgf*cm , 30 ft.*lbf }
| 47. INSTALL MANUAL TRANSMISSION BREATHER PLUG |
Install the manual transmission breather plug to the manual transmission case.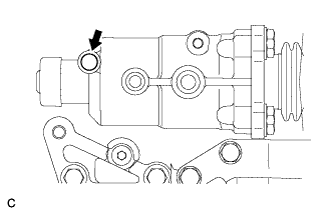
| 48. INSTALL SHIFT GATE PIN |
Install the shift gate pin to the manual transmission case.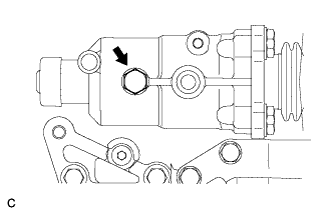
- Torque:
- 29 N*m{ 296 kgf*cm , 21 ft.*lbf }
| 49. INSTALL NO. 1 LOCK BALL ASSEMBLY |
Install the lock ball assembly No. 1 to the manual transmission case.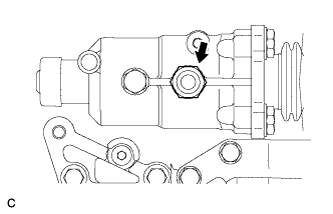
- Torque:
- 29 N*m{ 296 kgf*cm , 21 ft.*lbf }
| 50. INSTALL CONTROL SHAFT COVER |
Coat the 4 bolts with adhesive. Install a new gasket and the control shaft cover with the bolts.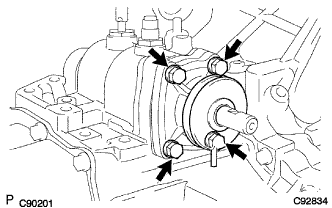
- Torque:
- 20 N*m{ 204 kgf*cm , 15 ft.*lbf }
- Adhesive:
- Toyota Genuine Adhesive 1344, Three Bond 1344 or equivalent
| 51. INSTALL CONTROL SHIFT LEVER |
Install the control shift lever with the shift outer lever lock pin to the shift and select lever shaft.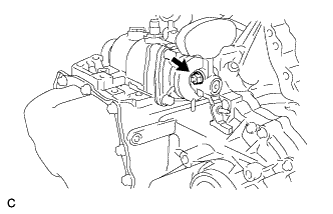
Install the spring washer with the nut.
- Torque:
- 6.4 N*m{ 65 kgf*cm , 57 in.*lbf }
| 52. INSTALL SELECTING BELLCRANK ASSEMBLY |
Coat the 2 bolts with adhesive. Install the selecting bellcrank assembly to the manual transmission case with the bolts.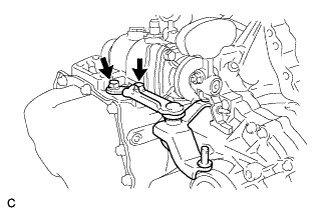
- Torque:
- 20 N*m{ 204 kgf*cm , 15 ft.*lbf }
- Adhesive:
- Toyota Genuine Adhesive 1344, Three Bond 1344 or equivalent
| 53. INSTALL SPEEDOMETER DRIVEN HOLE COVER SUB-ASSEMBLY |
Install a new O-ring and the speedometer driven hole cover sub-assembly to the transmission case with the bolt.
- Torque:
- 5.5 N*m{ 56 kgf*cm , 48 in.*lbf }
| 54. INSTALL CLUTCH RELEASE FORK BOOT |
Install the clutch release fork boot to the manual transaxle case.
| 55. INSTALL RELEASE FORK SUPPORT |
Using a deep socket wrench, install the release fork support to the manual transaxle case.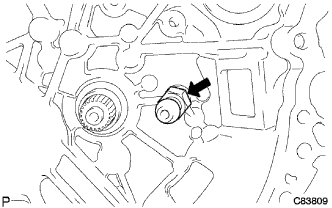
- Torque:
- 47 N*m{ 480 kgf*cm , 36 ft.*lbf }
| 56. INSTALL CLUTCH RELEASE BEARING ASSEMBLY |
Coat the clutch release bearing assembly with release hub grease, and install it to the clutch release fork sub-assembly.
- Sealant:
- Part No. 08887-01806, Release Hub Grease or equivalent
Apply clutch spline grease to the input shaft spline.
| 57. INSTALL CLUTCH RELEASE FORK SUB-ASSEMBLY |
Install the clutch release fork sub-assembly to the input shaft.