Door Control Switch Circuit
Circuit diagnosis · Vehicles built from Jun 2006
DESCRIPTION
- for LHD Driver Side:
When the lock side of the door control switch is pressed, continuity is established between terminal 2 and terminal 1 of the switch. When the unlock side of the switch is pressed, continuity is established between terminal 9 and 1 of the switch.
Terminals L1 and UL1 of the main body ECU are connected to the door control switch and door lock/unlock request signals (by door control switch operation) are input to the ECU.
The main body ECU constantly applies voltage to terminal 2 of the door control switch via terminal L1. When the door control switch is operated to lock all doors, current flows from terminal L1 to terminal 2. The main body ECU determines that this is door lock request signal input.
The main body ECU also applies constant voltage to terminal 9 of the door control switch via terminal UL1. When the door control switch is operated to unlock the doors, current flows from terminal UL1 to terminal 9. The main body ECU determines that this is door unlock request signal input.
- for LHD Passenger Side:
When the lock side of the door control switch is pressed, continuity is established between terminal 4 and terminal 3 of the switch. When the unlock side of the switch is pressed, continuity is established between terminal 2 and 3 of the switch.
Terminals L1 and UL1 of the main body ECU are connected to the door control switch and door lock/unlock request signals (by door control switch operation) are input to the ECU.
The main body ECU constantly applies voltage to terminal 4 of the door control switch via terminal L1. When the door control switch is operated to lock all doors, current flows from terminal L1 to terminal 4. The main body ECU determines that this is door lock request signal input.
The main body ECU also applies constant voltage to terminal 2 of the door control switch via terminal UL1. When the door control switch is operated to unlock the doors, current flows from terminal UL1 to terminal 2. The main body ECU determines that this is door unlock request signal input.
- for RHD Driver Side:
When the lock side of the door control switch is pressed, continuity is established between terminal 2 and terminal 9 of the switch. When the unlock side of the switch is pressed, continuity is established between terminal 8 and 9 of the switch.
Terminals L1 and UL1 of the main body ECU are connected to the door control switch and door lock/unlock request signals (by door control switch operation) are input to the ECU.
The main body ECU constantly applies voltage to terminal 2 of the door control switch via terminal L1. When the door control switch is operated to lock all doors, current flows from terminal L1 to terminal 2. The main body ECU determines that this is door lock request signal input.
The main body ECU also applies constant voltage to terminal 8 of the door control switch via terminal UL1. When the door control switch is operated to unlock the doors, current flows from terminal UL1 to terminal 8. The main body ECU determines that this is door unlock request signal input.
WIRING DIAGRAM
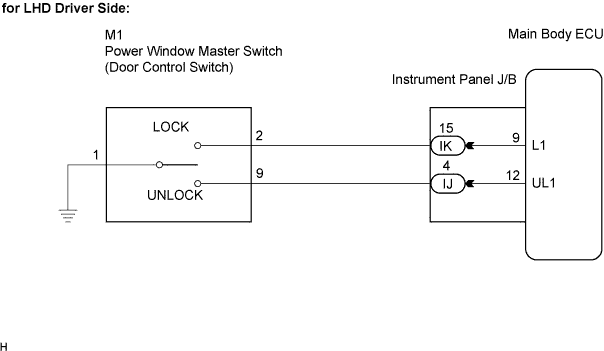

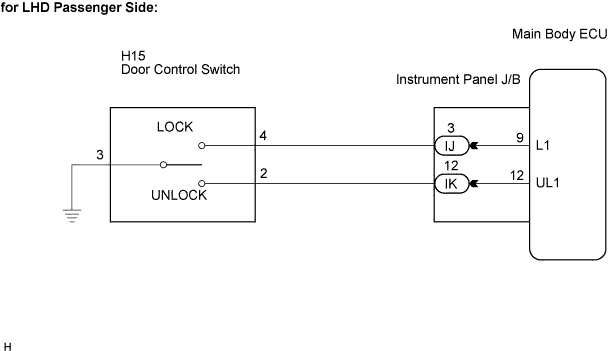
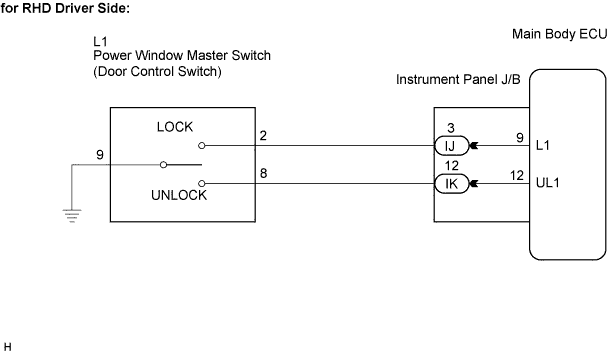
INSPECTION PROCEDURE
| 1. INSPECT DOOR CONTROL SWITCH ASSEMBLY |

Inspect driver side.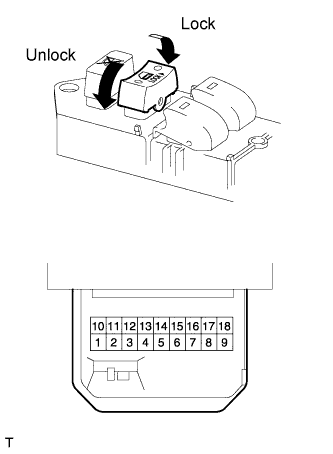
Remove the master switch.
Measure the resistance of the door control switch.
- Standard resistance:
Tester Connection
Switch Condition
Specified Condition
(*1) 2 - 1
Lock
Below 1 Ω
(*1) 2 - 1
OFF (Free)
10 kΩ or higher
(*1) 9 - 1
Unlock
Below 1 Ω
(*1) 9 - 1
OFF (Free)
10 kΩ or higher
(*2) 2 - 9
Lock
Below 1 Ω
(*2) 2 - 9
OFF (Free)
10 kΩ or higher
(*2) 8 - 9
Unlock
Below 1 Ω
(*2) 8 - 9
OFF (Free)
10 kΩ or higher
Inspect passenger side.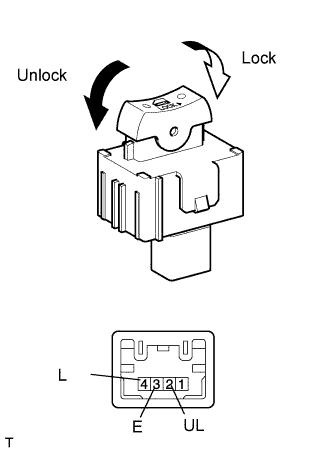
Remove the door control switch assembly.
Measure the resistance according to the value(s) in the table below.
- Standard resistance:
Tester Connection
Switch Condition
Specified Condition
4 - 3
Lock
Below 1 Ω
4 - 3
2 - 3
OFF (Free)
10 kΩ or higher
2 - 3
Unlock
Below 1 Ω
|
|
||||

| OK | |
 |
| 2. CHECK WIRE HARNESS (DOOR CONTROL SWITCH - MAIN BODY ECU (INSTRUMENT PANEL J/B)) |
Disconnect the door control switch connector.
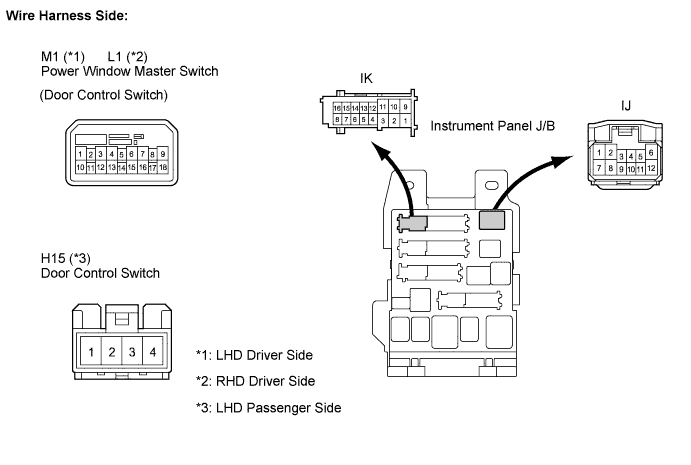
Disconnect the ECU (instrument panel J/B) connector.
Measure the resistance according to the value(s) in the table below.
- Standard resistance:
Tester Connection
Condition
Specified Condition
(*1) M1-2 - IK-15
Always
Below 1 Ω
(*1) M1-9 - IJ-4
Always
Below 1 Ω
(*1) M1-1 - Body ground
Always
Below 1 Ω
(*1) IK-15 - Body ground
Always
10 kΩ or higher
(*1) IJ-4 - Body ground
Always
10 kΩ or higher
(*2) L1-2 - IJ-3
Always
Below 1 Ω
(*2) L1-8 - IK-12
Always
Below 1 Ω
(*2) L1-9 - Body ground
Always
Below 1 Ω
(*2) IJ-3 - Body ground
Always
10 kΩ or higher
(*2) IK-12 - Body ground
Always
10 kΩ or higher
(*3) H15-4 - IJ-3
Always
Below 1 Ω
(*3) H15-2 - IK-12
Always
Below 1 Ω
(*3) H15-3 - Body ground
Always
Below 1 Ω
(*3) IJ-3 - Body ground
Always
10 kΩ or higher
(*3) IK-12 - Body ground
Always
10 kΩ or higher
|
|
||||
| OK | ||
 |
||
| ||