Front Fog Light Circuit
Circuit diagnosis · Vehicles built from Jun 2009
Versions by build date: Jun 2006 – May 2009 from Jun 2009
DESCRIPTION
When the taillights are on and the front fog light switch is turned on, the main body ECU turns the front fog lights on.WIRING DIAGRAM
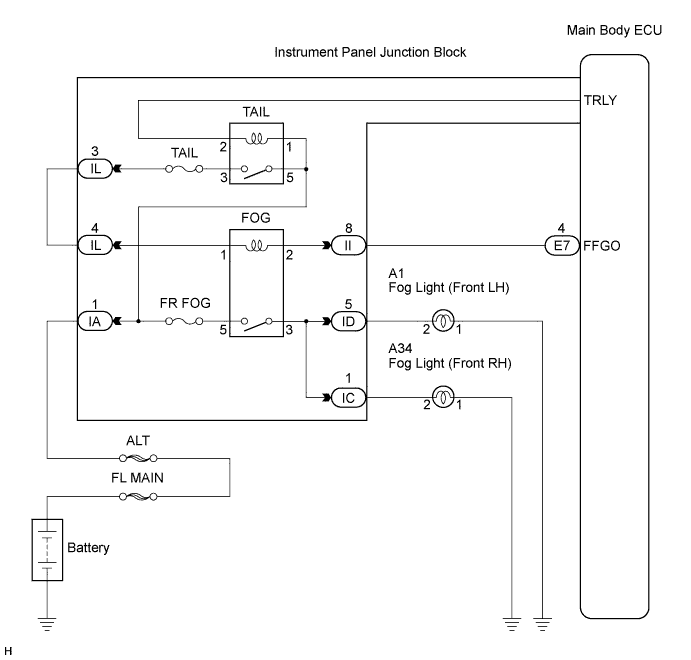

INSPECTION PROCEDURE
| 1. PERFORM ACTIVE TEST USING INTELLIGENT TESTER |
 |
Connect the intelligent tester to the DLC3.
Turn the ignition switch on (IG) and turn the intelligent tester main switch on.
Turn the light control switch to the TAIL position.
Select the item below in the ACTIVE TEST and then check that the relay operates.
Main Body (Main Body ECU):
Tester Display
|
Test Part
|
Control Range
|
Diagnostic Note
|
Front Fog Light Relay
|
Front fog light relay
|
ON / OFF
|
-
|
- OK:
- Front fog light relay operates. (Front fog lights come on.)
|
OK |
 |
|
| PROCEED TO NEXT CIRCUIT INSPECTION SHOWN IN PROBLEM SYMPTOMS TABLE |
|
|
| NG |
|
 |
|
| 2. INSPECT FUSE (FR FOG) |
|
Remove the FR FOG fuse from the instrument panel J/B assembly.
Measure the resistance of the fuse.
- Standard resistance:
- Below 1 Ω
|
NG |
|
|
|
|
| OK |
|
|
|
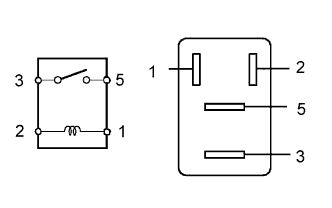
| 3. INSPECT FOG LIGHT RELAY |
|
- Remove the front fog light relay from the instrument panel J/B assembly.
Measure the resistance according to the value(s) in the table below.
- Standard resistance:
Tester Connection
|
Specified Condition
|
3 - 5
|
10 kΩ or higher
|
Below 1 Ω (When battery voltage is applied to terminals 1 and 2)
|
|
NG |
|
|
|
|
| OK |
|
|
|
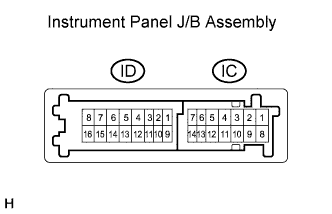
| 4. INSPECT INSTRUMENT PANEL JUNCTION BLOCK ASSEMBLY |
|
- Measure the voltage according to the value(s) in the table below.
- Standard voltage:
Tester Connection
|
Condition
|
Specified Condition
|
IC-1 - Body ground
|
Light control switch in TAIL and front fog light switch OFF → ON
|
Below 1 V → 10 to 14 V
|
ID-5 - Body ground
|
Light control switch in TAIL and front fog light switch OFF → ON
|
Below 1 V → 10 to 14 V
|
|
OK |
|
|
| REPAIR OR REPLACE HARNESS OR CONNECTOR (INSTRUMENT PANEL J/B ASSEMBLY - BODY GROUND) |
|
|
| NG |
|
|
|
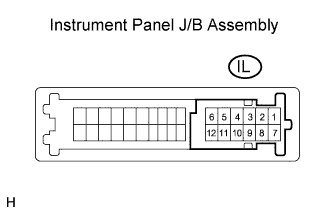
| 5. INSPECT INSTRUMENT PANEL JUNCTION BLOCK ASSEMBLY |
|
- Measure the voltage according to the value(s) in the table below.
- Standard voltage:
Tester Connection
|
Condition
|
Specified Condition
|
IL-3 - Body ground
|
Light control switch OFF → TAIL
|
Below 1 V → 10 to 14 V
|
|
NG |
|
|
| REPLACE INSTRUMENT PANEL JUNCTION BLOCK ASSEMBLY |
|
|
| OK |
|
|
|
| 6. CHECK HARNESS AND CONNECTOR (BETWEEN CONNECTOR IL-3 AND CONNECTOR IL-4) |
|
- Measure the voltage according to the value(s) in the table below.
- Standard voltage:
Tester Connection
|
Condition
|
Specified Condition
|
IL-4 - Body ground
|
Light control switch OFF → TAIL
|
Below 1 V → 10 to 14 V
|
|
NG |
|
|
| REPAIR OR REPLACE HARNESS OR CONNECTOR |
|
|
| OK |
|
|
|
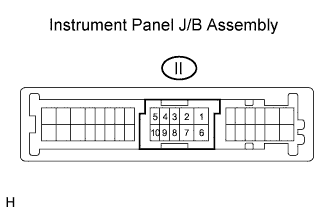
| 7. INSPECT INSTRUMENT PANEL JUNCTION BLOCK ASSEMBLY |
|
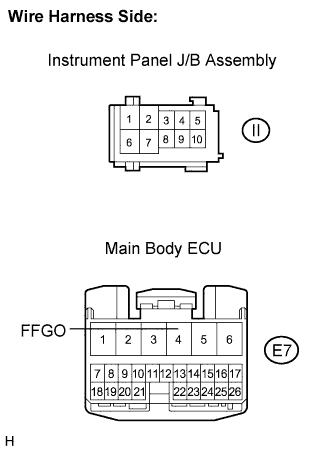
- Disconnect the II instrument panel J/B assembly connector.
Measure the voltage according to the value(s) in the table below.
- Standard voltage:
Tester Connection
|
Condition
|
Specified Condition
|
II-8 - Body ground
|
Light control switch OFF → TAIL
|
Below 1 V → 10 to 14 V
|
|
NG |
|
|
| REPLACE INSTRUMENT PANEL JUNCTION BLOCK ASSEMBLY |
|
|
| OK |
|
|
|
| 8. CHECK HARNESS AND CONNECTOR (BODY ECU - INSTRUMENT PANEL JUNCTION BLOCK ASSEMBLY) |
|
- Disconnect the E7 main body ECU connector.
Measure the resistance according to the value(s) in the table below.
- Standard resistance:
Tester Connection
|
Condition
|
Specified Condition
|
E7-4 - II-8
|
Always
|
Below 1 Ω
|
|
NG |
|
|
| REPAIR OR REPLACE HARNESS OR CONNECTOR |
|
|
| OK |
|
 |
|
| REPLACE INSTRUMENT PANEL JUNCTION BLOCK ASSEMBLY |
|