INSTALLATION
Removal / installation · Vehicles built Oct 2006 – May 2009
Versions by build date: Jun 2006 – Sep 2006 Oct 2006 – May 2009 from Jun 2009
| 1.
INSTALL FRONT AXLE HUB BEARING |
 |
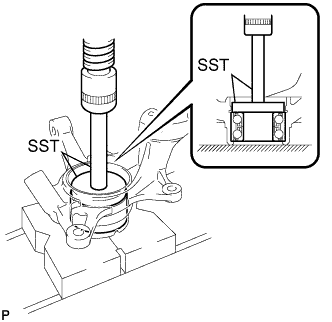
- Using SST and a press, install a new front axle hub bearing to the steering knuckle.
- SST
- 09950-60020
(09951-00810)
09950-70010
(09951-07100)
| 2.
INSTALL FRONT LOWER BALL JOINT ASSEMBLY
|
|
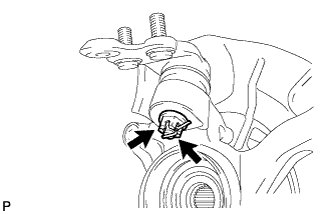
- Install the front lower ball joint to the steering knuckle with the nut.
-
Torque:
- 123 N*m{
1,250 kgf*cm
, 91 ft.*lbf
}
- NOTICE:
- Prevent oil from adhering to the screw and tapered parts.
Install a new cotter pin.
- NOTICE:
- If the holes for the cotter pin are not aligned, tighten the nut further up to 60°.
| 3.
INSTALL FRONT DISC BRAKE DUST COVER |
|
Install the disc brake dust cover to the steering knuckle with the 4 bolts.
-
Torque:
- 8.3 N*m{
85 kgf*cm
, 73 in.*lbf
}
| 4.
INSTALL FRONT AXLE HUB SUB-ASSEMBLY |
|
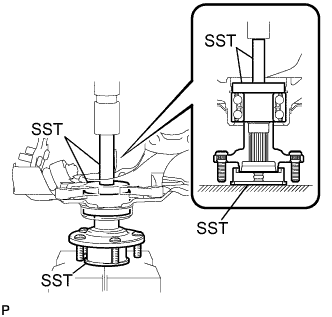
- Using SST and a press, install the front axle hub sub-assembly.
- SST
- 09608-32010
09950-60020
(09951-00810)
09950-70010
(09951-07100)
| 5.
INSTALL FRONT AXLE HUB HOLE SNAP RING |
|
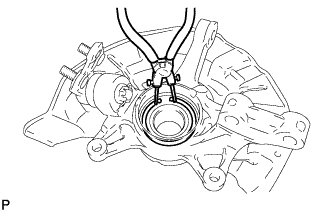
- Using snap ring pliers, install a new front axle hub hole snap ring.
| 6.
INSTALL NO. 1 FRONT WHEEL BEARING DUST DEFLECTOR |
|
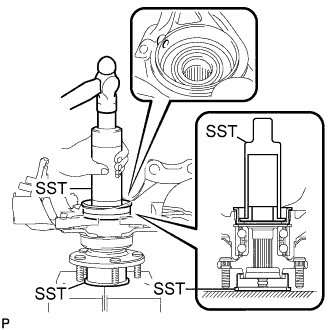
- Using SST and a hammer, install a new No. 1 front wheel bearing dust deflector.
- SST
- 09316-60011
(09316-00011, 09316-00031)
09608-32010
- HINT:
- Align the hole for the speed sensor in the No. 1 front wheel bearing dust deflector with the steering knuckle.
| 7.
INSTALL FRONT AXLE ASSEMBLY |
|
- Align the matchmarks and install the front drive shaft assembly to the front axle hub sub-assembly.
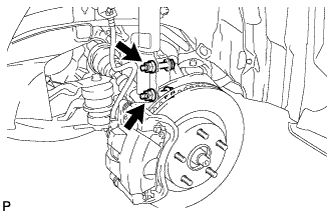
- Install the steering knuckle with the front axle assembly to the front shock absorber with the 2 bolts and 2 nuts.
-
Torque:
- 210 N*m{
2,140 kgf*cm
, 155 ft.*lbf
}
- NOTICE:
- Only when reusing the bolts and nuts, apply a small amount of engine oil to the threads of the nuts.
- Be careful not to damage the drive shaft boot and speed sensor rotor.
| 8.
INSTALL FRONT SUSPENSION LOWER NO. 1 ARM
|
|
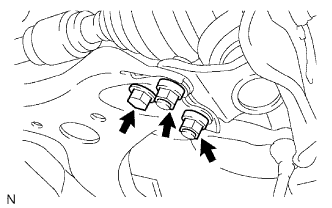
- Install the lower ball joint to the front suspension lower No. 1 arm with the bolt and 2 nuts.
-
Torque:
- 75 N*m{
765 kgf*cm
, 55 ft.*lbf
}
| 9.
INSTALL TIE ROD END SUB-ASSEMBLY
|
|
Install the tie rod end sub-assembly to the steering knuckle with the nut.
-
Torque:
- 49 N*m{
500 kgf*cm
, 36 ft.*lbf
}
Install a new cotter pin.
- NOTICE:
- If the holes for the cotter pin are not aligned, tighten the nut up to 60° further.
| 10.
INSTALL FRONT DISC
|
|
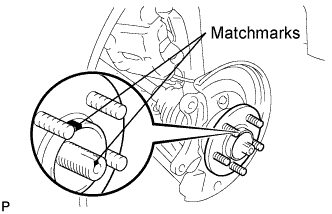
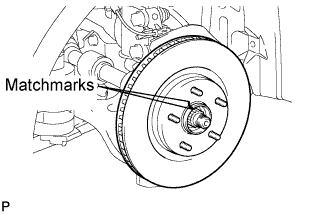
- Align the matchmarks and install the front disc.
- NOTICE:
- When replacing the disc with a new one, select the installation position where the front disc has the minimum runout.
| 11.
INSTALL FRONT DISC BRAKE CALIPER ASSEMBLY |
|
- Install the front disc brake caliper assembly to the steering knuckle with the 2 bolts.
-
Torque:
- 107 N*m{
1,090 kgf*cm
, 79 ft.*lbf
}
- NOTICE:
- Do not twist the brake hose when installing the front disc brake caliper assembly.
| 12.
INSTALL FRONT AXLE HUB NUT |
|
Using a socket wrench (30 mm), install a new axle hub nut.
-
Torque:
- 294 N*m{
3,000 kgf*cm
, 217 ft.*lbf
}
- HINT:
- Stake the nut after inspecting for looseness and runout in the following steps.
| 13.
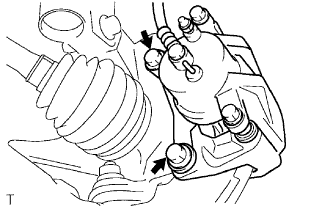
SEPARATE FRONT DISC BRAKE CALIPER ASSEMBLY |
|
Remove the 2 bolts and separate the front disc brake caliper assembly from the steering knuckle.
- NOTICE:
- Use wire or an equivalent tool to keep the brake caliper from hanging down by the flexible hose.
| 14.
REMOVE FRONT DISC
|
|
- Remove the front disc.
- HINT:
- Put matchmarks on the disc and the axle hub.
| 15.
INSPECT FRONT AXLE HUB BEARING LOOSENESS
|
|
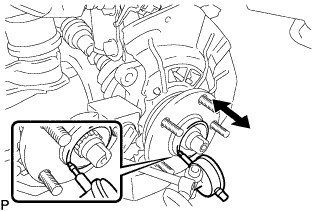
- Using a dial indicator, check for looseness near the center of the axle hub.
- Maximum:
- 0.05 mm (0.0020 in.)
- NOTICE:
- Ensure that the dial indicator is set perpendicular to the measurement surface.
- HINT:
- If looseness exceeds the maximum, replace the bearing.
| 16.
INSPECT FRONT AXLE HUB RUNOUT
|
|
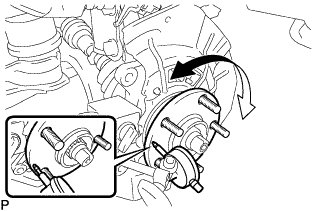
- Using a dial indicator, check for runout on the surface of the axle hub outside the hub bolt.
- Maximum:
- 0.05 mm (0.0020 in.)
- NOTICE:
- Ensure that the dial indicator is set perpendicular to the measurement surface.
- HINT:
- If runout exceeds the maximum, replace the axle hub.
| 17.
INSTALL FRONT DISC
|
|
- Align the matchmarks and install the front disc.
- NOTICE:
- When replacing the disc with a new one, select the installation position where the front disc has the minimum runout.
| 18.
INSTALL FRONT DISC BRAKE CALIPER ASSEMBLY |
|
Install the front disc brake caliper assembly with the 2 bolts to the steering knuckle.
-
Torque:
- 107 N*m{
1,090 kgf*cm
, 79 ft.*lbf
}
- NOTICE:
- Do not twist the brake hose when installing the front disc brake caliper assembly.
| 19.
INSTALL FRONT SPEED SENSOR
|
|
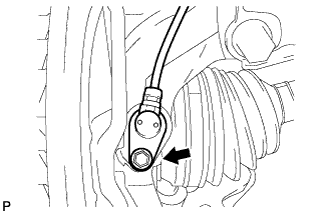
- Install the front speed sensor to the steering knuckle with the bolt.
-
Torque:
- 8.0 N*m{
82 kgf*cm
, 71 in.*lbf
}
- NOTICE:
- Prevent foreign matter from adhering to the speed sensor.
- Be careful not to damage the speed sensor.
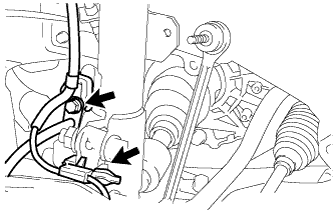
- Install the flexible hose and the speed sensor to the shock absorber with the bolt and set the sensor clip on the knuckle.
-
Torque:
- 19 N*m{
192 kgf*cm
, 14 ft.*lbf
}
- NOTICE:
- Be careful not to damage the speed sensor.
- Prevent foreign matter from adhering to the speed sensor.
- Do not twist the sensor wire when installing the speed sensor.
| 20.
INSTALL FRONT AXLE HUB NUT |
|
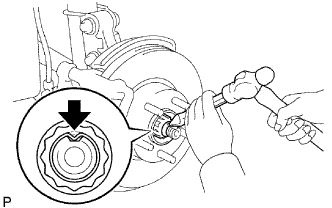
- Using a chisel and hammer, stake the axle hub nut.
| 21.
INSTALL FRONT WHEEL |
|
-
Torque:
- 103 N*m{
1,050 kgf*cm
, 76 ft.*lbf
}
| 22.
ADJUST FRONT WHEEL ALIGNMENT |
|
- HINT:
-
Click here
| 23.
INSPECT ABS SPEED SENSOR SIGNAL |
|
ABS: Click here
VSC: Click here