Home › ENGINE › 2GR-FE ENGINE CONTROL SYSTEM › SFI SYSTEMActive Control Engine Mount System
Circuit diagnosis · Vehicles built Oct 2006 – May 2009
Versions by build date: Oct 2006 – May 2009 from Jun 2009
DESCRIPTION
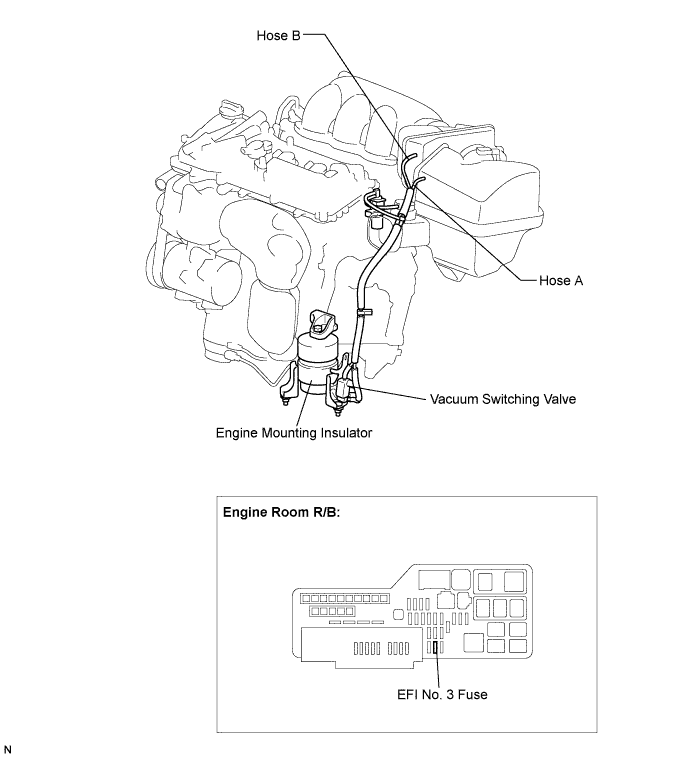
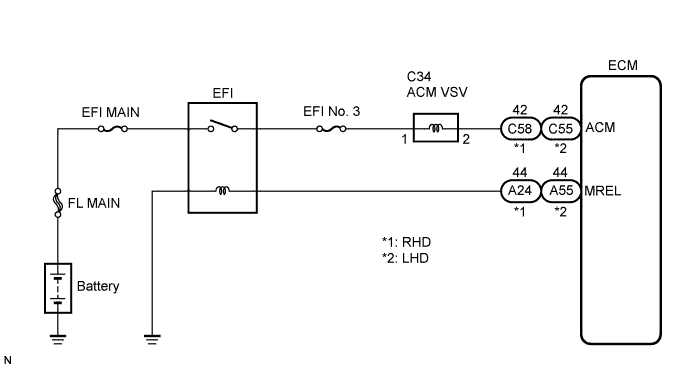
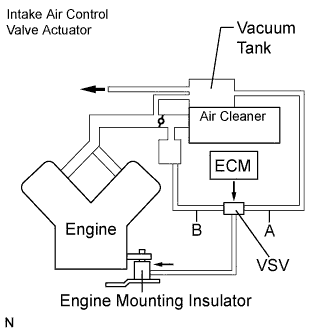
LOCATION The Active Control Engine Mount (ACM) system decreases engine vibration at a low engine speed using the ACM VSV. The VSV is controlled by a pulse signal transmitted to the VSV from the ECM. The frequency of this pulse signal is matched to the engine speed to decrease engine vibration. WIRING DIAGRAM
INSPECTION PROCEDURE
1. CHECK VACUUM HOSES
If the hose is damaged, replace the vacuum hose assembly. Check the air and vacuum hoses for looseness, disconnection and blockage.
NG
REPAIR OR REPLACE VACUUM HOSES
OK
2. CHECK VACUUM
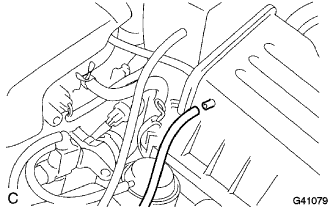
Start the engine. Disconnect the vacuum hose from the air cleaner cap.
Check that the disconnected port located on the vacuum tank applies suction to your finger.
OK:
Vacuum exists.
Reconnect the vacuum hose.
NG
CHECK AND REPLACE VACUUM SOURCE AND HOSES
OK
3. INSPECT DUTY VACUUM SWITCHING VALVE (OPERATION)
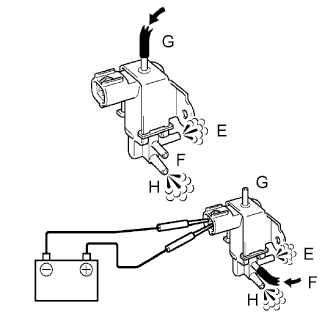
Remove the VSV for ACM. Check operation of the VSV for ACM when positive battery voltage is applied to the terminals of the VSV for ACM connector.
Battery voltage is not applied:
The air from pipe G is flowing out through pipes E and H.
Battery voltage is applied:
The air from pipe F is flowing out through pipes E and H.
Reinstall the VSV for ACM.
NG
REPLACE DUTY VACUUM SWITCHING VALVE
OK
4. INSPECT DUTY VACUUM SWITCHING VALVE (RESISTANCE)
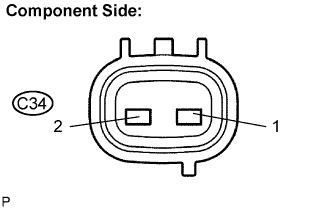
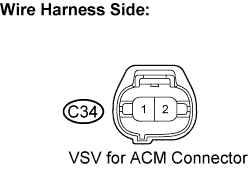
Disconnect the C34 VSV for ACM connector. Measure the resistance between terminals 1 and 2.
Standard resistance:
19 to 21 Ω at 20°C (68°F)
Reconnect the VSV for ACM connector.
NG
REPLACE DUTY VACUUM SWITCHING VALVE
OK
5. INSPECT FRONT ENGINE MOUNTING INSULATOR ASSEMBLY
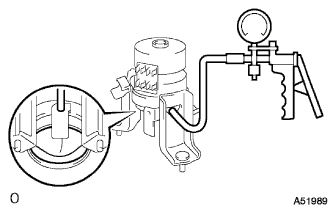
Disconnect the vacuum hose from the front engine mounting insulator. Using a vacuum pump, apply vacuum of 80 kPa (600 mmHg, 25 in.Hg) and wait for 1 minute.
Check that there is no change in the needle movement of the vacuum pump gauge.
Check that there is no fluid leakage caused by a break in the diaphragm.
OK:
Vacuum exists.
Reconnect the vacuum hose.
NG
REPLACE FRONT ENGINE MOUNTING INSULATOR ASSEMBLY
OK
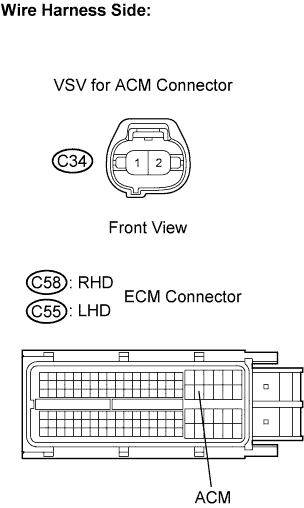
6. CHECK HARNESS AND CONNECTOR (VSV FOR ACM - ECM)
Check the wire harness between the VSV for ACM connector and the ECM connector.
Disconnect the C34 VSV for ACM connector.
Disconnect the C58 (RHD) or C55 (LHD) ECM connector.
Measure the resistance between the wire harness side connectors.
Standard resistance (Check for open):
RHD:
Tester Connection
Specified Condition
VSV for ACM (C34-2) - ACM (C58-42)
Below 1 Ω
LHD:
Tester Connection
Specified Condition
VSV for ACM (C34-2) - ACM (C55-42)
Below 1 Ω
Standard resistance (Check for short):
RHD:
Tester Connection
Specified Condition
VSV for ACM (C34-2) or ACM (C58-42) - Body ground
10 kΩ or higher
LHD:
Tester Connection
Specified Condition
VSV for ACM (C34-2) or ACM (C55-42) - Body ground
10 kΩ or higher
Reconnect the ECM connector.
Reconnect the VSV connector.
NG
REPAIR OR REPLACE HARNESS OR CONNECTOR
OK
7. INSPECT DUTY VACUUM SWITCHING VALVE (VOLTAGE)
Disconnect the C34 VSV connector. Turn the ignition switch on (IG).
Measure the voltage between the terminals.
Standard voltage:
Tester Connection
Specified Condition
C34-1 - Body ground
9 to 14 V
NG
OK
8. CHECK HARNESS AND CONNECTOR (VSV FOR ACM - ENGINE JUNCTION BLOCK (EFI RELAY))
Check the wire harness between the VSV for ACM and the EFI relay.
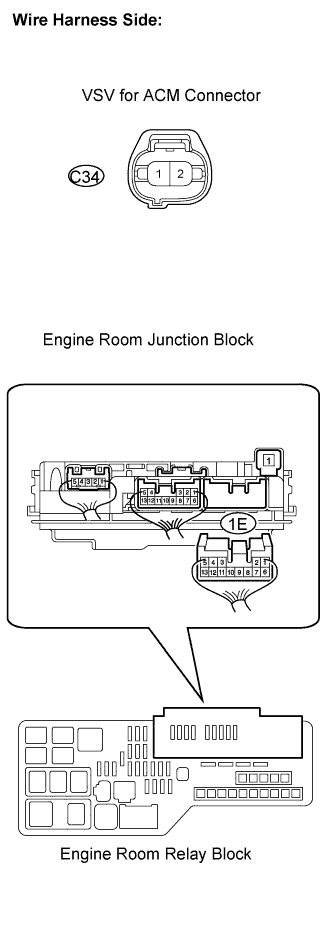
Disconnect the C34 VSV connector. Remove the engine room junction block.
Measure the resistance between the wire harness side connectors.
Standard resistance:
Check for open:
Tester Connection
Specified Condition
VSV for ACM (C34-1) - 1E-6 (Engine room relay block)
Below 1 Ω
Check for short:
Tester Connection
Specified Condition
VSV for ACM (C34-1) or 1E-6 (Engine room relay block) - Body ground
10 kΩ or higher
Reconnect the VSV for ACM connector.
Reinstall the engine room junction block.
NG
REPAIR OR REPLACE HARNESS OR CONNECTOR
OK
9. INSPECT ENGINE ROOM JUNCTION BLOCK (EFI RELAY)
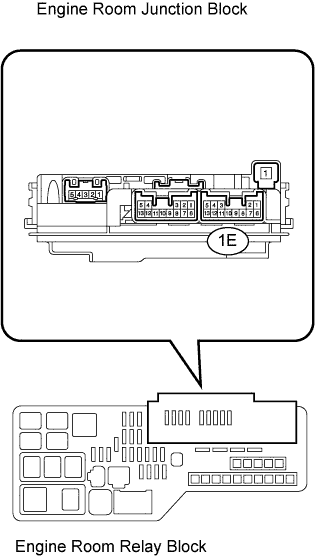
Remove the engine room junction block. Measure the EFI relay resistance.
Standard resistance:
Tester Connection
Specified Condition
1E-12 - 1E-6
10 kΩ or higher
1E-12 - 1E-6
Below 1 Ω
Reinstall the engine room junction block.
NG
REPLACE ENGINE ROOM JUNCTION BLOCK
OK