INSTALLATION
Removal / installation · Vehicles built from Jun 2009
Versions by build date: Jun 2006 – Sep 2006 Oct 2006 – May 2009 from Jun 2009
| 1. INSTALL BRAKE BOOSTER GASKET |

Install a new brake booster gasket.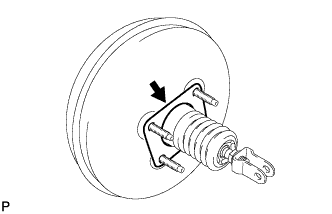

| 2. INSTALL BRAKE BOOSTER ASSEMBLY |
Install the brake booster assembly and the gasket with the 4 nuts.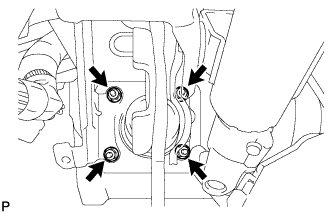
- Torque:
- 13 N*m{ 133 kgf*cm , 10 ft.*lbf }
- NOTICE:
- Do not damage the brake lines.
| 3. CONNECT NO. 2 VACUUM HOSE (for RHD) |
Connect the No. 2 vacuum hose and move the clip.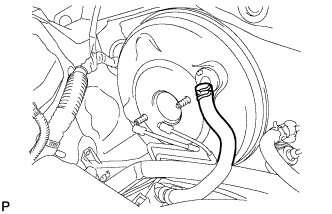
| 4. INSTALL BRAKE MASTER CYLINDER SUB-ASSEMBLY |
- HINT:
- Refer to the procedures up to "INSTALLATION MASTER CYLINDER" (Click here).
| 5. CONNECT NO. 2 VACUUM HOSE (for LHD) |
Connect the No. 2 vacuum hose and move the clip.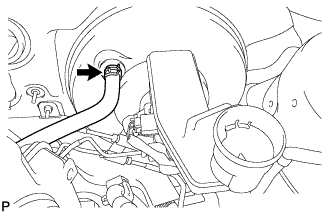
| 6. CONNECT BRAKE MASTER CYLINDER PUSH ROD CLEVIS |
Apply the lithium soap base glycol grease to the push rod pin.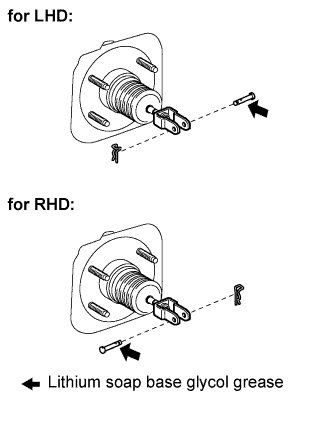
Connect the brake master cylinder push rod clevis to the brake pedal with the push rod pin and a new clip as shown in the illustration.
| 7. INSTALL BRAKE PEDAL RETURN SPRING (for LHD) |
Install the brake pedal return spring.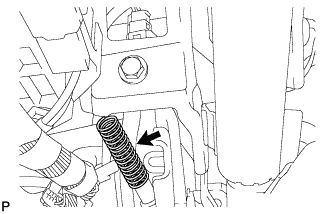
| 8. INSTALL BRAKE PEDAL RETURN SPRING (for RHD) |
Install the brake pedal return spring.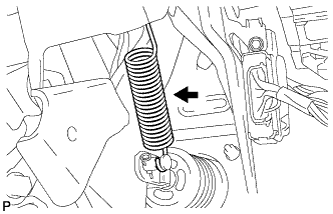
| 9. CONNECT BRAKE LINE (for RHD) |
Install the brake lines to the clamp.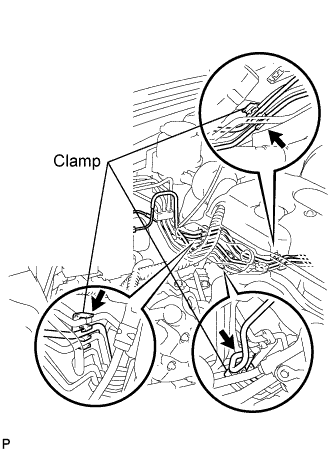
Connect the 6 brake lines (Click here).
| 10. INSTALL AIR CONDITIONING TUBE AND ACCESSORY (for 2AZ-FE RHD) |
Remove the attached vinyl tape from the tube.
Sufficiently apply compressor oil to a new O-ring and the fitting surface of the air conditioning tube assembly.
- Compressor oil:
- ND-OIL 8 or equivalent
Install the O-ring on the air conditioning tube and accessory.
Install the air conditioner tube and accessory.
| 11. INSTALL AIR CONDITIONING TUBE AND ACCESSORY (for 2GR-FE RHD) |
Remove the attached vinyl tape from the tube.
Sufficiently apply compressor oil to a new O-ring and the fitting surface of the air conditioning tube assembly.
- Compressor oil:
- ND-OIL 8 or equivalent
Install the O-ring on the air conditioning tube and accessory.
Install the air conditioner tube and accessory.
| 12. INSTALL SUCTION PIPE SUB-ASSEMBLY (for 2AZ-FE RHD) |
Remove the attached vinyl tape from the hose.
Sufficiently apply compressor oil to a new O-ring and the fitting surface of the suction hose sub-assembly.
- Compressor oil:
- ND-OIL 8 or equivalent
Install the O-ring on the suction hose sub-assembly.
Move the hook connector in the direction indicated by the arrow in the illustration.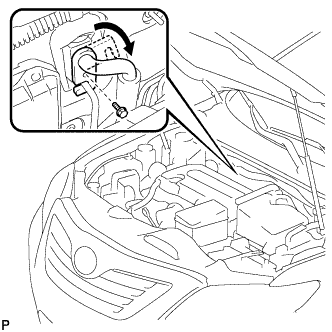
Insert the pipe joint into the fitting hole securely and tighten the bolt.
- Torque:
- 9.8 N*m{ 100 kgf*cm , 87 in.*lbf }
| 13. INSTALL SUCTION PIPE SUB-ASSEMBLY (for 2GR-FE RHD) |
Remove the attached vinyl tape from the hose.
Sufficiently apply compressor oil to a new O-ring and the fitting surface of the suction hose sub-assembly.
- Compressor oil:
- ND-OIL 8 or equivalent
Install the O-ring on the suction hose sub-assembly.
Move the hook connector in the direction indicated by the arrow in the illustration.
Insert the pipe joint into the fitting hole securely and tighten the bolt.
- Torque:
- 9.8 N*m{ 100 kgf*cm , 87 in.*lbf }
| 14. INSTALL ENGINE AND TRANSAXLE (for 2GR-FE RHD) |
- HINT:
- Refer to the instructions for installation of the engine assembly (Click here).
| 15. CHARGE WITH REFRIGERANT (for RHD) |
Perform vacuum purging using a vacuum pump.
Charge with refrigerant HFC-134a (R134a).
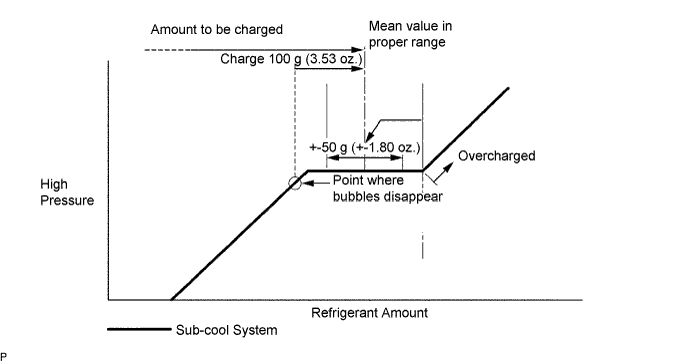
- Standard:
- 450 to 550 g (15.9 to 19.4 oz.)
- SST
- 07110-58060
(07117-58060, 07117-58070, 07117-58080, 07117-58090, 07117-78050, 07117-88060, 07117-88070, 07117-88080)
- NOTICE:
- Do not turn the A/C on before charging with refrigerant. Doing so will cause the cooler compressor to work without refrigerant, resulting in overheating of the cooler compressor.
- Approximately 100 g (3.53 oz.) of refrigerant may need to be charged after bubbles disappear.
The refrigerant amount should be checked by quantity, not with the sight glass.
- Do not turn the A/C on before charging with refrigerant. Doing so will cause the cooler compressor to work without refrigerant, resulting in overheating of the cooler compressor.
- HINT:
- Ensure that sufficient refrigerant is available to recharge the system when using a refrigerant recovery unit. Refrigerant recovery units are not always able to recover 100% of the refrigerant from the A/C system.
| 16. WARM UP ENGINE (for RHD) |
Keep the A/C switch on for at least 2 minutes to warm up the compressor.
- NOTICE:
- Be sure to warm up the compressor when turning the A/C on after removing and installing the cooler refrigerant lines (including the compressor), to prevent damage to the compressor.
| 17. INSPECT FOR REFRIGERANT LEAK (for RHD) |
After recharging with refrigerant gas, inspect for refrigerant gas leak using a halogen leak detector.
Carry out the test under the following conditions:
- IG OFF
- Secure good ventilation (the gas leak detector may react to volatile gases which are not refrigerant, such as evaporated gasoline and exhaust gas).
- Repeat the test 2 or 3 times.
- Make sure that there is some refrigerant remaining in the refrigeration system.
When the compressor is off: approx. 392 to 588 kPa (4 to 6 kgf/cm2, 57 to 85 psi)
- IG OFF
Using a gas leak detector, inspect for refrigerant line leaks.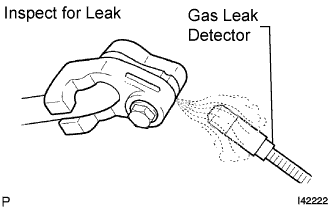
Bring the gas leak detector close to the drain hose with the detector's power off, and then turn the detector on.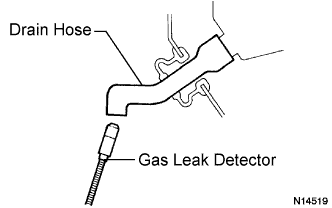
- HINT:
- After the blower motor has stopped, let the cooling unit stand for more than 15 minutes.
- Bring the gas leak detector sensor under the drain hose.
- When bringing the gas leak detector close to the drain hose, make sure that the gas leak detector does not react to volatile gases.
If it is not possible to avoid interference from volatile gases, the vehicle should be lifted up to allow testing.
- After the blower motor has stopped, let the cooling unit stand for more than 15 minutes.
If a gas leak is not detected from the drain hose, remove the blower motor control from the cooling unit. Insert the gas leak detector sensor into the unit and perform the test.
Disconnect the pressure switch connector and leave it for approximately 20 minutes. Bring the gas leak detector close to the pressure switch and perform the test.
| 18. INSPECT AND ADJUST BRAKE PEDAL HEIGHT |
Check the brake pedal height.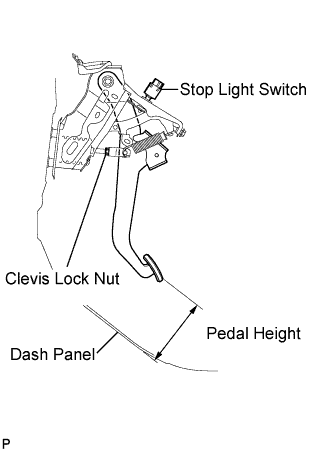
- Pedal height from dash panel:
Model
Transaxle
Specified condition
LHD
Automatic
129.9 to 139.9 mm (5.114 to 5.508 in.)
Manual
131.9 to 141.9 mm (5.193 to 5.587 in.)
RHD
Automatic
135.5 to 145.5 mm (5.335 to 5.728 in.)
Manual
137.5 to 147.5 mm (5.413 to 5.807 in.)
Adjust the brake pedal height.
Disconnect the connector from the stop light switch assembly.
Remove the stop light switch.
Loosen the push rod clevis lock nut.
Adjust the pedal height by turning the push rod.
Tighten the clevis lock nut.
- Torque:
- 26 N*m{ 265 kgf*cm , 19 ft.*lbf }
Insert the switch into the adjuster until the switch body touches the pedal.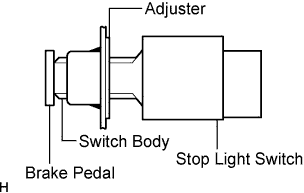
- NOTICE:
- Do not depress the pedal.
Rotate the switch a quarter turn clockwise.
- Torque:
- 1.5 N*m{ 15 kgf*cm , 13 in.*lbf } or less
- NOTICE:
- Do not depress the pedal.
Connect the connector.
Check the switch clearance.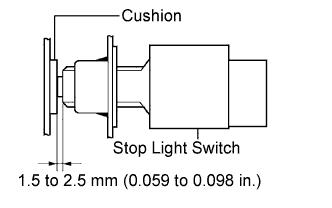
- Standard stop light switch clearance:
- 1.5 to 2.5 mm (0.059 to 0.098 in.)
| 19. INSPECT BRAKE PEDAL FREE PLAY |
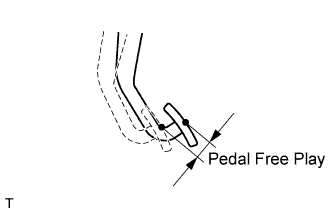 |
Stop the engine. Press the pedal several times until no vacuum is left in the booster. Release the pedal.
Depress the pedal until a slight resistance is felt. Measure the distance as shown in the illustration.
- Pedal free play:
- 1.0 to 6.0 mm (0.039 to 0.236 in.)
Check the switch clearance.
- Standard stop light switch clearance:
- 1.5 to 2.5 mm (0.059 to 0.098 in.)
| 20. INSPECT BRAKE PEDAL RESERVE DISTANCE |
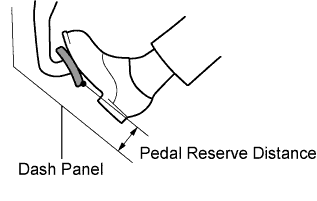 |
Release the parking brake pedal or parking brake lever.
With the engine running, depress the brake pedal and measure the pedal reserve distance as shown in the illustration.
- Pedal reserve distance from the dash panel at 500 N (51 kgf, 112 lbf):
Model
Transaxle
Specified condition
LHD
Automatic
61 mm (2.402 in.)
Manual
63 mm (2.480 in.)
RHD
Automatic
65 mm (2.559 in.)
Manual
67 mm (2.638 in.)