2006-2011 Camry Aurion · Service Manual BODY

REMOVAL

Removal / installation · Vehicles built Jun 2006 – Sep 2006

Versions by build date: Jun 2006 – Sep 2006 Oct 2006 – May 2009 from Jun 2009


1. REMOVE FRONT DOOR LOWER FRAME BRACKET GARNISH

  1. B132833
    Disengage the 2 clips and remove the front door lower frame bracket garnish.


2. REMOVE FRONT DOOR INSIDE HANDLE BEZEL PLUG

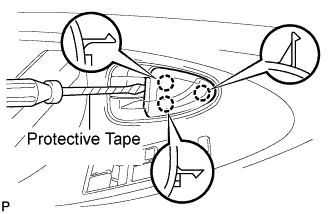
  1. B132834E01
    Using a screwdriver with the tip wrapped with protective tape, disengage the 3 claws, and remove the front door inside handle bezel plug.


3. REMOVE ASSIST GRIP COVER

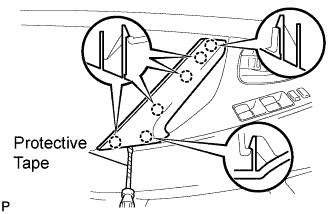
  1. B132836E01
    Using a screwdriver with the tip wrapped with protective tape, disengage the 6 claws and remove the assist grip cover.


4. REMOVE FRONT DOOR TRIM BOARD SUB-ASSEMBLY

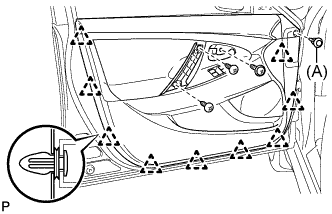
  1. B132840E01
    Remove the 3 screws and clip (A).

  1. Using a clip remover, disengage the 9 clips.

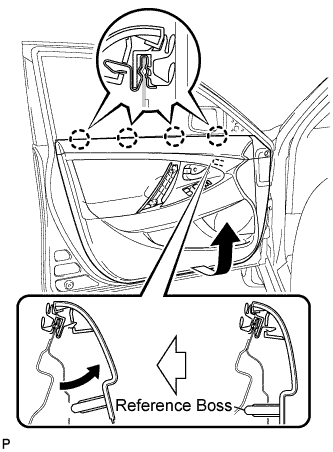
  1. B136401E01
    Pull up the front door trim board in the direction indicated by the arrow.

  1. Disengage the reference bosses from the front door panel.

  1. Raise the front door trim board to disengage the 4 claws and remove the front door trim board together with the front door inner glass weatherstrip.

  1. B136403
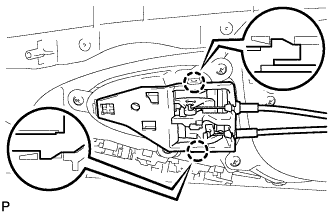
    Disengage the 2 claws and disconnect the front door inside handle sub-assembly.


5. REMOVE FRONT DOOR INSIDE HANDLE SUB-ASSEMBLY

  1. B136408
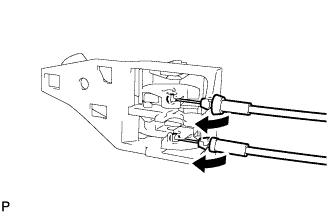
    Disconnect the front door lock remote control cable and front door inside locking cable and remove the front door inside handle sub-assembly.


6. REMOVE FRONT DOOR INNER GLASS WEATHERSTRIP

  1. B136404
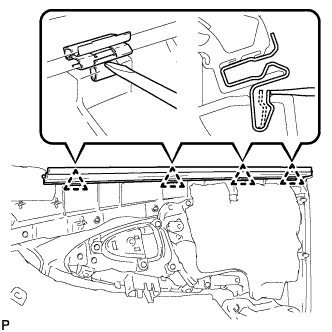
    Using a screwdriver, disengage the 4 clips as shown in the illustration and remove the front door inner glass weatherstrip from the front door trim board.


7. REMOVE FRONT NO. 1 SPEAKER ASSEMBLY

  1. E129164
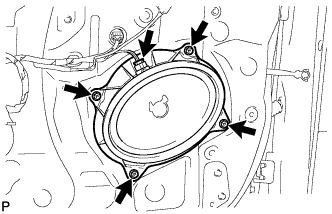
    Disconnect the connector.

  1. Remove the 4 bolts and front No. 1 speaker assembly.

    NOTICE:
    Do not touch the cone part of the speaker.


8. REMOVE FRONT DOOR SERVICE HOLE COVER

  1. B136410E01
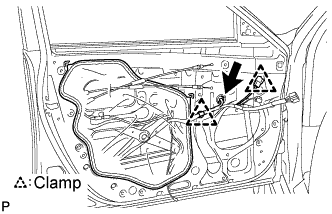
    Disconnect the connector and each clamp, and remove the front door service hole cover.

    HINT:
    Remove the remaining butyl tape on the door side.


9. REMOVE FRONT DOOR GLASS SUB-ASSEMBLY
  1. Connect the front power window regulator motor assembly connector.

  1. Connect the power window regulator master switch assembly and move the front door glass sub-assembly so that the door glass bolts can be seen.

  1. B136412
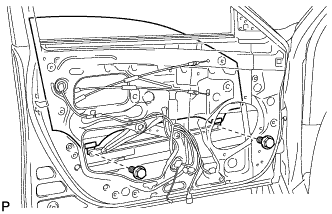
    Remove the 2 bolts.

    NOTICE:
    After the bolts are removed, the door glass may fall, causing damage.

  1. B136413E01
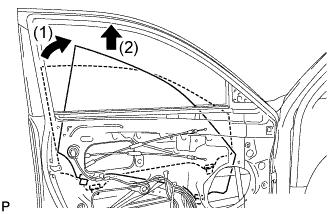
    Remove the front door glass sub-assembly as shown in the illustration.

    NOTICE:
    Do not damage the door glass.

  1. Disconnect the power window regulator master switch assembly and front power window regulator motor assembly connector.


10. REMOVE FRONT DOOR WINDOW REGULATOR SUB-ASSEMBLY

  1. B136415E01
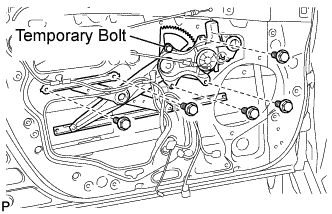
    Loosen the temporary bolt.

    NOTICE:
    Do not remove the temporary bolt. If the temporary bolt is removed, the front door window regulator may fall, causing damage.

  1. Remove the 5 bolts.

  1. Remove the front door window regulator sub-assembly and the power window regulator motor assembly front as a unit.

  1. Remove the temporary bolt from the front door window regulator sub-assembly.


11. REMOVE FRONT POWER WINDOW REGULATOR MOTOR ASSEMBLY

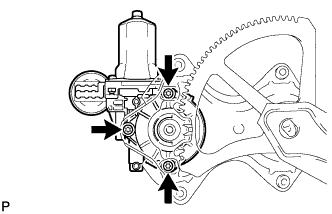
  1. B136416
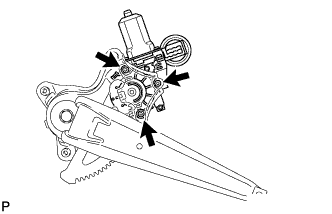
    Using a "TORX" driver (T25), remove the 3 screws and the front power window regulator motor assembly.


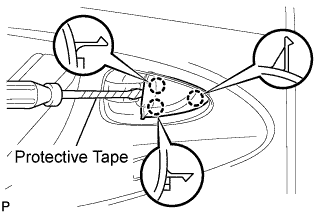
12. REMOVE REAR DOOR INSIDE HANDLE BEZEL PLUG

  1. B136443E01
    Using a screwdriver with the tip wrapped with protective tape, disengage the 3 claws and remove the rear door inside handle bezel plug.


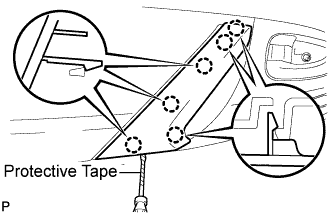
13. REMOVE DOOR ASSIST GRIP COVER

  1. B149028E01
    Using a screwdriver with the tip wrapped with protective tape, disengage the 6 claws and remove the door assist grip cover.

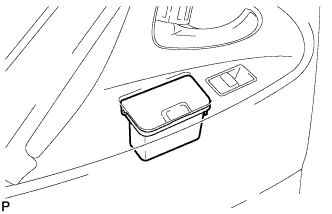
14. REMOVE REAR ASH RECEPTACLE ASSEMBLY (w/ Ashtray)

  1. B136442
    Remove the rear ash receptacle assembly.


15. REMOVE REAR DOOR TRIM BOARD SUB-ASSEMBLY

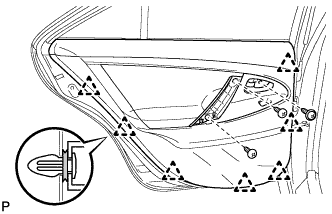
  1. B136451
    Remove the 3 screws.

  1. Using a clip remover, disengage the 7 clips.

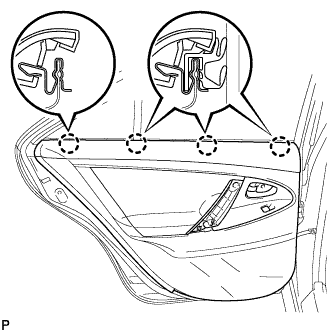
  1. B136452
    Raise the rear door trim board to disengage the 4 claws and remove the rear door trim board together with the rear door inner glass weatherstrip.

  1. Disconnect the connector.

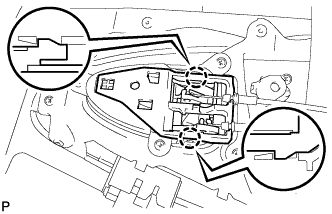
  1. B136453
    Disengage the 2 claws and disconnect the rear door inside handle sub-assembly.

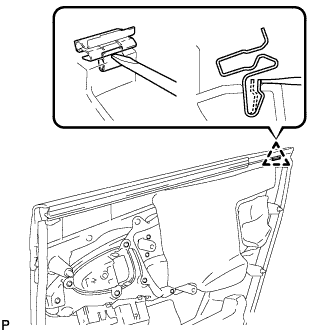
  1. B141704
    Disengage the clip as shown in the illustration and remove the No. 1 door scuff plate clamp from the rear door trim board.


16. REMOVE REAR DOOR INSIDE HANDLE SUB-ASSEMBLY

  1. B136459
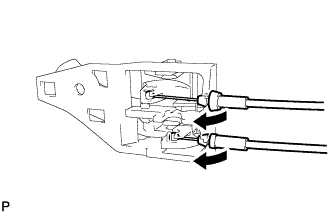
    Disconnect the cables and remove the rear door inside handle sub-assembly.


17. REMOVE REAR DOOR INNER GLASS WEATHERSTRIP

  1. B136456
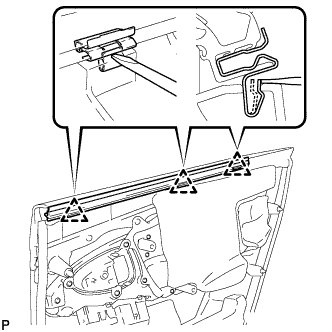
    Disengage the 3 clips as shown in the illustration and remove the rear door inner glass weatherstrip from the rear door trim board.


18. REMOVE REAR DOOR SERVICE HOLE COVER

  1. B149017
    Disconnect the connector.

  1. Remove the rear door service hole cover.

    HINT:
    Remove the remaining tape on the door side.


19. REMOVE REAR DOOR GLASS RUN

  1. B136466
    Remove the rear door glass run.


20. REMOVE REAR DOOR LOWER WINDOW FRAME SUB-ASSEMBLY

  1. B136467
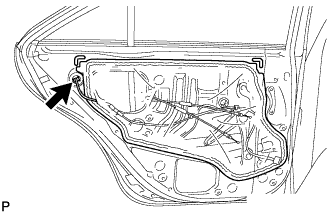
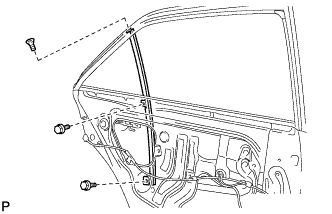
    Remove the 2 bolts, the screw, and the rear door lower window frame sub-assembly.


21. REMOVE REAR DOOR QUARTER WINDOW GLASS

  1. B136468
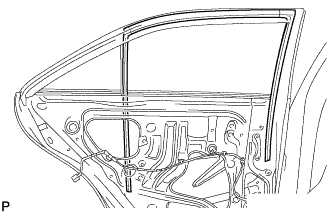
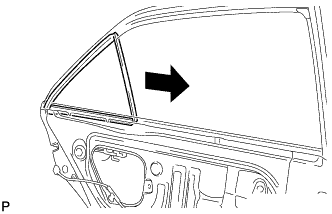
    Remove the rear door quarter window glass and the rear door quarter window weatherstrip as a unit as shown in the illustration.

  1. Remove the rear door quarter window glass from the rear door quarter window weatherstrip.


22. REMOVE REAR DOOR GLASS SUB-ASSEMBLY

  1. B146103
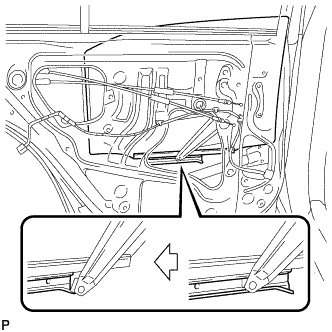
    Remove the rear door glass sub-assembly from the rear door window regulator sub-assembly as shown in the illustration.

    NOTICE:
    Do not damage the door glass.


23. REMOVE REAR DOOR WINDOW REGULATOR SUB-ASSEMBLY

  1. B136472E01
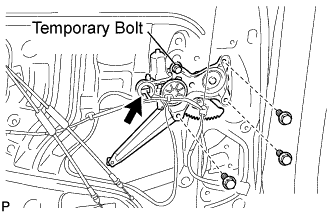
    Disconnect the connector.

  1. Loosen the temporary bolt.

    NOTICE:
    Do not remove the temporary bolt. If the temporary bolt is removed, the rear door window regulator may fall, causing damage.

  1. Remove the 3 bolts.

  1. Remove the rear door window regulator sub-assembly and the power window regulator motor assembly rear as a unit.

  1. Remove the temporary bolt from the rear door window regulator.


24. REMOVE REAR POWER WINDOW REGULATOR MOTOR ASSEMBLY

  1. B124520
    Using a "TORX" driver (T25), remove the 3 screws and the rear power window regulator motor assembly.

← COMPONENTS (from Oct 2006)REMOVAL (Oct 2006 – May 2009) →